
Owner's manual

• Philips head screwdriver
• Tape measure
• Level
• Safety glasses
10. Place the two upper bracket
bases (c1) on the studs (B) and
position the two upper
cylinder-shaped bracket parts
(c2) on the top edge of the
mirror. Align the respective
bracket parts (c1 and c2) over
the stud (B). (Fig. 8)
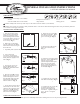
5. Unscrew the screws (a)
from the Molly bolts (A).
Molly bolts will remain in the
wall. (Fig. 3)
Caution: Two people are required to safely install this mirror. The mirror will break if dropped. Take extra precautionary measures
to ensure a secure grip on the parts.
Caution: Molly bolts are for dry walls only. Use tile anchors for tile surfaces. (not included)
INSTALLATION INSTRUCTION
9. Rest the mirror (F) on the
lower mirror brackets (C).
(Fig. 7)
1. Once the location of the
mirror has been determined,
mark the positioning of the
four mounting studs and their
screw holes with a pencil. Use
a measuring tape and a level
for accuracy. (Fig. 1)
2. Drill 5/16 in. pilot holes
into the wall where the Molly
bolts will be inserted using an
electrical drill.
4. Use an electrical
screwdriver to tighten the
screws. This will collapse the
Molly bolts (A) tightly to the
wall. (Fig. 2)
8. Tighten the set screws (D)
with Allen wrench (E). Make
sure that the opening of the
groove is facing up. (Fig. 6)
PREPARATION
Tools Required for Assembly: (not included)
• Pencil
• Electrical drill with 5/16 in. drill bit
6. Place the stud (B) over the
Molly bolts. Insert the screws
(a) back through the bracket
and the Molly bolts, and then
tighten firmly with Philips
head screwdriver. (Fig. 4)
7. Secure the two lower mirror
brackets (C) to the wall. First,
place the mirror bracket’s base
(c1) on the stud (B) and then
place the cylindar-shape part
(c2) on the base. (Fig. 5)
3. Tap Molly bolts (A) into the pilot holes using a hammer.
11. Tighten the set screws (D)
with Allen wrench (E). (Fig. 9)
12. Tighten the set screws (G)
in each of the four mirror
brackets with Philips head
screwdriver. Tighten until just
snug – do not over tighten.
(Fig. 10)
• Hammer
CARE AND MAINTENANCE
To maintain the beautiful luster finish, please use soft damp cloths when cleaning and never use any cleaning solvents.
GENERAL INSTALLATION INSTRUCTIONS
LATITUDE
2
MINIMALIST MIRROR
A
Fig. 2
Side View
Side View
Fig. 3
a
A
Fig. 4
Side View
B
a
Side View
Fig. 9
E
D
B
C
Fig. 5
c1
c1
c2
c2
Fig. 6
E
D
Side View
Fig. 10
G
Fig. 8
F
C
Fig. 7
Fig. 1