Gateway 210 Projector user'sguide Setup Connecting
www.gateway.
Contents Using the Gateway 210 Projector. . . . . . . . . . . . . . . . . . . . . . . . . . . . . . . . . . . . 1 Features . . . . . . . . . . . . . . . . . . . . . . . . . . . . . . . . . . . . . . . . . . . . . . . . . . . . . . . . . . . 2 Projector front . . . . . . . . . . . . . . . . . . . . . . . . . . . . . . . . . . . . . . . . . . . . . . . . . . . . . . 3 Projector back . . . . . . . . . . . . . . . . . . . . . . . . . . . . . . . . . . . . . . . . . . . . . . . . . . . . . . 4 Projector left . .
ii
Using the Gateway 210 Projector Read this guide to find out how to: ■ Use the projector safely ■ Use the remote control ■ Set up and connect the projector ■ Start and turn off the projector ■ Use the On-screen display (OSD) menus ■ Replace the lamp module ■ Troubleshoot typical hardware problems 1
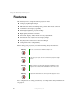
Using the Gateway 210 Projector Features The Gateway 210 is a high-resolution projector with: ■ Compact, lightweight design ■ Full-function remote including laser pointer and mouse controls ■ 16 million-color display capability ■ Ultra-high brightness projection lamp ■ High-quality manual zoom lens ■ On-screen display (OSD) menus for easy adjustment ■ One-button Auto adjust for best display image ■ Easy Keystone correction for distorted images ■ Component video compatibility Before using
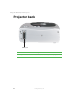
Projector front Projector front Projection lens Item Description Projection lens Projects the image on the screen. www.gateway.
Using the Gateway 210 Projector Projector back M1DA port 4 Item Description M1DA port Connects the video adapter to the projector. www.gateway.
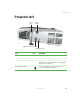
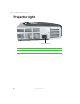
Projector left Projector left Zoom wheel Focus ring Adjustor-foot release button Kensington lock Item Icon Description Focus ring Manually adjust the focus of the display image. Zoom wheel Manually zoom the display image. Adjustor-foot release button Press to release the adjustor-foot on the bottom of the projector. For more information, see “Setting up the projector” on page 18. Kensington™ lock slot Connect a Kensington cable lock to this slot to secure the projector to an object. www.
Using the Gateway 210 Projector Projector right Power connector 6 Item Description Power connector Plug a power cable into this connector. www.gateway.
Projector top Projector top Focus ring Zoom wheel Indicator buttons Indicator Infrared remote sensor Power Auto/Enter Menu Power button Menu button Auto/Enter button www.gateway.
Using the Gateway 210 Projector Item Icon Description Focus ring Manually adjust the focus of the display image. Zoom wheel Manually zoom the display image in and out. Indicator Displays power status. buttons OSD active: Press to move between menu options. OSD inactive: Press to select the video input source. buttons Press to adjust menu options. Power button Press to turn the power off and on. Menu button Press to view the OSD. Press again to exit.
Projector bottom Projector bottom Lamp access panel Adjustor-foot Lens cap Ceiling mount connector Item Description Lamp access panel Remove the screw to access the lamp bay. For more information, see “Changing the lamp module” on page 35. Adjustor-foot Press the button on the right side of the projector to release the adjustor-foot. For more information, see “Setting up the projector” on page 18. Lens cap Protects the projector lens.
Using the Gateway 210 Projector Video adapter front M1DA connector 10 Item Description M1DA connector Connects the video adapter to the projector. www.gateway.
Video adapter back Video adapter back Audio/R Audio in port Thumbscrew port Thumbscrew VGA port USB port S-Video Video Audio/L Audio out port port port port www.gateway.
Using the Gateway 210 Projector 12 Item Description Thumbscrews (2) Tighten the two thumbscrews to secure the video adapter to the projector. VGA port Plug the video cable from your computer into this port. See “Connecting to your computer” on page 20. USB port Plug the USB cable into this port so you can use the remote control as a mouse. S-Video port Plug an S-Video cable into this port. For more information, see “To connect the projector to a DVD player or VCR using S-Video:” on page 25.
Cables Cables The projector comes with several cables so you can connect it to your computer or other video component. See “Connecting components” on page 20. Cable Description Power cable. Use this cable to connect the projector to a correctly grounded electrical outlet or surge protector. VGA cable. When the video adapter is connected to the projector, connect this cable to send the video signal from your computer to the projector. USB cable.
Using the Gateway 210 Projector Cable Description Composite video cable. When the video adapter is connected to the projector, connect this cable to send the video signal from a component, such as a DVD player or VCR, to the projector. The video signal is carried through a single video (yellow) connection. The two additional connectors carry the left (white) and right (red) channel audio signals. S-Video cable.
Remote control Remote control The infrared remote sensor is located on the top of the projector. The distance between the sensor and remote control should not exceed 29.5 feet (9 meters) for the remote control to function correctly. To insert batteries in the remote control: 1 2 3 Remove the battery compartment cover. Insert two AAA batteries into the battery compartment. Make sure that the + and – symbols match the + and – symbols inside the battery compartment. Replace the battery compartment cover.
Using the Gateway 210 Projector Remote front Laser button Enter/Right mouse button Freeze/ESC/Left mouse button buttons Pg. Up Pg. Down button Mode button Menu button Power button Blank button Source button Auto button 16 www.gateway.
Remote control Item Description Laser Press to activate the laser pointer. Freeze/ESC/L OSD active: Press to exit the OSD menu. OSD inactive: Press to freeze the display image. Mouse active: Use as the left mouse button. Enter/R Press to select an OSD option. For more information about the OSD options, see “OSD options” on page 30. Mouse active: Use as the right mouse button. Pg. Up Press up to zoom in the display image. Mouse active: Use to return to the previous page of your presentation.
Using the Gateway 210 Projector Setting up the projector To set up the projector: 18 1 Connect the video adapter to the back of the projector and tighten the two thumbscrews. 2 Place the projector on a sturdy cart or table close to other components you plan to connect to the projector and an electrical outlet. 3 Point the projector lens towards a blank wall or projection screen. www.gateway.
Setting up the projector 4 Press the button on the right side of the projector to release the adjustor-foot so you can adjust the tilt angle of the projector. 5 Plug the power cable into the power connector on the left side of the projector, then plug the other end into a correctly grounded electrical outlet or surge protector. www.gateway.
Using the Gateway 210 Projector Connecting components You can connect the projector to your computer, DVD player or VCR, and satellite dish receiver. To connect the projector to a DVD player or VCR, go to “Connecting to a DVD player or VCR” on page 23. To connect the projector to a satellite dish, go to “Connecting to a satellite dish” on page 27.
Connecting components 2 If you want to use the remote control as a mouse, plug the USB cable into the USB port on the back of the video adapter, then plug the other end into a USB port on the back of your computer. www.gateway.
Using the Gateway 210 Projector 3 22 If your presentation contains an audio track, plug the audio cable into the Audio In port on the back of the video adapter, then plug the other end into the Audio Out port on the back of your computer. www.gateway.
Connecting components Connecting to a DVD player or VCR If you are using composite video to connect the DVD player or VCR, follow these instructions. If you are using S-Video to connect the DVD player or VCR, go to “To connect the projector to a DVD player or VCR using S-Video:” on page 25. To connect the projector to a DVD player or VCR using composite video: 1 Plug the yellow, red, and white composite cable connectors into the corresponding ports on the back of the video adapter. www.gateway.
Using the Gateway 210 Projector 2 24 Plug the yellow, red, and white connectors on the other end into the corresponding line out ports on the back of the DVD player or VCR. www.gateway.
Connecting components To connect the projector to a DVD player or VCR using S-Video: 1 Plug the S-Video cable connector into the S-Video port on the back of the video adapter, then plug the other end into the S-Video port on the back of the DVD player or VCR. www.gateway.
Using the Gateway 210 Projector 2 Plug the red and white connectors from a composite video cable into the corresponding ports on the back of the video adapter, then plug the red and white connectors on the other end to the corresponding ports on the back of the DVD player or VCR. Tips & Tricks 26 If you are using the composite cable for your audio cable connections, make sure that you do not plug in the yellow video connector. www.gateway.
Connecting components Connecting to a satellite dish To connect the projector to a satellite dish: 1 Plug the component cable connector into the VGA port on the back of the projector, then plug the green, blue, and red connectors on the other end into the corresponding ports on the back of the satellite dish receiver. www.gateway.
Using the Gateway 210 Projector 2 Plug the red and white connectors from a composite video cable into the corresponding ports on the back of the video adapter, then plug the red and white connectors on the other end to the corresponding ports on the back of the satellite dish receiver. Tips & Tricks 28 If you are using the composite cable for your audio cable connections, make sure that you do not plug in the yellow video connector. www.gateway.
Operating the projector Operating the projector After you have connected all components to the projector, you are ready to begin using the projector. Starting the projector To start the projector: 1 Press the power button. The power LED displays steady green. 2 Turn on the connected components. After all components are running, allow about 30 seconds for the display image to appear. If the power LED is not steady green or you do not see a display image, check the connections.
Using the Gateway 210 Projector OSD options This projector features an on-screen display (OSD) that lets you adjust and save contrast, brightness, and other display settings. Use the remote control to access all OSD functions. ■ Menu Press to view the OSD. Press again to exit. ■ Press and options. ■ to highlight OSD options, or press and to adjust OSD Enter Press to select an OSD option. To adjust the OSD settings: 1 Press the Menu button. The OSD menu opens.
Operating the projector OSD menus OSD Menu Description VGA MODE - Image Brightness. Adjusts the brightness of the display image. Brightness Contrast You may need to readjust brightness after the projector has warmed up. 64 128 Keystone 0 Zoom 0 Contrast. Adjusts the contrast of the display image. Keystone. Corrects a display image that is wider at the top or at the bottom. Do not activate when displaying text or spreadsheets to eliminate text distortion. Zoom.
Using the Gateway 210 Projector OSD Menu Description VIDEO MODE - Image Brightness. Adjusts the brightness of the display image. You may need to readjust brightness after the projector has warmed up. Brightness 128 128 Contrast Contrast. Adjusts the contrast of the display image. Color Hue 128 Color Hue. Changes the display image from black and white to color. Saturation 128 Sharpness 6 Saturation. Adjusts the balance between red and green color levels. Sharpness.
Operating the projector OSD Menu Description Management OSD Location. Adjusts the position of the OSD within the display image. Projection. Flips the display image so it can be viewed correctly when the projector is set up for rear screen projection.
Using the Gateway 210 Projector Shutting down the projector To shut down the projector: 1 2 3 Turn off all connected components. Press the power button on the projector. A warning message appears. Press the power button again to turn off the projector. Warning 4 34 The projector needs a 120 second cool-down period. Do not disconnect the power cable until the fan stops, or you may damage the projector. Wait until the fan stops, then disconnect the power cable. www.gateway.
Maintaining the projector Maintaining the projector The only user-replaceable part in the projector is the lamp module. Contact Gateway Technical Support for any additional service or repair. Warning To prevent electric shock, do not open the projector case. There are no user-replaceable parts inside. Contact Gateway Technical Support for service or repair. Changing the lamp module You should replace the lamp module in the projector every 1500 hours to maintain the best possible display image.
Using the Gateway 210 Projector 5 36 Remove the lamp access panel screw, then press down on the access panel lock to remove the access panel. www.gateway.
Maintaining the projector 6 Remove the three lamp module retaining screws. 7 Unsnap the lamp removal handle, then lift the lamp module straight up out of the lamp bay. www.gateway.
Using the Gateway 210 Projector 8 9 10 Gently press the new lamp module into the lamp bay. The lamp module is keyed so it can only be inserted in one direction. If the lamp module does not fit, make sure that the cable connections line up with the connectors in the lamp bay. Replace the three lamp module retaining screws. Replace the lamp bay access panel, then replace the access panel screw. Important 11 12 38 Make sure that the lamp bay access panel is securely in place.
Maintaining the projector Cleaning the projector Keeping the projector clean and the vents free from dust helps keep it performing at its best. Warning Make sure that the projector is off, power is disconnected, and the lamp is completely cool (minimum of 30 minutes) before cleaning the projector. Cleaning the exterior Always turn off the projector and wait for it to cool before cleaning it. Use a damp, lint-free cloth to clean the projector case.
Using the Gateway 210 Projector Accessories Gateway offers accessories that can help you make the most of using the projector. To order accessories, visit the Accessory Store at accessories.gateway.com. Carrying cases Gateway has large-capacity carrying cases if you need additional space for accessories or supplies. Ceiling mount kits Gateway has ceiling mounting kits available that let you mount the projector to the ceiling.
Troubleshooting Troubleshooting Warning To avoid bodily injury, do not attempt to troubleshoot the projector problem if: Power cord or plug are damaged Liquid has been spilled into the projector ■ The projector was dropped ■ The projector case was damaged Instead, unplug the projector and contact a qualified service technician. ■ ■ First steps Try these things first: ■ Make sure that the power cable is connected to the projector and an AC outlet and that the AC outlet is supplying power.
Using the Gateway 210 Projector Common problems and solutions No power ■ Make sure that the power cable is connected to the projector and an AC outlet and that the AC outlet is supplying power. ■ Wait 120 seconds after the projector fan stops before starting the projector again. No picture ■ Make sure that you removed the lens cap. ■ Press the Source button on the remote control to select the correct video input source. For more information, see “Remote front” on page 16.
Troubleshooting Display image is wider on the top or bottom ■ Press the button on the remote control to adjust the display image. For more information, see “Remote front” on page 16. ■ Reposition the projector to get a better angle on the projection screen. Display image is poor or blurred ■ If the projector is connected to your computer, press the Auto button on the remote control to automatically adjust the display image to the ideal settings for the display source.
Using the Gateway 210 Projector Specifications Specifications are subject to change without notice or obligation. Model Gateway 210 projector Resolution 1024 × 768 XGA Aspect ratio 4:3 or 16:9 Brightness 1500 lumens Zoom ratio 1.2:1 Lamp 150 W VIP lamp Power supply AC 100 ~ 240 V, 2.2 A, 50/60 Hz (automatic) Power consumption 220 W (max.) Dimensions (W × H × D) 9.01 × 2.72 × 7.60 inches (229 × 69 × 193 mm) Weight 3.5 lbs (1.
Specifications Display size chart Distance to Screen Minimum Display Size Maximum Display Size 55 inches (1.4 m) 35 inches (0.89 m) 41 inches (1.04 m) 78 inches (2.0 m) 49 inches (1.25 m) 58 inches (1.47 m) 157 inches (4.0 m) 99 inches (2.52 m) 116 inches (2.95 m) 236 inches (6.0 m) 149 inches (3.79 m) 174 inches (4.42 m) 393 inches (10.0 m) 248 inches (6.30 m) 290 inches (7.
Using the Gateway 210 Projector 46 www.gateway.
Safety, Regulatory, and Legal Information Important safety information The Gateway projector is designed and tested to meet the latest standards for safety of information technology equipment. However, to ensure safe use of this product, it is important that the safety instructions marked on the product and in the documentation are followed. Warning Always follow these instructions to help guard against personal injury and damage to the Gateway projector.
Appendix : Safety, Regulatory, and Legal Information Setting up the projector ■ Read and follow all instructions marked on the product and in the documentation before you operate the projector. Retain all safety and operating instructions for future use. ■ Do not use this product near water or a heat source such as a radiator. ■ Set up the projector on a stable work surface. ■ The product should be operated only from the type of power source indicated on the rating label.
Regulatory compliance statements Regulatory compliance statements United States of America Federal Communications Commission (FCC) Unintentional emitter per FCC Part 15 This device has been tested and found to comply with the limits for a Class B digital device, pursuant to Part 15 of the FCC rules. These limits are designed to provide reasonable protection against harmful interference in a residential installation.
Appendix : Safety, Regulatory, and Legal Information Canada Industry Canada (IC) Unintentional emitter per ICES-003 This digital apparatus does not exceed the Class B limits for radio noise emissions from digital apparatus as set out in the radio interference regulations of Industry Canada.
Notices Notices Copyright © 2003 Gateway, Inc. All Rights Reserved 14303 Gateway Place Poway, CA 92064 USA All Rights Reserved This publication is protected by copyright and all rights are reserved. No part of it may be reproduced or transmitted by any means or in any form, without prior consent in writing from Gateway. The information in this manual has been carefully checked and is believed to be accurate. However, changes are made periodically.
Appendix : Safety, Regulatory, and Legal Information 52 www.gateway.
www.gateway.
Quick Setup To connect the projector to your computer for a simple presentation: 1. Connect the video adapter to the back of the projector and tighten the two thumbscrews. 2. Place the projector on a sturdy cart or table close to your computer and an electrical outlet. 3. Point the projector lens towards a blank wall or projection screen. 4. Plug the VGA cable into the blue VGA port on the back of the video adapter, then plug the other end into the blue video port on the back of your computer. 5.