
User Guide

68
Replacing Gateway 450ROG Components
www.gateway.com
To replace the system board:
1 Disconnect the AC adapter and modem and network cables and prepare
the notebook by following the instructions in “Preparing the notebook”
on page 6.
2 Disconnect the notebook from the optional port replicator by following
the instructions in “Disconnecting from the port replicator” on page 7.
3 Turn the notebook over so the bottom is facing up.
4 Remove the main battery by following the instructions in “Removing the
main battery” on page 8.
5 Remove the optional secondary battery or modular drive by following the
instructions in “Removing the optional secondary battery” on page 9.
6 Remove the memory modules by following the instructions in “Adding or
replacing memory modules” on page 11.
7 If the notebook has IEEE 802.11 wireless networking built in, remove the
IEEE 802.11 Mini PCI module by following the instructions in “Replacing
the IEEE 802.11 Mini PCI card” on page 15.
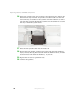
8 Remove the hard drive kit by following the instructions in “Replacing the
hard drive kit” on page 20.
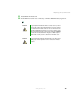
9 Turn the notebook over so the top is facing up.
10 Remove the keyboard cover by following the instructions in “Replacing
the keyboard cover” on page 26.
11 Remove the keyboard by following the instructions in “Replacing the
keyboard” on page 29.
12 Remove the modem by following the instructions in “Replacing the
modem” on page 35.
13 Remove the LED indicator panel by following the instructions in
“Replacing the LED indicator panel” on page 39.
14 Remove the cooling assembly by following the instructions in “Replacing
the cooling assembly” on page 42.
15 Remove the hinge covers by following the instructions in “Replacing the
hinge covers” on page 45.
16 Remove the LCD panel by following the instructions in “Replacing the
LCD panel assembly” on page 47.