
Quick Start Manual


57
Installing power supply components
www.gateway.com
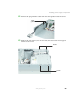
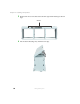
16 Slide the power supply cage forward until it stops (about ½ inch), then
lift it away from the server.
17 Insert the new power supply cage into the cage bay, then slide it back until
it stops (about ½ inch).
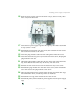
18 Reinstall the front bracket onto the server, then reinstall the four screws
that secure the bracket to the server.
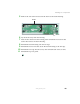
19 Insert the plug module’s cable into the cable guides inside the server.
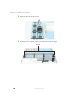
20 Insert the electronics bay part-way into the back of the server, keeping the
plug module in the slot.
21 Thread the plug module’s cable into the slot on the side of the electronics
bay, then slide the electronics bay all the way into the server.
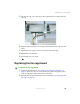
22 Reinsert the four screws that secure the electronics bay to the server.
23 Reinstall the plug module onto the back of the server, then reinstall the
screw that secures the plug module to the server.
24 Plug all cables back into the system board, the hot-swap hard drive cage,
the combination drive, and the tape drive (if installed).
25 Reinstall the fan cage, then reinstall each of the six fans.
26 Reinstall all panels, then reinstall all power supplies into the power supply
cage.