DV-S20 digital MPEG 4 camcorder user's guide
09449.book Page i Tuesday, September 16, 2003 5:04 PM Contents Contents . . . . . . . . . . . . . . . . . . . . . . . . . . . . . . . . . . . . . . . . . . . . . . . . . . . . . i Introducing Your Gateway Digital MPEG4 Camcorder . . . . . . . . . . . . . . . . 1 Features . . . . . . . . . . . . . . . . . . . . . . . . . . . . . . . . . . . . . . . . . . . . . . . . . 2 Important Safeguards . . . . . . . . . . . . . . . . . . . . . . . . . . . . . . . . . . . . . . 3 Package contents . . . . . . . . . . . .
09449.book Page ii Tuesday, September 16, 2003 5:04 PM Using the flash . . . . . . . . . . . . . . . . . . . . . . . . . . . . . . . . . . . . . . . . . . . 33 Using the digital zoom . . . . . . . . . . . . . . . . . . . . . . . . . . . . . . . . . . . . . 34 Using the self-timer . . . . . . . . . . . . . . . . . . . . . . . . . . . . . . . . . . . . . . . 35 Viewing images . . . . . . . . . . . . . . . . . . . . . . . . . . . . . . . . . . . . . . . . . . 36 Deleting images . . . . . . . . . . . . . . . .
09449.book Page 1 Tuesday, September 16, 2003 5:04 PM Introducing Your Gateway Digital MPEG4 Camcorder This section provides basic information about your Gateway Digital MPEG4 Camcorder. Read this section to learn about: ■ Features ■ Warnings and safeguards ■ Package contents ■ Controls and connections © 2003 Gateway, Inc. All rights reserved. Gateway, Gateway Country, the Gateway stylized logo, and the black-and-white spot design are trademarks or registered trademarks of Gateway, Inc.
09449.book Page 2 Tuesday, September 16, 2003 5:04 PM Features 2 ■ MPEG4-compressed format ■ 2.1 mega pixel CMOS sensor and 2.5 digital zoom ■ 320 × 240 QVGA video 1600 × 1200 resolution still images ■ Three quality settings — Super fine, fine, and normal ■ 1.
09449.book Page 3 Tuesday, September 16, 2003 5:04 PM Important Safeguards Warning Risk of electric shock - Do not open To reduce the risk of electric shock, do not modify your camcorder or open the case. There are no user-serviceable parts inside. Opening the case voids the warranty. Have your camcorder repaired by qualified service personnel only. Warnings and precautions ■ Disconnect all cables before moving your camcorder.
09449.book Page 4 Tuesday, September 16, 2003 5:04 PM 4 ■ Disconnect your camcorder and remove the batteries when not used for a long period of time. ■ Do not use any other batteries than ones specified for your camcorder. ■ Never use different types of batteries together (alkaline and Ni-MH) or mix old and new batteries. ■ Disconnect your camcorder and remove the batteries if your camcorder acts in any way abnormal while following normal operating instructions.
09449.
09449.
09449.book Page 7 Tuesday, September 16, 2003 5:04 PM Software Digital camcorder Driver for: Windows 98/98SE/ME Windows 2000/XP Copyri .
09449.book Page 8 Tuesday, September 16, 2003 5:04 PM Accessories You can purchase these optional accessories for your camcorder: ■ Accessory kit: ■ AC adapter ■ Battery charger and rechargeable batteries ■ Carrying pouch ■ Tripod ■ SD memory cards ■ SD memory card reader Contact Gateway for these and other accessories.
09449.
09449.book Page 10 Tuesday, September 16, 2003 5:04 PM Item Description Power/Menu button (top) Turns your camcorder on and off and enters the OSD (on-screen display). For more information, see “Using the OSD” on page 21. Lens Lets light into your camcorder to capture images. Microphone Records audio. Flash Activates when lighting conditions are dark. Self-timer LED Blinks blue when in self-timer mode. Battery/Memory card cover Open to install batteries and optional SD memory cards.
09449.
09449.book Page 12 Tuesday, September 16, 2003 5:04 PM Item Flash/ Description button Manually activates flash mode. For additional information, see “Using the flash” on page 33. OSD active: Moves up through menu options. Zoom out/ button Reduces the zoom level. OSD active: Enters a menu and moves to the next item field. System LED indicator Displays system status. For additional information, see “LED indicators and audible beeps” on page 50.
09449.book Page 13 Tuesday, September 16, 2003 5:04 PM Item Self-timer/ Description button Activates the self-timer. For additional information, see “Using the self-timer” on page 35. OSD active: Moves down through menu options. Digital Zoom/OK button Activates digital zoom. For additional information, see “Using the digital zoom” on page 34. OSD active: Saves menu changes. Delete button Deletes any images that you do not want to keep.
09449.
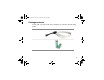
09449.book Page 15 Tuesday, September 16, 2003 5:04 PM Connecting the wrist strap To connect the wrist strap: 1 2 Find the wrist strap that came with your camcorder. 3 Pull the large looped end of the wrist strap through the small loop until the strap is secure. Thread the small looped end of the wrist strap through the wrist strap eyelet on your camcorder.
09449.book Page 16 Tuesday, September 16, 2003 5:04 PM Installing the batteries To supply power to your camcorder, use either two AA size batteries (alkaline or Ni-MH) or use an AC power adapter (optional). Warning Tips & Tricks Never use different types of batteries together (alkaline and Ni-MH) or mix old and new batteries. Use rechargeable batteries. See “Accessories” on page 8.
09449.book Page 17 Tuesday, September 16, 2003 5:04 PM To install the batteries: 1 2 3 Slide open the battery cover. Insert the two AA batteries into your camcorder. Make sure that you match the + and – on the batteries with the + and – symbols inside the battery compartment. Close the battery cover. Warning To protect your camcorder from battery leakage or corrosion, remove the batteries if you will not be using your camcorder for an extended period of time.
09449.book Page 18 Tuesday, September 16, 2003 5:04 PM Installing an optional SD memory card Your camcorder comes with 64 MB of internal memory to record video and still images. However, you can also expand the memory capacity of your camcorder using optional SD memory cards. Your camcorder uses the SD memory card first, then uses internal memory. To install an SD memory card: 18 1 2 Slide open the SD memory card cover. 3 Close the SD memory card cover. Insert the SD memory card.
09449.book Page 19 Tuesday, September 16, 2003 5:04 PM To remove an SD memory card: 1 2 3 Make sure that your camcorder is turned off. Slide open the SD memory card cover. Press in gently on the visible edge of the SD memory card to eject it. Tips & Tricks To prevent valuable data from being accidentally erased, slide the write protect tab (on the side of the SD memory card) to “LOCK.
09449.book Page 20 Tuesday, September 16, 2003 5:04 PM Turning on your camcorder To turn on your camcorder: ■ Press and hold the Power/Menu button on the top of your camcorder for two seconds. Setting the date and time The date and time setting screen automatically appears: ■ The first time you turn on your camcorder. ■ When you replace the batteries. Go to “Using the OSD” on page 21 for more information on making changes to OSD menus.
09449.book Page 21 Tuesday, September 16, 2003 5:04 PM Using the OSD Your camcorder features an on-screen display (OSD) that lets you adjust and save date/time, image resolution, and other settings. Your camcorder saves changes you make to the settings, even if you turn it off. To access the OSD: 1 2 3 4 5 6 7 8 Turn on your camcorder. Open the LCD display on your camcorder 90 degrees. Press the Power/Menu button on your camcorder to open the OSD.
09449.book Page 22 Tuesday, September 16, 2003 5:04 PM OSD Menu Description Setup Format. Formats and erases the internal memory. Also formats and erases an optional SD memory card. Record Format Beep Speaker LCD brightness Power off Exit: MENU Record Reset to default Date type Date setup Date imprint Video out Exit: MENU Record Light freq. Language Setup On 5 0 Cancel Change: Setup Beep. Turns audible mode on and off. Your camcorder beeps whenever a button is pressed when this mode is on.
09449.book Page 23 Tuesday, September 16, 2003 5:04 PM OSD Menu Description Record Image size. Sets the resolution. Choose between 1600 × 1200 and 800 × 600. Record Image size Image quality Video quality Exposure White balance Exit: MENU Record ISO Quick view Exit: MENU Setup 0 EV Auto Image quality. Sets the compression ratio of the still image. Choose between Super fine, Fine, and Normal. Video quality. Sets the compression ratio for video files. Choose between Super fine, Fine, and Normal.
09449.book Page 24 Tuesday, September 16, 2003 5:04 PM OSD Menu Description Play Protect. Prevents video and still images from being deleted. Play Setup Protect Delete all Slide show Copy to card Exit: 24 MENU 3 Sec Delete all. Deletes all video and still images from the internal memory or optional SD memory card. Slide show. Displays recorded still images sequentially at a selected interval. Copy to card. Copies all video and still images from the internal memory to an optional SD memory card.
09449.
09449.book Page 26 Tuesday, September 16, 2003 5:04 PM Understanding LCD display information The following information appears on the LCD display when you are recording video and still images. Sound level Battery status Zoom level W T SD Card indicator Flash mode Self-timer indicator +0.
09449.book Page 27 Tuesday, September 16, 2003 5:04 PM The following information appears on the LCD display when you are in video playback mode.
09449.book Page 28 Tuesday, September 16, 2003 5:04 PM The following information appears on the LCD display when you are in still image playback mode. Folder/Image number Battery status Card indicator 100-0001 SD Image size Image quality Still image mode F2.8 1/60S F-stop Exposure time 28 2003.08.
09449.book Page 29 Tuesday, September 16, 2003 5:04 PM Understanding image quality and storage Resolution and quality settings determine the pixel size (dimension), image file size, and compression ratio for your video and still images. Your camcorder has three image quality settings: ■ Super fine ■ Fine ■ Normal The Super fine setting provides the highest resolution and quality. However, this setting generates larger files that require more memory storage space.
09449.book Page 30 Tuesday, September 16, 2003 5:04 PM Number of recordable images The table below indicates the approximate number of still images that can be stored in your camcorder’s internal memory and with an optional SD memory card.
09449.book Page 31 Tuesday, September 16, 2003 5:04 PM Video quality and estimated recording time The table below indicates the approximate recording time at each setting based on 64 MB internal memory and using an optional SD memory card. 64 MB Internal Memory 128 MB SD Memory Card 256 MB SD Memory Card 512 MB SD Memory Card Resolution Video Quality 320 × 240 Super fine 5 min. 10 min. 20 min. 40 min. 320 × 240 Fine 10 min. 20 min. 40 min. 80 min. 320 × 240 Normal 18 min. 36 min.
09449.book Page 32 Tuesday, September 16, 2003 5:04 PM Recording video and still images Your camcorder can record video and still images. To record video: 1 2 3 4 Turn on your camcorder. Open the LCD display on your camcorder 90 degrees. Press the Record/Stop button. Press the Record/Stop button again to stop recording. To record still images: 1 2 3 32 Turn on your camcorder. Open the LCD display on your camcorder 90 degrees. Press the Image shutter button.
09449.book Page 33 Tuesday, September 16, 2003 5:04 PM Using the flash Your camcorder has three flash modes for taking still images: ■ Auto flash (intensive) ■ Auto flash (extensive) ■ Flash off Auto flash (intensive). The flash fires automatically according to the ambient lighting conditions. Use this mode for general photography. Auto flash (extensive). The flash fires every time. Use for this mode for distance photography. Flash off. Flash is turned off.
09449.book Page 34 Tuesday, September 16, 2003 5:04 PM Using the digital zoom Use the digital zoom to enlarge video. The digital zoom’s range is from 1x to 2.5x. Digital zoom is only available when digital zoom mode is turned on and you are filming video. You can use digital zoom to help you to see clearly when you are recording still images, but the images will be recorded at 1x. To use the digital zoom: 1 2 3 4 34 Turn on your camcorder. Open the LCD display on your camcorder 90 degrees.
09449.book Page 35 Tuesday, September 16, 2003 5:04 PM Using the self-timer Use the self-timer so you can join the picture when taking group shots. After the self-timer is set, the self-timer lamp blinks slowly for 7 seconds, then blinks rapidly for the last 3 seconds prior to shutter release. Self-timer mode automatically turns off after an image is taken. To use the self-timer: 1 2 3 4 5 Attach your camcorder to a tripod or place it on a stable surface. Turn on your camcorder.
09449.book Page 36 Tuesday, September 16, 2003 5:04 PM Tips & Tricks The LCD display swivels 270 degrees so you can join the picture and watch the LCD display at the same time. Viewing images In playback mode, you can view, magnify, protect, or delete all images. Playback mode also provides a thumbnail image display, letting you quickly find the image you want. Still image files To view recorded still images: 1 2 3 4 36 Turn on your camcorder. Open the LCD display on your camcorder 90 degrees.
09449.book Page 37 Tuesday, September 16, 2003 5:04 PM Zoomed playback While reviewing your images, you can enlarge a portion of an image. To use zoom playback: 1 2 3 4 5 Turn on your camcorder. Open the LCD display on your camcorder 90 degrees. Press the Playback/Pause button to view recorded still images. Select the still image you want to view using the or button. Press the Digital Zoom button to adjust the zoom level. A red frame with a red box inside appears.
09449.book Page 38 Tuesday, September 16, 2003 5:04 PM Displaying thumbnail images Thumbnail mode lets you to view nine small images on the LCD display simultaneously so you can quickly find a specific still image. To use thumbnail mode: 1 2 3 4 5 38 Turn on your camcorder. Open the LCD display on your camcorder 90 degrees. Press the Playback/Pause button to view recorded still images. Select the still image you want to view using the or button.
09449.book Page 39 Tuesday, September 16, 2003 5:04 PM Slide show display Slide show mode lets you playback your still images automatically in sequential order as a slide show viewed on the LCD display. To view the slide show on your TV or computer, see “Connecting your camcorder” on page 43. To use slide show mode: 1 2 3 Turn on your camcorder. 4 5 Select Slide show from the Play menu. Open the LCD display on your camcorder 90 degrees.
09449.book Page 40 Tuesday, September 16, 2003 5:04 PM Video files To view recorded video files: 1 2 3 4 Turn on your camcorder. Open the LCD display on your camcorder 90 degrees. Press the Playback/Pause button to view recorded video. Select the video file you want to view using the or button. Press the Playback/Pause button again to pause the playback. 5 Press the OK button to stop the playback. To play the video file back on your computer, we recommend you use Windows Media Player 9.0.
09449.book Page 41 Tuesday, September 16, 2003 5:04 PM Deleting images All files stored in the internal memory or on an optional SD memory card can be removed. To delete one image at a time: 1 2 3 4 5 6 7 Turn on your camcorder. Open the LCD display on your camcorder 90 degrees. Press the Playback/Pause button to view recorded still images. Select the still image you want to delete using the or button. Press the Delete button. A Delete this? message appears.
09449.book Page 42 Tuesday, September 16, 2003 5:04 PM To delete all images at once: 1 2 3 Turn on your camcorder. 4 5 Select Delete all from the Play menu. Open the LCD display on your camcorder 90 degrees. Press the Playback/Pause button, then press the Power/Menu button to enter the OSD. For additional information, see “Using the OSD” on page 21. Use the button to select Yes, then press the OK button to confirm. A progress bar appears as image files are deleted.
09449.book Page 43 Tuesday, September 16, 2003 5:04 PM Connecting your camcorder You can view video and still images on: ■ Your computer ■ Your TV or VCR To connect to your computer: ■ Connect the small square end of the USB cable that came with your kit to your camcorder, then connect the other end to your computer. See the documentation that came with your computer for additional information.
09449.book Page 44 Tuesday, September 16, 2003 5:04 PM To connect to your TV or VCR: 1 Connect the single connector of the AV cable that came with your kit to the video out connector on your camcorder. 2 Connect the yellow video connector on the AV cable to the yellow video in jack on the back of your TV or VCR. 3 Connect the red (R) and white (L) audio connectors to the R and L audio-in jacks on the back of your TV or VCR.
09449.book Page 45 Tuesday, September 16, 2003 5:04 PM Software After you have connected your camcorder to your computer, you can edit recorded video and still images with Pinnacle Studio 8 SE. To load the software: ■ Insert the CD that came with your camcorder into the CD or DVD drive. Setup runs automatically. Follow all screen prompts.
09449.book Page 46 Tuesday, September 16, 2003 5:04 PM To use the software: 46 1 Click Start, All Programs, Studio 8, Tools, then click DVS Importer. The DVS Importer window opens. 2 3 Click Add. The Destination dialog box opens. Navigate to the folder that contains the video files, click each file you want to convert, then click Open.
09449.book Page 47 Tuesday, September 16, 2003 5:04 PM 4 Click the Set Destination Folder icon, then select the destination folder where you want to store the finished video files. 5 6 Click Go. The files are converted into the correct format. Click the Launch Studio 8 button to launch Studio 8 SE. For instructions on how to use Studio 8 SE, see the online documentation and help files.
09449.book Page 48 Tuesday, September 16, 2003 5:04 PM Troubleshooting Use the following information to understand error messages and indicator status. Error messages MEMORY ERROR Internal memory access error. CARD ERROR Optional SD memory card access error. MEMORY FULL There is not enough to memory to store the image. NO IMAGES There are no images stored in internal memory or on an optional SD memory card.
09449.book Page 49 Tuesday, September 16, 2003 5:04 PM NO CARD There is not an optional SD memory card loaded in your camcorder. USB ERROR USB transmit error. MEMORY FULL XXX OF XXX IMAGES COPIED STORAGE HAS NOT ENOUGH MEMORY SIZE XXX — Number of images “LOW BATTERY” “AUTO” “6” Battery power is low and your camcorder is going to shut-down within 6 seconds. The LCD display will also show the count-down (from 6 to 1).
09449.
09449.book Page 51 Tuesday, September 16, 2003 5:04 PM Specifications Item Description Image sensor 1/2-inch CMOS Effective pixels 2.1 Mega Pixels Image size Movie image: QVGA 320 × 240 Still Image:1600 × 1200; 800 × 600 Image quality Super fine, Fine, Normal Recording media 64 MB internal memory Optional SD memory card (up to 512 MB) Lens F-no: 2.8, 5G All glass, Focus range: 1.2 m ~ infinity LCD display High resolution (130 k dots) 1.
09449.book Page 52 Tuesday, September 16, 2003 5:04 PM Item Description Exposure compensation Auto Manual: -1.8 ~ +1.8 EV (0.3 EV) White Balance Auto Manual: Daylight, Shade, Fluorescent 1, Fluorescent 2, Lamp ISO ISO 100/200/400 Light frequency 50/60Hz Compressed format MPEG4 SP (video); IMA-ADPCM (audio) Standards EXIF 2.1, DCF 1.
09449.book Page 53 Tuesday, September 16, 2003 5:04 PM FCC Statement FCC declaration of conformity Responsible party: Gateway Companies, Inc. 610 Gateway Drive, North Sioux City, SD 57049 (605) 232-2000 Fax: (605) 232-2023 Product: ■ DV-S20 Digital MPEG4 Camcorder This device complies with Part 15 of the FCC Rules.
09449.book Page 54 Tuesday, September 16, 2003 5:04 PM However, there is no guarantee that interference will not occur in a particular installation.
MAN DV-S20 DIG MPEG4 GDE R0 8/03