FPD1750 Monitor User Guide
Contents Using Your FPD 1750 Monitor . . . . . . . . . . . . . . . . . . . . . . . . . . . . . . . . . . . . . . . . . . . . . 1 Connecting the monitor . . . . . . . . . . . . . . . . . . . . . . . . . . . . . . . . . . . . . . . . . . . . . . . . . . . . . 2 Starting the monitor . . . . . . . . . . . . . . . . . . . . . . . . . . . . . . . . . . . . . . . . . . . . . . . . . . . . . . . . 4 Adjusting monitor settings . . . . . . . . . . . . . . . . . . . . . . . . . . . . . . . . . . . . . . . . . . . . .
ii www.gateway.
Gateway Using Your FPD 1750 Monitor ■ Connecting the monitor ■ Starting the monitor ■ Adjusting monitor settings ■ Maintenance and troubleshooting ■ Specifications 1
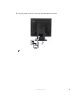
Connecting the monitor To connect the monitor: 2 1 2 Position your computer and the monitor so you can reach the connections on each. 3 Connect the video cable to the blue video connector under the bottom of the screen. 4 5 Return the monitor to its upright position. Lay the monitor on its back, then connect the power cord to the power connector under the bottom of the screen.
6 Plug the power cord into a correctly grounded electrical outlet. www.gateway.
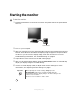
Starting the monitor To start the monitor: 1 Press the power button on the front of monitor. The power LED on the power button turns on. Power button 2 3 Turn on your computer. 4 5 Adjust the tilt of the monitor for the best viewing angle. 6 Use the on-screen display (OSD) to adjust other monitor settings. For more information, see “Adjusting monitor settings” on page 5. After your computer is running, the power LED on the monitor’s power button should be blue.
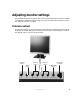
Adjusting monitor settings Use the external controls (located on the monitor itself) and software controls (accessible in Windows) to adjust the display image. For more information about software controls, see “Software controls” on page 9. External controls This monitor features an on-screen display (OSD) that lets you adjust and save contrast, brightness, and other settings for the monitor. The monitor saves changes you make to the settings, even if you turn off the monitor.
■ LightView Press to access the LightView menu and select a preset viewing mode. Preset modes include optimized settings for text, movies, or photos in either day or night ambient light levels. ■ MENU Press to view the OSD. Press again to exit. ■ (Contrast) OSD active: Press to select OSD options. OSD inactive: Press to adjust the contrast. ■ (Brightness) OSD active: Press to adjust OSD options. OSD inactive: Press to adjust the brightness.
Locking the control buttons You can lock the front control buttons to prevent them from being used to change display settings. To lock the control buttons: 1 2 Press and hold the MENU and buttons together for five seconds. To unlock the control buttons, press and hold the MENU and five seconds. buttons together for OSD menus OSD Menu Description BRIGHTNESS. Adjusts the amount of light in the darkest portion of the picture.
OSD Menu Description HORIZONTAL. Moves the display image left and right. POSITION VERTICAL. Moves the display image up and down. HORIZONTAL 50 You can also use the AUTO/SELECT button to configure the vertical and horizontal position automatically. VERTICAL 50 MENU CLOCK. Minimizes any vertical bars or stripes visible on the screen background. The horizontal screen size will also change. TRACKING CLOCK 50 PHASE. Minimizes any horizontal distortion and clears or sharpens the displayed characters.
Software controls Color depth, screen resolution, and changing display fonts to ClearType are three of the most basic monitor settings you may need to change. Adjusting the color depth Color depth is the number of colors your video card uses. Most images look best displayed with the maximum number of colors available. Windows lets you choose from several color depth settings for the monitor. We recommend that you use the 32-bit True Color setting or the highest setting available at all times.
4 Click the arrow button to open the Color quality list, then click the color depth you want. 5 Click OK, then click Yes to save your changes. Help and Support For more information about adjusting monitor settings, click Start, then click Help and Support. Type the keyword changing display settings in the Search box , then click the arrow. 10 www.gateway.
Adjusting the screen resolution You can change the screen resolution to a size you prefer. For example, you can increase the resolution to fit more icons on your desktop, or you can decrease the resolution to make reading and identifying objects on the monitor easier. The higher the resolution, the smaller individual components of the screen (such as icons and menu bars) appear. To change the screen resolution: 1 Click Start, then click Control Panel. The Control Panel window opens.
Clarifying screen fonts You can change the display fonts to ClearType for smoother screen fonts. To change the display fonts to ClearType: 12 1 Click Start, then click Control Panel. The Control Panel window opens. If your Control Panel is in Category View, click Appearance and Themes. 2 3 Click/Double-click the Display icon. The Display Properties dialog box opens. 4 5 6 7 Click the Effects button. The Effects dialog box opens. Click the Appearance tab.
Video modes The monitor supports several video modes. ■ Best video mode is 1280 × 1024 @ 6o Hz. The supported video modes are: Screen Resolution (display mode) Horizontal Frequency Vertical Frequency 1 VGA 640 × 350 31.47 kHz 70 Hz 2 VGA 720 × 400 31.47 kHz 70 Hz 3 VGA 640 × 480 31.47 kHz 60 Hz 4 VESA 640 × 480 37.50 kHz 75 Hz 5 VESA 800 × 600 37.88 kHz 60 Hz 6 VESA 800 × 600 46.88 kHz 75 Hz 7 MAC 832 × 624 49.73 kHz 75 Hz 8 VESA 1024 × 768 48.
Power management ENERGY STAR As an ENERGY STAR® Partner, Gateway has determined that this product meets the ENERGY STAR guidelines for energy efficiency. This monitor complies with the EPA's International ENERGY STAR Program, which is a program designed to encourage manufacturers of computer equipment to build circuitry into their products to reduce energy consumption during time of non-use.
Maintenance To keep the monitor in optimal working order: ■ Do not block the ventilation holes. ■ Do not expose the monitor to rain or use near water. ■ Keep the monitor away from radiators or heat vents. ■ Keep the monitor out of direct sunlight. To clean the monitor, use a soft cloth slightly moistened with water only. Wipe the cabinet, screen, and controls. Caution Do not use any type of abrasive pad or glass cleaner. You will permanently scratch the screen.
No picture ■ Make sure that the power cord is connected correctly to both the back of the monitor and the wall outlet. For more information about connecting the power cord, see “Connecting the monitor” on page 2. ■ Make sure that the video cable is connected securely to the back of the monitor and computer. For more information about connecting the video cable, see “Connecting the monitor” on page 2. ■ Make sure that the monitor is turned on.
Picture has shadows or “ghosts” ■ Press the AUTO/SELECT button to automatically adjust the display image to the ideal settings. ■ Remove any extension cables or switchboxes. ■ Make sure that the video cable is connected securely to the back of the monitor and your computer. For more information about connecting the power cord, see “Connecting the monitor” on page 2. ■ Make sure that the video cable is not damaged. ■ Check the ends of the video cable for any pins that might be bent or pushed in.
Specifications Specifications are subject to change without notice or obligation. Monitor 17-inch active-matrix TFT (Thin Film Transistor) LCD Best screen resolution 1280 × 1024 Display colors Over 16 million colors Power input AC 100-240 V 50/60 Hz 1.0 A Power consumption Normal operation: 40 W Active Off operation: ≤ 3 W Dimensions 14.57 × 8.78 × 16.57 inches (37.00 × 22.30 × 42.
Appendix A Safety, Regulatory, and Legal Information ■ Safety information ■ Regulatory statements ■ Notices 19
Important safety information Your Gateway system is designed and tested to meet the latest standards for safety of information technology equipment. However, to ensure safe use of this product, it is important that the safety instructions marked on the product and in the documentation are followed. Warning Always follow these instructions to help guard against personal injury and damage to your Gateway system.
Care during use ■ Do not walk on the power cord or allow anything to rest on it. ■ Do not spill anything on the system. The best way to avoid spills is to avoid eating and drinking near your system. ■ Do not expose the monitor to rain or use near water. If the monitor does get exposed to moisture, unplug it and allow it to dry for 24 hours. Call Gateway Technical Support for advice on whether the monitor is safe to turn back on.
Regulatory compliance statements United States of America Federal Communications Commission (FCC) Unintentional emitter per FCC Part 15 This device has been tested and found to comply with the limits for a Class B digital device, pursuant to Part 15 of the FCC rules. These limits are designed to provide reasonable protection against harmful interference in a residential installation.
Canada Industry Canada (IC) Unintentional emitter per ICES-003 This digital apparatus does not exceed the Class B limits for radio noise emissions from digital apparatus as set out in the radio interference regulations of Industry Canada. Le présent appareil numérique n’émet pas de bruits radioélectriques dépassant les limites applicables aux appareils numériques de Classe B prescrites dans le règlement sur le brouillage radioélectrique édicté par Industrie Canada.
Notices Copyright © 2004 Gateway, Inc. All Rights Reserved 14303 Gateway Place Poway, CA 92064 USA All Rights Reserved This publication is protected by copyright and all rights are reserved. No part of it may be reproduced or transmitted by any means or in any form, without prior consent in writing from Gateway. The information in this manual has been carefully checked and is believed to be accurate. However, changes are made periodically. These changes are incorporated in newer publication editions.
www.gateway.
26 www.gateway.
MAN LG FPD1750 USR GDE R0 07/04