Gateway FPD2185W Monitor User Guide
Contents Using Your Gateway Flat Panel Monitor . . . . . . . . . . . . . . . . . . . . . . . . . . . . . . . 1 Connecting the monitor . . . . . . . . . . . . . . . . . . . . . . . . . . . . . . . . . . . . . . . . . . . . . . . . . . . . . 2 Connecting video inputs . . . . . . . . . . . . . . . . . . . . . . . . . . . . . . . . . . . . . . . . . . . . . . . . . 2 Connecting USB cables . . . . . . . . . . . . . . . . . . . . . . . . . . . . . . . . . . . . . . . . . . . . . . . . .
ii www.gateway.
Using Your Gateway Flat Panel Monitor • Connecting the monitor • Adjusting the stand • Turning on the monitor • Changing monitor settings • Maintaining and troubleshooting • Getting help • Specifications 1
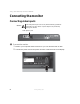
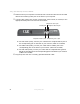
Using Your Gateway Flat Panel Monitor Connecting the monitor Connecting video inputs Caution The audio power in jack is for use only with the Gateway speaker bar. Connecting any other device or power adapter can permanently damage the monitor. Audio power in jack To connect the monitor: 1 2 2 Position your computer and the monitor so you can reach the back of each. Connect the power cord to the power connector under the back of the display. www.gateway.
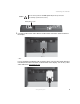
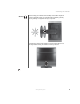
Connecting the monitor Caution Do not connect power to the Audio power in jack for any device but the Gateway speaker bar accessory. Audio power in jack 3 Connect the blue VGA video cable to the blue video connector under the back of the display. - OR If your computer has a digital video connector (DVI), connect a DVI video cable (not included) to the white connector under the back of the display. You can buy a DVI video cable from www.gateway.com. www.gateway.
Using Your Gateway Flat Panel Monitor 4 Make sure that your computer is turned off, then connect the other end of the video cable to the matching video port on the back of your computer. 5 Connect video inputs (such as from a DVD player, video camera, or receiver) to the appropriate video jacks on the back of the monitor.
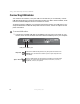
Connecting the monitor Warning Because lifting your monitor off the desktop surface takes weight off from the adjustable stand, the stand will extend suddenly, possibly causing damage to equipment or injury to yourself. To avoid injury, always lift the monitor so that the stand adjusts to its full height before moving the monitor or turning it around. www.gateway.
Using Your Gateway Flat Panel Monitor Connecting USB cables Your monitor has a built-in, four-port USB 2.0 hub that lets you conveniently connect USB devices. Because your computer case may be under your desk or inside a cabinet, these monitor-mounted USB ports can be much easier to access. To use the monitor’s USB ports, you must first connect the monitor to a USB port on your computer. Because the USB hub uses power from the monitor, it does not require its own power connection.
Connecting the monitor 2 Connect any USB device to one of the available USB 2.0 ports on the side or back of the monitor. USB ports Tips & Tricks Use the USB 2.0 ports on the side of the monitor for connecting USB devices that are frequently disconnected, such as camera interface cables, flash drives, and USB hard drives. www.gateway.
Using Your Gateway Flat Panel Monitor Connecting a security cable You can secure your monitor to your computer desk (or to another heavy object) with a cable lock. To connect a cable lock, follow the cable lock’s instructions to connect it to the Kensington lock slot on the back of your monitor. (cable lock not included) Kensington lock slot 8 www.gateway.
Adjusting the stand Adjusting the stand Height: 4.12 inches (105 mm) Rotation: 90° Tilt: 35° Pan: 35° www.gateway.
Using Your Gateway Flat Panel Monitor Adjusting monitor height tension The stand is factory adjusted to maintain the adjusted height for your monitor. However, you can further adjust the tension. To test and adjust your monitor’s height tension: 1 Move your monitor up and down through its entire vertical range. If it does not stay in place when you let go, you need to change the adjustable stand’s height tension.
Adjusting the stand Ergonomic guidelines The recommended mounting heights, the range of adjustability required to provide comfortable use by a range of users, and the forces required for making adjustments to the display are based upon the following guildelines. These guidelines are based on available scientific literature and published standards.
Using Your Gateway Flat Panel Monitor Starting the monitor To start the monitor: 1 Press the power button on the front of monitor. The power LED on the power button turns on. 2 Turn on your computer. After your computer is running, the power LED on the monitor’s power button should be blue. Allow about 10 seconds for the display image to appear. If the power LED is not blue or you do not see a display image, check the connections. For more troubleshooting information, see “Troubleshooting” on page 26.
Adjusting monitor settings Adjusting monitor settings Use the monitor controls (located on the monitor itself) and computer controls (accessible through Windows) to adjust the display image. For more information about computer controls, see “Windows controls” on page 19. Monitor buttons This monitor features an on-screen display (OSD) that lets you adjust contrast, brightness, and other settings for the monitor. The monitor saves changes you make to the settings, even if you turn off the monitor.
Using Your Gateway Flat Panel Monitor 14 ■ Input OSD active: Press to move to previous menu. OSD inactive: Press to select the video source. ■ Auto OSD active: Press to select a menu or setting. OSD inactive: Press to automatically optimize the monitor’s image position, clock, and phase. ■ PIP OSD active: Press to move up through menu selections and adjust OSD options. OSD inactive: Press to turn on PIP (Picture-in-Picture).
Adjusting monitor settings On-screen display (OSD) options Adjusting OSD settings To adjust the OSD settings: 1 Press the Menu button. The OSD menu opens. Main Menu Auto Picture PIP Video Adjust Geometry Previous Advanced Next Reset 2 Select Menu Off Press the Previous and Next (PIP buttons) to highlight a setting, then press the Auto button to open the selected menu or setting. Tips & Tricks While the OSD is active, on-screen labels appear next to the buttons to help you identify them.
Using Your Gateway Flat Panel Monitor OSD menus OSD Menu Main menu Description Auto—Automatically adjusts your monitor to its optimum settings. (VGA input only) Picture—Opens the Picture menu, where you can adjust brightness, contrast, and gamma. PIP—Opens the PIP Settings menu, where you can adjust the source, position, size, and transparency of the Picture-in-Picture image.
Adjusting monitor settings OSD Menu Video Adjust menu Description These settings apply only to SD (standard definition) video at 480i and below. Sharpness—Adjusts sharpness for video images. Noise Reduction—Uses noise reduction filters that adapt to the amount of noise and motion from the video source. Video Scaling—Sets video aspect ratios and scaling between Wide, Zoom, 1:1, and Panoramic modes. Wide mode stretches a standard broadcast or full-frame image to fill the entire screen. Widescreen (1.
Using Your Gateway Flat Panel Monitor OSD Menu Geometry menu Description H-Position—Moves the display image left and right. V-Position—Moves the display image up and down. You can also press the Auto button to configure the vertical and horizontal position automatically. Clock—Minimizes any vertical bars or stripes visible on the screen background. The horizontal screen size will also change. Phase—Minimizes any horizontal distortion and clears or sharpens the displayed characters.
Adjusting monitor settings Using Picture-in-Picture (PIP) Picture-in-Picture (PIP) is a convenient way to view video from multiple video sources at the same time. Refer to the following chart to determine which combinations of video sources can be used as a PIP display.
Using Your Gateway Flat Panel Monitor To change the color depth: 1 Right-click a blank area of your desktop, then click Properties. The Display Properties dialog box opens. 2 Click the Settings tab. 3 Click the arrow button to open the Color quality list, then click the color depth you want. 4 Click OK, then click Yes to save your changes. Help and Support For more information about adjusting monitor settings, click Start, then click Help and Support.
Adjusting monitor settings To change the screen resolution: 1 Right-click a blank area of your desktop, then click Properties. The Display Properties dialog box opens. 2 Click the Settings tab. 3 Drag the Screen resolution slider to the size you prefer, click OK, then click Yes to save your changes. Help and Support For more information about adjusting monitor settings, click Start, then click Help and Support. Type the keyword changing screen resolution in the Search box, then click the arrow.
Using Your Gateway Flat Panel Monitor 2 Click the Appearance tab. 3 4 Click the Effects button. The Effects dialog box opens. 5 22 Click to select the Use the following method to smooth the edges of screen type check box, click the arrow to open the list, then click ClearType. Click OK. www.gateway.
Adjusting monitor settings EzTune software When installed onto your computer, EzTune™ software lets you control many of the monitor settings from your computer. With EzTune, you can: ■ Change the orientation of the image (landscape to portrait) by rotating the screen ■ Change brightness, contrast, and color balance ■ Change screen geometry ■ Set the display position and resolution For more information, see the program’s CD or the installed program’s online help.
Using Your Gateway Flat Panel Monitor Important While using portrait mode: ■ ■ ■ Full-screen video may display incorrectly or be slow. Video games or other full-screen applications may not be fully compatible. Some programs are not able to recognize and adapt to your monitor’s portrait mode. If you experience problems with a program while using portrait mode, switch to landscape mode and restart the program.
Power management Power management ENERGY STAR As an ENERGY STAR® Partner, Gateway has determined that this product meets the ENERGY STAR guidelines for energy efficiency. This monitor complies with the EPA's International ENERGY STAR Program, which is a program designed to encourage manufacturers of computer equipment to build circuitry into their products to reduce energy consumption during time of non-use.
Using Your Gateway Flat Panel Monitor Maintenance To keep the monitor in optimal working order: ■ Do not block the ventilation holes. ■ Do not expose the monitor to rain or use near water. ■ Keep the monitor away from radiators or heat vents. ■ Keep the monitor out of direct sunlight. To clean the monitor, use a soft cloth slightly moistened with water only. Wipe the cabinet, screen, and controls. Caution Do not use any type of abrasive pad or glass cleaner.
Troubleshooting No picture ■ Press the Input button to make sure that you have selected the correct video source. ■ Make sure that the power cord is connected correctly to both the back of the monitor and the wall outlet. For more information about connecting the power cord, see “Connecting the monitor” on page 2. ■ Make sure that the video cable is connected securely to the back of the monitor and computer. For more information about connecting the video cable, see “Connecting the monitor” on page 2.
Using Your Gateway Flat Panel Monitor Picture has shadows or “ghosts” ■ Press the Auto button to automatically adjust the display image to the ideal settings. ■ Remove any extension cables or switchboxes. ■ Make sure that the video cable is connected securely to the back of the monitor and your computer. For more information about connecting the power cord, see “Connecting the monitor” on page 2. ■ Make sure that the video cable is not damaged.
Troubleshooting Gateway contact information To help you locate Gateway contact information, you can find the Gateway Web site, Online Support, and technical support contact information on the label located on the back of your monitor. www.gateway.
Using Your Gateway Flat Panel Monitor Specifications Specifications are subject to change without notice or obligation. Many products for Gateway and its subsidiaries are custom engineered by our suppliers to Gateway specifications and may vary from similarly marketed products. Panel size 21 inches (diagonal) Panel type ■ ■ ■ 21-inch viewable TFT active matrix S-PVA Anti-glare coating Pixel resolution 1680 × 1050 (native) (75 Hz) Pixel pitch 0.0106 × 0.0106 inches (0.270 mm × 0.
Specifications Power consumption Normal operation: >75 W Off (power-save): 2 W Power input 100-240 VAC, 50/60 Hz (built-in power supply) Power management Energy Star® Certifications UL, cUL, FCC Class B, CE. VCCI and TCO’99 where applicable. Wall mount bracket VESA 4 × 3.937 inches (4 × 100 mm) Weight Net weight (with stand): 18.74 lbs. (8.5 kg) Gross weight (with packaging): 22.05 lbs. (10 kg) Dimensions With base: 19.47 × 15.35 × 6.15 inches (49.4 × 39.0 × 15.6 cm) Without base: 19.47 × 13.
Using Your Gateway Flat Panel Monitor 32 www.gateway.
Appendix Safety, Regulatory, and Legal Information • Safety information • Regulatory statements • Notices 33
Safety, Regulatory, and Legal Information Important safety information Your Gateway system is designed and tested to meet the latest standards for safety of information technology equipment. However, to ensure safe use of this product, it is important that the safety instructions marked on the product and in the documentation are followed. Warning Always follow these instructions to help guard against personal injury and damage to your Gateway system.
Care during use ■ Do not walk on the power cord or allow anything to rest on it. ■ Do not spill anything on the system. The best way to avoid spills is to avoid eating and drinking near your system. ■ Do not expose the monitor to rain or use near water. If the monitor does get exposed to moisture, unplug it and allow it to dry for 24 hours. Call Gateway Customer Care for advice on whether the monitor is safe to turn back on.
Safety, Regulatory, and Legal Information Environmental information The product you have purchased contains extracted natural resources that have been used in the manufacturing process. This product may contain substances known to be hazardous to the environment or to human health.
Regulatory compliance statements United States of America Federal Communications Commission (FCC) Unintentional emitter per FCC Part 15 This device has been tested and found to comply with the limits for a Class B digital device, pursuant to Part 15 of the FCC rules. These limits are designed to provide reasonable protection against harmful interference in a residential installation.
Safety, Regulatory, and Legal Information Canada Industry Canada (IC) Unintentional emitter per ICES-003 This digital apparatus does not exceed the Class B limits for radio noise emissions from digital apparatus as set out in the radio interference regulations of Industry Canada. Le présent appareil numérique n’émet pas de bruits radioélectriques dépassant les limites applicables aux appareils numériques de Classe B prescrites dans le règlement sur le brouillage radioélectrique édicté par Industrie Canada.
Notices © 2005 Gateway, Inc. All rights reserved. Gateway, Inc. 7565 Irvine Center Drive Irvine, CA 92618 USA All Rights Reserved This publication is protected by copyright and all rights are reserved. No part of it may be reproduced or transmitted by any means or in any form, without prior consent in writing from Gateway. The information in this manual has been carefully checked and is believed to be accurate. However, changes are made periodically.
MAN FPD2085/2185 USR GDE R0 8/05