8512088.
8512088.
8512088.book Page i Friday, January 12, 2007 3:31 PM Contents Chapter 1: Using Your Gateway Flat-Panel Monitor . . . . . . . . . . . . . . . . . . . . . . . . . . . . . . . . . . . . . . . . . . . . . . 1 Connecting the monitor . . . . . . . . . . . . . . . . . . . . . . . . . . . . . . . . . . . . . . . . . . . . . . 2 Attaching the base . . . . . . . . . . . . . . . . . . . . . . . . . . . . . . . . . . . . . . . . . . . . 2 Connecting video inputs . . . . . . . . . . . . . . . . . . . . . . . . . . . .
8512088.
8512088.
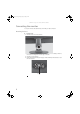
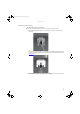
8512088.book Page 2 Friday, January 12, 2007 3:31 PM CHAPTER 1: Using Your Gateway Flat-Panel Monitor Connecting the monitor To set up the monitor, first attach the base, then make your cable connections. Attaching the base To attach the base: 1 Slide the monitor’s neck onto the base. 2 Place the monitor face-up on a stable surface. A non-slip mat on a tabletop is ideal. Let the monitor neck hang down over the edge of the table. 3 Slide the neck onto the base.
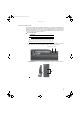
8512088.book Page 3 Friday, January 12, 2007 3:31 PM www.gateway.com Connecting video inputs To connect video sources to your monitor: 1 Position your computer and the monitor so you can reach the back of each. 2 Connect the blue VGA video cable to the blue VGA video connector under the back of the display. - OR If your computer has a digital video connector (DVI), connect a DVI video cable (not included) to the white connector under the back of the display. You can buy a DVI video cable from www.
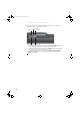
512088.book Page 4 Friday, January 12, 2007 3:31 PM CHAPTER 1: Using Your Gateway Flat-Panel Monitor 4 Connect other video sources (such as a DVD player, video camera, or receiver) to the appropriate video jacks on the back of the monitor. Component red Pr jack S-Video jack Composite video in jack Component blue Pb jack Component green Y jack • For basic video quality, connect your video device’s composite video in jack to the corresponding jack on the back of your monitor.
8512088.book Page 5 Friday, January 12, 2007 3:31 PM www.gateway.com Connecting USB cables Your monitor has a built-in, four-port USB 2.0 hub that lets you conveniently connect USB devices. Because your computer case may be under your desk or inside a cabinet, these monitor-mounted USB ports can be much easier to access. To use the monitor’s USB ports, you must first connect the monitor to a USB port on your computer.
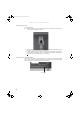
8512088.book Page 6 Friday, January 12, 2007 3:31 PM CHAPTER 1: Using Your Gateway Flat-Panel Monitor Connecting power To connect power: 1 Position your monitor so you can reach the back, then connect the power cord to the power connector under the back of the monitor. 2 Plug the power cord into a correctly grounded power outlet. We recommend using a surge protector to protect your monitor from voltage spikes.
8512088.book Page 7 Friday, January 12, 2007 3:31 PM www.gateway.com Setting up the optional stand Attaching the USB stand In the United States, you can buy an adjustable USB stand from www.gateway.com. The stand can be adjusted for height, tilt, and screen rotation. With EzTune software installed on your computer, a sensor inside your monitor detects the rotation mode (portrait or landscape) your monitor is in, and rotates the screen image accordingly.
8512088.book Page 8 Friday, January 12, 2007 3:31 PM CHAPTER 1: Using Your Gateway Flat-Panel Monitor 6 Slide the adjustable stand’s neck onto the base. 7 Tighten the thumbscrew with your fingers (or a flat screwdriver) under the base to secure the neck into place. Thumbscrew 8 With the stand facing you, press the mounting bracket lever to the left and hold it, then remove the bracket from the stand.
8512088.book Page 9 Friday, January 12, 2007 3:31 PM www.gateway.com 9 Attach the bracket to the LCD panel using the four screws you removed previously. Screws Screws 10 Slide the neck’s bracket slot onto the bracket’s mounting tab. 11 Press the bracket lever to the right and hold it, then lower the neck into place and release the lever.
8512088.book Page 10 Friday, January 12, 2007 3:31 PM CHAPTER 1: Using Your Gateway Flat-Panel Monitor Adjusting monitor height tension The stand is factory adjusted to maintain the height for your monitor. However, if it does not stay in place when you let go, you need to change the stand’s height tension. You also need to adjust the stand if the amounts of force required to raise and lower the monitor are not equal.
8512088.book Page 11 Friday, January 12, 2007 3:31 PM www.gateway.com Adjusting monitor tilt tension To adjust your monitor’s tilt tension: • Adjust the tilt tension screw (on the top of the stand) so the monitor stays in place when you let go. If the monitor changes its tilt angle when you let go, turn the screw clockwise one complete turn to increase the tension. Tilt tension screw Ergonomic guidelines The recommended screen positioning is based upon the following guildelines.
8512088.book Page 12 Friday, January 12, 2007 3:31 PM CHAPTER 1: Using Your Gateway Flat-Panel Monitor Connecting the USB hub The optional USB stand has a built-in, 4-port, USB 2.0 hub. To use these USB connectors, you need to connect the hub to power and to your computer. To connect your USB stand’s built-in USB hub: 1 Plug the included USB cable into the USB In port on the back of your USB stand and into a USB 2.0 port on your computer. If you connect the stand to a USB 1.
8512088.book Page 13 Friday, January 12, 2007 3:31 PM www.gateway.com Installing the speaker bar To install the speaker bar: Tip When using the speaker bar with a DVI connection, we recommend that you use the right-angle DVI cable so the speaker bar does not obstruct the cable. 1 Tilt the screen back, then center the speaker bar below the screen. Make sure that the speakers face forward. 2 Tighten the two thumbscrews on the back of the speaker bar.
8512088.book Page 14 Friday, January 12, 2007 3:31 PM CHAPTER 1: Using Your Gateway Flat-Panel Monitor Starting the monitor To start the monitor: 1 Press the power button on the front of monitor. The power LED on the power button changes from purple (off) to blue (on). 2 Turn on your computer. After your computer is running, the power LED on the monitor’s power button should be blue. Allow about 10 seconds for the display image to appear.
8512088.book Page 15 Friday, January 12, 2007 3:31 PM www.gateway.com Using the shortcut menu To use the shortcut menu: (Menu) button on the front of your monitor. The rest of the button icons light up and the shortcut menu opens. 1 Press the Important The buttons are very sensitive, and may be “pressed” by holding your finger just above its surface. To completely “release” a touch button, make sure that you lift your finger well away from the button.
8512088.book Page 16 Friday, January 12, 2007 3:31 PM CHAPTER 1: Using Your Gateway Flat-Panel Monitor Using the main menu To use the main menu: (Menu) button on the front of your monitor. The rest of the button icons light up and the shortcut menu opens. 1 Press the Important The EzTouch menu buttons are very sensitive, and may be “pressed” by holding your finger just above its surface. To completely “release” a touch button, make sure that you lift your finger well away from the button.
8512088.book Page 17 Friday, January 12, 2007 3:31 PM www.gateway.com OSD Menu Main menu Description Auto—Automatically adjusts your monitor to its optimum settings. (VGA input only) Picture—Opens the Picture menu, where you can adjust brightness, contrast, and gamma. PIP—Opens the PIP Settings menu, where you can adjust the source, position, size, and transparency of the Picture-in-Picture image.
8512088.book Page 18 Friday, January 12, 2007 3:31 PM CHAPTER 1: Using Your Gateway Flat-Panel Monitor OSD Menu Description Video Adjust menu Unless otherwise indicated, these settings apply only to SD (standard definition) video at 480i and below. Where “PC input” is indicated, the resolutions that apply are from 800 × 600 to 1680 × 1050. Sharpness—Adjusts sharpness for video images. Video Scaling—Sets video aspect ratios and scaling between Wide, Zoom, 1:1, and Panoramic modes.
8512088.book Page 19 Friday, January 12, 2007 3:31 PM www.gateway.com OSD Menu Description Geometry menu H Position—Moves the display image left and right. You can also press the Auto button to configure the vertical and horizontal position automatically. V Position—Moves the display image up and down. You can also press the Auto button to configure the vertical and horizontal position automatically. Clock—Minimizes any vertical bars or stripes visible on the screen background.
8512088.book Page 20 Friday, January 12, 2007 3:31 PM CHAPTER 1: Using Your Gateway Flat-Panel Monitor Changing Windows screen settings Adjusting the color depth and screen area are two of the most basic display settings you may need to change. You can also adjust settings such as the screen background and screen saver. Changing color depth and screen resolution Color depth and screen resolution are two of the most basic monitor settings you may need to change to suit your needs.
8512088.book Page 21 Friday, January 12, 2007 3:31 PM www.gateway.com EzTune software When installed onto your computer, EzTune™ software lets you control many of the monitor settings from your computer. With EzTune, you can: • Change the orientation of the image (landscape to portrait) by just rotating the screen (requires the optional height-adjustable stand available in the U.S. at www.gateway.
8512088.book Page 22 Friday, January 12, 2007 3:31 PM CHAPTER 1: Using Your Gateway Flat-Panel Monitor Video modes Your monitor supports several video modes. If you do not use the best mode for the monitor, the display image may look slightly “fuzzy.” 22 Mode Resolution Horizontal frequency (kHz) Vertical frequency (Hz) Available in DVI mode 1 720 × 400 31.469 70 N 2 640 × 480 31.469 60 Y 3 640 × 480 37.9 72 N 4 640 × 480 37.5 75 N 5 800 × 600 35.1 56 N 6 800 × 600 37.
8512088.book Page 23 Friday, January 12, 2007 3:31 PM www.gateway.com Power management Energy declaration When connected to a computer that supports the VESA Display Power Management Signaling (DPMS) Protocol, the monitor can conserve significant energy by reducing power consumption during periods of non-use. When your computer goes into the energy saving mode, the monitor will then enter the Active Off mode (sleep). In the Active Off mode the Power LED will still show orange.
8512088.book Page 24 Friday, January 12, 2007 3:31 PM CHAPTER 1: Using Your Gateway Flat-Panel Monitor Troubleshooting Important Make sure that the monitor has warmed up for approximately 30 minutes before making any judgments about the picture quality. If you have problems with the monitor, the information in this troubleshooting section may help you solve them. No power Make sure that the power cord is connected correctly to both the back of the monitor and the wall outlet.
8512088.book Page 25 Friday, January 12, 2007 3:31 PM www.gateway.com Picture has shadows or “ghosts” • Press • • (Menu), then (Auto) to automatically adjust the display image to the ideal settings. Remove any extension cables or switchboxes. Make sure that the video cable is connected securely to the back of the monitor and your computer. For more information about connecting the video cable, see “Connecting the monitor” on page 2. Make sure that the video cable is not damaged.
8512088.book Page 26 Friday, January 12, 2007 3:31 PM CHAPTER 1: Using Your Gateway Flat-Panel Monitor The sound coming from the speakers sounds distorted. • Turn down the volume until the distortion disappears. • Check the audio output volume of the sound device the speaker bar is connected to. If the audio device’s output volume is set too high, the speaker bar’s sound may always be distorted. To adjust the audio device’s output volume, see the device’s user guide.
8512088.book Page 27 Friday, January 12, 2007 3:31 PM www.gateway.com I do not see 1680 × 1050 available in the Windows display control panel. • Make sure that your video card can display at 1680 × 1050 resolution. • This may be caused by older video drivers on your computer. See the Gateway support Web site (support.gateway.com) for updated video drivers for your computer. You can also go directly to your video card’s support Web site for the most up-to-date video drivers.
8512088.book Page 28 Friday, January 12, 2007 3:31 PM CHAPTER 1: Using Your Gateway Flat-Panel Monitor How do I know if a component is HDCP compliant? If the video source device does not have a DVI or HDMI connection, it is not HDCP compliant. Video/Display When I display video from S-Video, composite, or component, why does the video look overly compressed? See your video device user manual to adjust the video or TV format output to 16:9. Setting this option to 4:3 results in compressed video.
8512088.book Page 29 Friday, January 12, 2007 3:31 PM www.gateway.com Specifications Specifications are subject to change without notice or obligation. Many products for Gateway and its subsidiaries are custom engineered by our suppliers to Gateway specifications and may vary from similarly marketed products.
8512088.
8512088.
8512088.book Page 32 Friday, January 12, 2007 3:31 PM APPENDIX A: Safety, Regulatory, and Legal Information Important safety information Warning Always follow these instructions to help guard against personal injury and damage to your Gateway product. Warning Do not use Gateway products in areas classified as hazardous locations. Such areas include patient care areas of medical and dental facilities, oxygen-laden environments, or industrial facilities.
8512088.book Page 33 Friday, January 12, 2007 3:31 PM www.gateway.com Environmental information Recycling Mercury Warning Hg Lamp(s) inside this product contain mercury and must be recycled or disposed of according to local, state, or federal laws. The product you have purchased contains extracted natural resources that have been used in the manufacturing process. This product may contain substances known to be hazardous to the environment or to human health.
8512088.book Page 34 Friday, January 12, 2007 3:31 PM APPENDIX A: Safety, Regulatory, and Legal Information FCC declaration of conformity Caution Changes or modifications not expressly approved by Gateway could void the FCC compliance and negate your authority to operate the product. California Proposition 65 Warning This product contains chemicals, including lead, known to the State of California to cause cancer, birth defects or reproductive harm. Responsible party: Gateway, Inc.
8512088.
8512088.