HD1900 19-inch Widescreen LCD Monitor USERGUIDE ®
Contents Using Your Gateway Flat-Panel Monitor . . . . . . . . . . . . . . . . . . . . . . . . . . . . . 1 Connecting your monitor . . . . . . . . . . . . . . . . . . . . . . . . . . . . . . . . . . . . . . . . . . . . . . . . . . . 2 Attaching the base . . . . . . . . . . . . . . . . . . . . . . . . . . . . . . . . . . . . . . . . . . . . . . . . . . 2 Connecting video inputs . . . . . . . . . . . . . . . . . . . . . . . . . . . . . . . . . . . . . . . . . . . . . 3 Connecting power . . . . . . . . . . . .
Contents ii
Using Your Gateway Flat-Panel Monitor • • • • • • • • Connecting your monitor Starting your monitor Adjusting monitor settings Changing Windows screen settings Power management Maintaining Troubleshooting Specifications 1
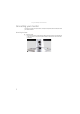
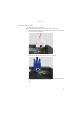
Using Your Gateway Flat-Panel Monitor Connecting your monitor To set up your monitor, first unpack the box, unwrap the components, attach the base, then make your cable connections. Attaching the base To attach the base: • Place the monitor base on a table top, then slide the monitor neck down onto the base until it clicks into place. You may need to press the button on the base to let the monitor slide on smoothly.
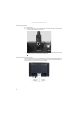
www.gateway.com Connecting video inputs To connect video sources to your monitor: 1 Position your computer and your monitor so you can reach the back of each. 2 If your computer has a digital video connector (DVI), connect a DVI video cable (not included) to the white connector on the display. - OR Connect the blue VGA video cable to the blue connector on the display.
Using Your Gateway Flat-Panel Monitor Connecting power To connect power: 1 Position your monitor so you can reach the back, then connect the power cord to the power connector under the back of your monitor. 2 Plug the power cord into a correctly grounded power outlet. We recommend using a surge protector to protect your monitor from voltage spikes. Connecting a security cable You can secure your monitor to your computer desk (or to another heavy object) with a cable lock.
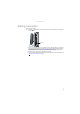
www.gateway.com Starting your monitor To start your monitor: (power) button on the side of your monitor. The power LED in front of the power button turns on. 1 Press the Power button 2 Turn on your computer. After your computer is running, the power LED on your monitor’s power button should be blue. Allow about 10 seconds for the display image to appear. If the power LED is not blue or you do not see a display image, check the connections.
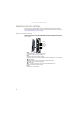
Using Your Gateway Flat-Panel Monitor Adjusting monitor settings Use your monitor controls (located on your monitor itself) and computer controls (accessible through Windows) to adjust the display image. For more information about computer controls, see “Changing Windows screen settings” on page 10. Using the monitor buttons This monitor features an on-screen display (OSD) that lets you adjust contrast, brightness, and other settings for your monitor.
www.gateway.com On-screen display options Adjusting OSD settings To adjust the OSD settings: Tip While the OSD is active, on-screen labels appear next to the buttons to help you identify them. 1 Press the Auto button. The display image is automatically adjusted to the ideal settings for your current screen resolution. 2 Press the Menu button. The OSD opens. 3 Press the / (brightness) or / (contrast) button to highlight a setting, then press the Auto button to open the selected menu or setting.
Using Your Gateway Flat-Panel Monitor OSD menus OSD Menu Description Main menu Auto—Automatically adjusts your monitor to its optimum settings. Picture—Opens the Picture menu, where you can adjust brightness, contrast, gamma, and video scaling. Geometry—Opens the Geometry menu, where you can adjust image size and minimize distortions. Advanced—Opens the Advanced menu, where you can adjust the color balance, change the OSD language, and display information about current monitor settings.
www.gateway.com OSD Menu Description Geometry menu Geometry H-Position V-Position H-Position—Moves the display image left and right. You can also press the Auto button to configure the horizontal position automatically. V-Position—Moves the display image up and down. You can also press the Auto button to configure the vertical position automatically. Clock—Minimizes any vertical bars or stripes visible on the screen background. The horizontal screen size will also change.
Using Your Gateway Flat-Panel Monitor Changing Windows screen settings Adjusting the color depth and screen area are two of the most basic display settings you may need to change. You can also adjust settings such as the screen background and screen saver. Changing color depth and screen resolution Color depth is the number of colors your computer uses to display images on your monitor. Most images look best displayed with the maximum number of colors available.
www.gateway.com Power management Energy declaration When connected to a computer that supports the VESA Display Power Management Signaling (DPMS) Protocol, your monitor can conserve significant energy by reducing power consumption during periods of non-use. When your computer goes into the energy saving mode, your monitor will then enter the Active Off mode (sleep). In the Active Off mode the Power LED will still show orange.
Using Your Gateway Flat-Panel Monitor No picture • Make sure that the power cord is connected correctly to both the back of your monitor and • • • the power outlet. For more information about connecting the power cord, see “Connecting power” on page 4. Make sure that the video cable is connected securely to both the back of your monitor and your computer. For more information about connecting the video cable, see “Connecting video inputs” on page 3. Make sure that your monitor is turned on.
www.gateway.com Color is not uniform • Press the Menu button, then press the Auto button to automatically adjust the display image • to the ideal settings. Make sure that your monitor warms up for at least 30 minutes before making a final judgment about color uniformity or brightness. Image is not sized or centered correctly • Press the Menu button, then press the Auto button to automatically adjust the display image to the ideal settings. • Use the position controls to adjust the image.
Using Your Gateway Flat-Panel Monitor Specifications Specifications are subject to change without notice or obligation. Many products for Gateway and its subsidiaries are custom engineered by our suppliers to Gateway specifications and may vary from similarly marketed products. 14 Panel size 19 inches (diagonal) Panel type 19-inch viewable TFT with glare coating Pixel resolution 1440 × 900 (native) Pixel pitch 0.0112 × 0.0112 inches (0.2835 mm × 0.
www.gateway.com Video modes Mode Mode name and resolution Horizontal frequency (kHz) Vertical frequency (Hz) 1 VGA 640 × 350 31.469 70.087 2 VGA 640 × 480 31.469 59.941 3 VESA 640 × 480 37.861 72.810 4 VESA 640 × 480 37.500 75.000 5 VGA 720 × 400 31.469 70.087 6 VESA 800 × 600 35.156 56.250 7 VESA 800 × 600 37.879 60.317 8 VESA 800 × 600 48.077 72.188 9 VESA 800 × 600 46.875 75.000 10 VESA 1024 × 768 48.363 60.004 11 VESA 1024 × 768 56.476 70.
Using Your Gateway Flat-Panel Monitor 16
Safety, Regulatory, and Legal Information • • • • Important safety information Environmental information Regulatory compliance statements Notices 17
Safety, Regulatory, and Legal Information Important safety information Warning Always follow these instructions to help guard against personal injury and damage to your Gateway product. Warning Do not use Gateway products in areas classified as hazardous locations. Such areas include patient care areas of medical and dental facilities, oxygen-laden environments, or industrial facilities.
www.gateway.com Environmental information EPA ENERGY STAR® As an ENERGY STAR Partner, Gateway has determined that this product meets or exceeds the ENERGY STAR 4.1 performance guidelines for computer energy efficiency and power management. ENERGY STAR Power Management (standard in the Windows operating system) places inactive components (CPU, hard drives, and other components except memory) into a low-power Sleep mode.
Safety, Regulatory, and Legal Information Regulatory compliance statements United States of America Federal Communications Commission (FCC) Unintentional emitter per FCC Part 15 This device has been tested and found to comply with the limits for a Class B digital device, pursuant to Part 15 of the FCC rules. These limits are designed to provide reasonable protection against harmful interference in a residential installation.
www.gateway.com Notices © 2008 Gateway, Inc. All rights reserved. Gateway, Inc. 7565 Irvine Center Drive Irvine, CA 92618 USA All Rights Reserved This publication is protected by copyright and all rights are reserved. No part of it may be reproduced or transmitted by any means or in any form, without prior consent in writing from Gateway. The information in this manual has been carefully checked and is believed to be accurate. However, changes are made periodically.
Safety, Regulatory, and Legal Information 22
MAN HD1900 USR GDE R0 5/08