HX2000 20-inch Widescreen LCD Monitor USERGUIDE ®
Contents Chapter 1: Using Your Gateway Flat-Panel Monitor . . . . . . . . . . . . . . . . . . . 1 Connecting the monitor . . . . . . . . . . . . . . . . . . . . . . . . . . . . . . . . . . . . . . . . . . . . . . . . . . . . 2 Connecting video inputs . . . . . . . . . . . . . . . . . . . . . . . . . . . . . . . . . . . . . . . . . . . . . 2 Connecting audio input . . . . . . . . . . . . . . . . . . . . . . . . . . . . . . . . . . . . . . . . . . . . . . 3 Connecting the power . . . . . . . . . . . . . . . .
Contents ii
CHAPTER1 Using Your Gateway Flat-Panel Monitor • • • • • • • • • • Connecting the monitor Adjusting the angle Starting the monitor Adjusting monitor settings Changing Windows screen settings Power management Maintenace Troubleshooting FAQs Specifications 1
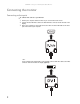
CHAPTER 1: Using Your Gateway Flat-Panel Monitor Connecting the monitor Connecting video inputs To connect video sources to your monitor: 1 Position your computer and the monitor so you can reach the back of each. 2 Connect the blue VGA video cable to the blue VGA video connector under the back of the display. 3 Ensure your computer is turned off. Connect the other end of the VGA cable to the video port on the back of your computer.
www.gateway.com Connecting audio input (option) To connect audio source to your monitor: 1 Position your computer and the monitor so you can reach the back of each. 2 Connect the audio cable to the audio connector under the back of the display. 3 Ensure your computer is turned off. Connect the other end of the audio cable to the audio port on the back of your computer.
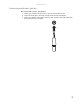
CHAPTER 1: Using Your Gateway Flat-Panel Monitor Connecting the power Connect the power: 1 Position your monitor so you can reach the back, then connect the power cord to the power connector at the back of the monitor. 2 Plug the power cord into a correctly grounded power outlet. We recommend using a surge protector to protect your monitor from voltage spikes. 3 To make sure that the monitor’s power is correctly connected, check the power icon above the power button. The power icon should be orange.
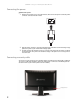
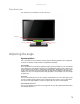
www.gateway.com Basic front view Your monitor has menu buttons to ensure ease of use. Menu buttons Power LED Power button Adjusting the angle Ergonomic guidelines The recommended screen positioning is based upon the following guildelines. These guidelines are based on available scientific literature and published standards.
CHAPTER 1: Using Your Gateway Flat-Panel Monitor Starting the monitor Using the OSD and menu buttons This monitor features an onscreen display (OSD) and menu buttons that let you turn the monitor on and off, and adjust contrast, brightness, and other settings. For more information on menu buttons, see “Using the Menu and quick key buttons” on page 6. Turning on the monitor To start the monitor: Press the power button below the monitor's power icon.
www.gateway.com Using the left/right arrow buttons The Left/Right arrow keys access quick-key functions, and are used to select a setting in menus. • You can press the Left arrow key to change the volume; or the Right key to select a pre-defined Theme setting. • When you're in a menu, press the Left or Right arrow keys to highlight a menu item. Press Auto to return to the previous menu. OSD Menu Description Auto Automatically adjusts your monitor to its optimum settings (VGA input only).
CHAPTER 1: Using Your Gateway Flat-Panel Monitor Changing Windows screen settings Adjusting the color depth and screen area are two of the most basic display settings you may need to change. You can also adjust settings such as the screen background and screen saver. Changing color depth and screen resolution Color depth and screen resolution are two of the most basic monitor settings you may need to change to suit your needs.
www.gateway.com Video modes Your monitor supports several video modes. If you do not use the best mode for the monitor, the display image may look slightly “fuzzy.” Mode Resolution (active dot) Horizontal frequency (kHz) Vertical frequency (Hz) 1 640x480 31.469 59.941 2 640x480 37.861 72.809 3 640x480 37.500 75.000 4 640x480 35 66.66 5 720x400 31.469 70.087 6 800x600 35.156 56.250 7 800x600 37.879 60.317 8 800x600 48.077 72.188 9 800x600 46.875 75.
CHAPTER 1: Using Your Gateway Flat-Panel Monitor Power management Energy declaration ENERGY STAR® Acer’s ENERGY STAR qualified products save you money by reducing energy costs and helps protect the environment without sacrificing features or performance. Acer is proud to offer our customers products with the ENERGY STAR mark. What is ENERGY STAR? Products that are ENERGY STAR qualified use less energy and prevent greenhouse gas emissions by meeting strict energy efficiency guidelines set by the U.S.
www.gateway.com Troubleshooting Important Make sure that the monitor has warmed up for approximately 30 minutes before making any judgments about the picture quality. If you have problems with the monitor, the information in this troubleshooting section may help you solve them. No power Make sure that the power cord is connected correctly to both the back of the monitor and the wall outlet. For more information about connecting the power cord, see “Connecting the monitor” on page 2.
CHAPTER 1: Using Your Gateway Flat-Panel Monitor Picture has shadows or “ghosts” • Press (Auto) to automatically adjust the display image to the ideal settings. • Remove any extension cables or switchboxes. • Make sure that the video cable is connected securely to the back of the monitor and your computer. For more information about connecting the video cable, see “Connecting the monitor” on page 2. Make sure that the video cable is not damaged.
www.gateway.com How To Setup Why does the image looks stretched or fuzzy when I connect the monitor to my computer? You must adjust the operating system’s display settings to match the monitor’s optimal (native) 1600× 900 setting. For information on adjusting settings in Windows Vista, see “Changing color depth and screen resolution” on page 8. I do not see 1600 × 900 available in the Windows display control panel. • Make sure that your video card can display at 1600 × 900 resolution.
CHAPTER 1: Using Your Gateway Flat-Panel Monitor For example, while watching a movie on a HDCP-enabled DVD player, you change the receiving device (DTV, monitor, or projector) input to watch broadcast TV, then change the input back to watch the DVD movie. However, you are unable to watch the movie. This is because when the input was changed, the receiver lost the HDCP signal. Restart the HDCP-enabled DVD player to allow renegotiation.
www.gateway.
CHAPTER 1: Using Your Gateway Flat-Panel Monitor 16
APPENDIXA Safety, Regulatory, and Legal Information • • • • Important safety information Environmental information Regulatory compliance statements Notices 17
APPENDIX A: Safety, Regulatory, and Legal Information Important safety information Warning Always follow these instructions to help guard against personal injury and damage to your Gateway product. Warning Do not use Gateway products in areas classified as hazardous locations. Such areas include patient care areas of medical and dental facilities, oxygen-laden environments, or industrial facilities.
www.gateway.com Environmental information Recycling Mercury Warning Hg Lamp(s) inside this product contain mercury and must be recycled or disposed of according to local, state, or federal laws. The product you have purchased contains extracted natural resources that have been used in the manufacturing process. This product may contain substances known to be hazardous to the environment or to human health.
APPENDIX A: Safety, Regulatory, and Legal Information FCC declaration of conformity Caution Changes or modifications not expressly approved by Gateway could void the FCC compliance and negate your authority to operate the product. California Proposition 65 Warning This product contains chemicals, including lead, known to the State of California to cause cancer, birth defects or reproductive harm. Responsible party: Gateway, Inc.