One PC + OfficeStation solution = 10 happy users.
The following instructions pertain to the risk of fire, electric shock or bodily injury. Please read all of these instructions carefully. 1. Save these instructions for later use. 2. Follow all of the instructions and warnings marked on this product or included in this manual. 3. Do not use this system on an unstable cart, stand or table. The product may fall, causing serious damage to the product. 4. Slots and openings in the cabinet and the back have been provided for ventilation.
Safety Instructions Maintenance If the product does not operate normally, adjust only those controls that are covered in the operating instructions. Improper adjustment of other controls may result in damage and may require extensive repair. Unplug this product from the main power outlet and call for service under any of the following conditions : ● If the power cord or plug is damage or frayed . ● If the product has been exposed to rain, or water, or other liquids.
Trademarks NComputing, NComputing Co., Ltd. the NComputing logo, and other NComputing trademarks are the property of NComputing Co., Ltd. and may be registered in the United States and/or other countries. OfficeStation, EXPANION, WoIP and UTMA are trademarks or registered trademarks of NComputing Co., Ltd. in the United States and/or other countries. Microsoft, Windows, and the Microsoft logo are trademarks or registered trademarks of Microsoft Corporation in the United States and/or other countries.
Notice Notice How to register your S/W Serial Number(s) and S/W Activation Key(s) You will be required to register the S/W Serial Number(s) and S/W Activation Key(s) for your OfficeStation unit(s) either via the Internet or through out offline methods mentioned during setup.
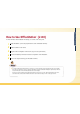
How to Use OfficeStation For more information about installation and settings, see contents of the user’s guide. 1 Install OfficeStation. (Connect the peripheral devices to the OfficeStation terminal) 2 Install the software on the Host PC. 3 Setup the network configuration of the Host PC. (If you are using the Internet) 4 Press the OfficeStation power button and set the configuration of the OfficeStation. 5 Your are now ready to start using your OfficeStation terminal.
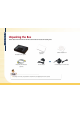
Unpacking the Box Unpacking the Box Unpacking the Box Remove all the items from the box and make sure that the box includes the following items. OfficeStation(L110) System User's Guide (Optional) Software Installation CD or Direct LAN (CAT5 LAN) Cable (Optional) AC Power Adapter ▶ Depending on the model, your OfficeStation’s components may look slightly different as those pictured.
CONTENTS CONTENTS CONTENTS Chapter 1 System Introductions Introductions ₩₩₩₩₩₩₩₩₩₩₩₩₩₩₩₩₩₩₩₩₩₩₩₩₩₩₩₩₩₩₩₩₩₩₩₩₩₩₩₩₩₩₩₩₩₩₩₩₩ 1-2 Overview ₩₩₩₩₩₩₩₩₩₩₩₩₩₩₩₩₩₩₩₩₩₩₩₩₩₩₩₩₩₩₩₩₩₩₩₩₩₩₩₩₩₩₩₩ 1-6 Connecting Peripheral Devices ₩₩₩₩₩₩₩₩₩₩₩₩₩₩₩₩₩₩₩₩₩₩₩₩₩₩₩₩ 1-8 Chapter 2 Software Installation and Operation Installing the Software ₩₩₩₩₩₩₩₩₩₩₩₩₩₩₩₩₩₩₩₩₩₩₩₩₩₩₩₩₩₩₩₩₩₩₩₩₩ 2-2 Setting up Network Configurations₩₩₩₩₩₩₩₩₩₩₩₩₩₩₩₩₩₩₩₩₩ 2-10 Using the Software ₩₩₩₩₩₩₩₩₩₩₩₩₩₩₩₩₩₩₩₩₩₩₩₩₩₩₩₩₩₩₩₩₩₩₩₩₩₩₩₩ 2-22 OfficeStation (L110) Co
Introductions Overview Connecting Peripheral Devices
System Introductions Introductions What is OfficeStation (L110)? 1-2 OfficeStation is an unique networking device using WoIP(Windows over IP) based on networking standards. You can share the resources of the Host PC system by connecting OfficeStation terminal(s) to it, thus giving you the benefit of having several networked PCs. You can connect one or more OfficeStation terminals to one Host PC directly using a LAN adapter and cable or via network using a hub/router. Features ● Convenient Installation.
Host PC Operates as a Host PC or terminal server.
System Introductions 1-4 System Requirements Host PC ● To connect one OfficeStation terminal to a single Host PC, the following system requirement is needed of the Host PC : Intel® Pentium® 4 1.3 GHz processor with at least 256 MB RAM or higher. ● To connect two to three OfficeStation terminal(s) to a single Host PC, the following system requirement is needed of the Host PC : Intel® Pentium® 4 2.4 GHz processor with Hyper - Threading technology with at least 512 MB RAM or higher.
System Introductions 1-5
Front 1-6 System Introductions Overview Power Indicators Lights up when the system is on. LAN Operation Indicator Blinks when OfficeStation communicates with Host PC. Ready Indicator Lights up when OfficeStation configuration is ready communicate with Host PC.
System Introductions Rear 1-7 LAN (RJ45) Port Power Switch To connect OfficeStation to the Host PC, plug the network cable into the Host PC. PS/2 Keyboard Port Connection for a PS/2 keyboard. PS/2 Mouse Port Connection for a PS/2 type mouse. Turns On/Off the system. Power Inlet(DC-IN) Jack Connection for AC power adapter. Speaker/Headphone Jack Connection for speakers or headphone. VGA Monitor Port Connection for an external monitor.
To connect the peripheral devices to OfficeStation, refer to the following.
System Introductions Connecting OfficeStation (L110) with Host PC Direct Connecting Host PC (Optional) User 1-9 Cross Cable Connecting via Network Hub or Router Host PC (optional) Direct LAN Cable Hub or Router(optional) (supports over 100 Mbit switching) Direct LAN Cable User 1 User 2 User 3
Installing the Software Setting up Network Configurations Using the Software OfficeStation (L110) Console Management
Software Installation and Operation Installing the Software Before you install the software, please check the connection of the OfficeStation terminal with the Host PC. Refer to the following steps : 2-2 Installing NCT-2000-XP 1 Turn on the Host PC and insert the Software Installation CD into the 2 The installation program will start automatically. When the installation 3 When starting the installation of our software, the “Preparing to install...” message appears as shown on the left.
If the server has the latest version, You will be asked if you want to install the latest version as shown on the left. Click “Yes” if you want to install, or click “No” if you want to install the version on the CD. The new version will be downloaded as shown on the right when installing. (It is recommended to select “Yes” to install the latest version.
Once the license agreement window appears, check "I agree" and click "Next". If you do not agree with the license agreement, click "Cancel" to finish the process. If you want to print in out, please click the “Print” . 2-4 Software Installation and Operation 7 8 When the NCT-2000-XP-Terms of use window appears, check "I agree" and click "Next". If you do not want to agree to the license, click "Cancel" to finish the process. If you want to print in out, please click the “ Print”.
Select the installation default folder and click "Next". The “Program Files” 11 If the screen same as the one shown on the right appears, select the item is the default installation folder. Software Installation and Operation 10 2-5 that you want to install after confirming the following reference and click the “Next”. ▶ Administrator Password : If you logon by using this password, you can control the Network Administrator Console. You should remember the "Administrator Password".
Software Installation and Operation 2-6 12 Click "Next". 13 After collecting of Help Information, program files will be copied to the hard disk drive.
When the program installation is completed, the message screen for user adding will be appeared.(Refer to the screen) For more details, please refer to "Create a new account" of operating system. When the user adding is completed you will be asked to restart the system(Refer to the below screen). After checking "Yes, I want to restart my computer now" and click "Restart" to reboot your computer.
Software Installation and Operation When NCT-2000-XP remove wizard window appears, click "Next". (If you set the 3 Click “Next”. 4 Instruction message similar to the one shown in the figure appears if a serial number 2-8 2 Administrator Password, type the password and click "Next") is registered. If a serial number is to be unregistered, click “unregister now”. Refer to “NCT-2000-XP Internet Registration” when unregistering.
6 After the programs have been removed from your computer, check “Yes, 2-9 NCT-2000-XP is being deleted. Software Installation and Operation 5 I want to restart my Computer now” and click "Restart" to reboot your computer.
Software Installation and Operation 2-10 Setting up Network Configurations If your computer is using Windows 2000 or XP or 2000 Server or Server 2003 and has a network adapter, you have to configure the network to connect with any OfficeStation terminal(s). To configure your computer's network configurations, please refer to the following : Connecting to the Network by Using a Cable/DSL Router (Support 100 Mbit Switching and DHCP Function) If you use a Cable/DSL router, you can use dynamic IP addresses.
Software Installation and Operation Check "Obtain an IP address automatically" and "Obtain DNS server address automatically," and then click “OK”. 2-11 Turn on the OfficeStation terminal for configuration settings. Click the “Setup”.
Dynamic IP address”. 2-12 Software Installation and Operation Viewing the monitor connected to the OfficeStation terminal, the Setup window will appear. In the “Network” tab, check “Get In the "TS Options" tab, "Autodetect" would be activated as the default setting for automatic connection to the Host PC. If it is not connected properly, or if you want to run the “Fail-over” function, click the “Enable / Disable” after selecting. TS 2(or TS 3) and inputting the IP address.
Click "Start" on the Host PC. Click “Run”. Software Installation and Operation ▶ You have to know the allocated IP address that the Host PC received automatically. You can see the IP address of the Host PC as follows : 2-13 Type “cmd” in the input box. The DOS prompt window will appear.
Software Installation and Operation 2-14 Type "ipconfig" in the DOS command line and press Enter. IP address, Subnet mask, and Gateway that was allocated to the Host PC will be displayed on the screen. Input the displayed IP address into Terminal Server network address. If you finished the setting, click “Save”. Click “Connect”. (or Try Again) Your OfficeStation terminal should be connected to the Host PC. You are now ready to use your OfficeStation terminal.
“Properties”) Click “Internet Protocol (TCP/IP)” and click the “Properties”. 2-15 (In Windows 2000, click “Internet Protocol (TCP/IP)” and Software Installation and Operation Right click on the LAN adapter icon and select “Properties”. (In Windows 2000, right click on the LAN adapter icon and select click the “Properties”) Check “Use the following IP address” and input the address of the IP address, Subnet mask, and Default Gateway, and then click “OK”.
Click the “Setup”. 2-16 Software Installation and Operation Turn on the OfficeStation terminal for configuration. In the “Network” tab, check "Use Static IP address" and input the IP and Gateway address you want to use. In the "TS Options" tab, select "TS 2" and click "Edit" then, input the IP address of the Host PC on the Terminal Server Network address. or If you are finished with the settings, click “Save”. Click “Connect”.
2-17 Host PC has one LAN adapter and no connection to the Internet Click “Start” and click “Control Panel”. (In Windows 2000, click “Start”, click “Settings”, and then click “Control Panel”) Click “Network and Internet Connections”, and then click “Network Connections”. (In Windows 2000, double click “Network and Dial-up Connections”) Right click on the LAN adapter icon and select “Properties”.
Software Installation and Operation 2-18 Click “Internet Protocol (TCP/IP)” and click the “Properties”. Check "Use the following IP address" and input as below and click “OK”. (For example, IP Address is 192.168.0.1 and Subnet mask is 255.255.255.0.
Software Installation and Operation Turn on the OfficeStation terminal for configuation settings. Click the “Setup”. 2-19 In the “Network” tab, check "Use Static IP address" and input IP and Gateway address as below. (For example, IP address is 192.168.0.1 and Subnet mask is 255.255.255.0. According to Host PC's configuration, the IP address should be different) In the “TS Options” tab, input the Terminal Server Network address as below.
Software Installation and Operation 2-20 Host PC has two LAN adapters and one of the LAN adapter connected to the Internet If your Host PC has only one LAN adapter connected to the Internet, you have to install the LAN adapter to connect the OfficeStation terminal to your Host PC. To connect the OfficeStation terminal to your Host PC, refer to “Host PC has one LAN adapter and no connection to the Internet”. The setting of the Internet, contact to your ISP.
Software Installation and Operation 2-21
If you install the software, you can see the group and its program lists. To see the software group and lists, click “Start”, click “All Programs”, click “NCT-2000-XP”. 2-22 Software Installation and Operation Using the Software Running NCT-2000-XP Console Using NCT-2000-XP Console you can control the OfficeStation terminal. To run NCT-2000-XP Console, double click the NCT-2000-XP Console icon on the taskbar.
You can refer to the options and function of each option. If you select the “Software Settings(local)” window, you will be able to see the “NCT-2000-XP Management Console” window. Type the password and click “OK”. (If you select the “Disable password protection”option, during software installation, the “NCT-2000-XP Management Console” window will not appear) Software Installation and Operation Explaining Software Settings(local) Function 2-23 Please store the administrator password for safe keeping.
If you select this item, you can see the lists of the operating programs and information for each connected OfficeStation terminal. 2-24 Software Installation and Operation Station #01 Stop Station This is a shortcut icon to logoff of the connected OfficeStation terminal. Send Message This is an icon to send message from Host PC to OfficeStation terminal or send the message to OfficeStation terminal connected to the Host PC.
Application loaded This shows the running process lists of the connected OfficeStation terminal(s). Software Installation and Operation Viewing the Information of Each Station 2-25 Information Shows the information of the connected OfficeStation terminal(s). Explanation of Information Items ● Station Name : Number of station selected. Number is assigned as it is connected to the Host PC. ● Logon user : Shows name of the user logged on to OfficeStation.
Product Information Shows the product information, manufactured date, manufacturer, copyright, and web site for technical support. 2-26 Software Installation and Operation Information & Settings User License Information Shows the user information.
Shows the general system information. Maximum number of stations : Shows the maximum number of stations that can be connected to a Host PC. Current number of stations : The number of stations which are currently logged on to Software Installation and Operation System Settings the Host PC. This user : Name of the user. System uptime : Runtime of the OfficeStation terminal since the computer was started.
Software Installation and Operation 2-28 Serial Numbers Depending on the product, either user has to input the serial number or the serial number is automatically input (for the product with serial number included) when installing the software. In order to input manually, click right mouse in the right side of the screen. Add Serial Number : You can add the serial number when a window appears. Import Serial Numbers : You can save the text type serial number to a group.
Software Installation and Operation 2-29
You can see the information of the Host PC or OfficeStation terminal that is connected on the network. 2-30 Software Installation and Operation Software Settings (LAN) NCT-2000-XP Internet Registration To register via Internet, follow these steps : ▶ Serial number and activation key for the product purchased should be registered by user using internet or other method. Serial number should be unregistered when changing to new computer, reformatting or changing hard disk.
Click “Start”, click “All Programs”, click “NCT-2000-XP”, and then click 2 Click “Next”. (If you entered an administrator password, please input it) “NCT-2000-XP Internet Registration”. Software Installation and Operation 1 2-31 ▶ If you select the “Disable password protection” option, during software installation, the window requiring the password will not appear.
Software Installation and Operation Input user information correctly and click “Next”. 4 Choose one of the methods to register and click “Next”.
This option can be used to register by connecting directly to the Ncomputing's FTP server when the Host PC with NCT-2000-XP installed is connected to the internet. Program update and technical support can be provided only if serial number and user are registered. Select serial number to be registered and click “Next”. Screen showing user's registration information appears. Click “Back” if information needs to be changed, otherwise click “Next” to continue.
Software Installation and Operation 2-34 ❹ Start registering the serial number if all information is correct. Registration may not be completed if Host PC is turned off or internet is disconnected during registration. ❺ Registration is complete. Click “Finish”. ▶ “On Line – Unregister via Internet” Option Serial number should be unregistered before NCT-2000-XP is deleted when existing Host PC is to be changed or hard disk is to be reformatted after serial number is registered.
Software Installation and Operation Select serial number to be unregistered and click “Next”. 2-35 Screen showing user's registration information appears. Click “Back” if information needs to be changed, otherwise click “Next” to continue. ❹ Start unregistering serial number if all information is correct. Registration may not be completed if Host PC is turned off or internet is disconnected during registration.
Software Installation and Operation 2-36 ❺ The unregistration process is complete. Click “Finish”. ▶ “Off Line – Registration via File/Email” Option This option can be used when the Host PC with NCT-2000-XP installed is not connected to the internet or on-line registration is not available.
❺ If successfully completed as shown in the figure, send the file with registration information to the registration center or agent. Click “Finish”. 2-37 ❹ Select file path and name to be created and click “Next”. Default file path and name are “My Document” and “RGFSerialNumber.txt”, respectively. Software Installation and Operation Screen showing user's registration information appears. Click “Back” if information needs to be changed, otherwise click “Next” to continue.
This option must be used when canceling registration after registered through registration center or agent using file created with “Off Line Registration via File / E-mail Document” option. After creating file needed for canceling registration, send the data file by e-mail from other computer with internet connection or send the diskette or CD to the product supplier or agent so that they can assist you in canceling registration. Select “Off Line - Unregistration via File / E-mail” option and click “Next”.
▶ “Off Line – Cancel Registration” Option This option is used when unregistering using “Off Line - Registration via File / E-mail” option and before receiving registration key from registration center or agent. Note that after completing this option, registration can not be done again using document created with “Off Line - Registration via File / E-mail” option.
Software Installation and Operation 2-40 Select serial number to be canceled and click “Next”. Screen showing user's registration information appears. Click “Back” if information needs to be changed, otherwise click “Next” to continue. The "Cancel Registration" process is complete. Click “Finish”.
Select “Off Line - Key input” option and click “Next”. Software Installation and Operation ▶ “Off Line – Key Input” Option This option is used to register serial number after sending file created using “Off Line - Registration via File / E-mail” option to and receiving text file from the registration center or agent. 2-41 Text file received from the registration center or agent has two sets of six digit numbers, a total of twelve digits in the “Activate Key” section.
Software Installation and Operation 2-42 NCT-2000-XP Internet Update If you finished registering, you can update your NCT-2000-XP via Internet. Update via File With the file that you downloaded via the Internet, (On a diskette, hard disk drive, CD, or USB memory stick) you can update the NCT-2000-XP. (In this case, you have to finish the user registration.
3 To do continuous upgrade, you have to do “Internet Registration”. If you have already registered, update will go on by protection" option, during software installation, the window requiring the password will not appear) click the “Register later”. In the case of not doing “Internet Registration” please do update “Internet Registration” by click the “Register Now”. 4 Click “Connect”. 2-43 When the “Enter Password” window appears, type the password and click “OK”.
Installed version and the version in the FTP can be confirmed. If FTP has newer version, click “Download” to download. 6 After finishing download of update file, program set up will proceed as Section 2-3 of "Software installation and operation".
Software Installation and Operation 2-45
Software Installation and Operation 2-46 OfficeStation (L110) Console Management Thank you for buying the NComputing OfficeStation terminal(s). This User’s guide tells you how to use and configure the OfficeStation terminal(s). This program user's guide follows the basic process that you will use to setup and use the administrator console and improve the security of your shared Host PC environment. ▶ This user’s guide provides instructions of OfficeStation(s) connection function and management.
Connected with Host PC in Local Network. (Green Color Icon) Disconnected with Host PC in Local Network. (Blue Color Icon) Turn Off state but as of old connected with Host PC more than one times. (Red Color Icon) “UTMA/UTSA Device Overview” for remote OfficeStation connection. 2-47 Choose the one “UTMA/UTSA Devices”, and double click OfficeStation Device setup Icon. Software Installation and Operation Click “Hardware settings(LAN/Local)” in the NCT-2000-XP Console menu.
Software Installation and Operation 2-48 Connections Settings : OfficeStation setup → Same item as “TS option” setup and can change the settings for the Host PC to be connected.(Remote OfficeStation connection include auto connection) Network Settings : OfficeStation setup → Same item as “Network” and can change. Setup Password and Language : OfficeStation setup → Same item as “Password” and “Language” and can change the setting values of password and language for OfficeStation.
With the “Auto Connection” function, you can easily connect to a Host PC without using the OfficeStation main setup screen. Software Installation and Operation Auto Connection Function 2-49 Turn On your OfficeStation device. Next, you will automatically go into the Windows Logon dialog box screen without having to press the “Connect” . Fill in the “User name” and “Password”.
Software Installation and Operation 2-50 Introducing the Auto connection setup Setting up your Auto Connection menu from OfficeStation main setup Click “Setup” to setup your connection menu. Click “TS Options”. Select “TS 2” then click “Enable/Disable”. (You must Disable the Autodetection selection) Click “Edit” to select the option menu. Click “Autoconnect Enabled”. Click “OK” to save all settings.
Click “Hardware Settings (LAN/Local)” menu from NCT-2000-XP Console. Select the target OfficeStation devices then double click. Click “Connection Settings” to connection settings. Click “TS 2” connection profile. (You must Disable the Autodetection selection) Click “OK” to save all settings. 2-51 Click “UTMA/UTSA Devices” setup menu.
With the “Auto Logon” function, you can easily connect to a Host PC(s) without fill in the Windows Logon dialog box. 2-52 Software Installation and Operation Auto Logon Function Turn on your OfficeStation device. Automatically go in to the Click “Connect” of main setup Windows main screen due to screen. setting the “User Name” and “Password” already.
Setting up your Auto Logon menu from NCT-2000-XP Console. Click “Hardware Settings(LAN/Local)” menu from NCT-2000-XP Console. Click “UTMA/UTSA Devices” setup menu. Click “Connection Settings” to connection settings. Select connection profile(Autodetection, TS 2, TS 3). Click “Edit” from connection profile. Click “Enable Autologon Mode”. Fill in the “User Name” and “Password”. Click “OK” to save all settings. Click “OK” from “Connection Settings”.
Software Installation and Operation 2-54 USB Device Assignment(s) The USB port in the Host PC can be set to use USB storage devices connected to the Host PC in each OfficeStation. When a USB storage device is connected, the USB storage devices connected to each port is shown on the screen. Change the settings by clicking the applicable port for each USB storage device connected that is to be used in the OfficeStation or applicable Host PC.
“UTMA MAC Address” to share the USB Port Assignment(s). Click “Apply”. Software Installation and Operation Click “Use default prevent setting from system settings” then select 2-55 View Screen and Management Function Through the console you can view the screen of the OfficeStation selected. Users must have Admin authority to activate this function. Introducing the View Screen setup Setting up your View Screen menu from the NCT-2000-XP Console.
Software Installation and Operation 2-56 OfficeStation(s) Management Introducing Management setup Click the right mouse button on the menu bar of selected user form view screen. Click “Controlled By TS Admin” to control OfficeStation screen. (“User Input Allowed” menu is used to allow the OfficeStation user to control the main screen) ▶ Depending on the model, your OfficeStation’s functions may look slightly different than those from this NCT-2000-XP user's guide.
FAQ Glossary FCC Information to Use
FAQ FAQ Network Configuration Setting A-2 Q How do I connect the OfficeStation directly to the Host PC? A Use a crossover adapter to connect the OfficeStation terminal to the Host PC. If you use a crossover cable to connect to the Host PC, you do not need a crossover adapter. You can only directly connect one OfficeStation to a Host PC by using a LAN adapter.
FAQ Q If a router/hub is connected to the Host PC, how do I connect an OfficeStation terminal to the Host PC with a static IP address? A You have to allocate the static IP address of the Host PC and the OfficeStation to OfficeStation terminal(s) through a router/hub.
FAQ Q I am not connected and a screen displays the "DHCP server was not found" message. A ● OfficeStation is set to get the IP address dynamically. If you enter the setup screen of the OfficeStation by pressing “Setup”, you can check in the “Network” tab and make sure that the "Get Dynamic IP Address" option is selected. To use this option the router has to have DHCP server functionality activated.
FAQ 6. Remove the check for the “Remote Desktop” option in the “Advanced” tab of the “Advanced Settings” window. ● If you use a certain firewall program that blocks the outer connection, you can't use your OfficeStation terminal. ● Turn off the OfficeStation terminal and wait several seconds, and then turn it on. ● Check to make sure that any third party Antivirus, Firewall, or security related programs do not interfere with our software. Please disable these programs before the initial setup.
FAQ Q What games can I play? A You can run only 2D games and Internet casual games such as a java and flash type. Refer to the list below for what is not supported through OfficeStation : A-6 ● 3D games that require GPU or hardware accelerator. ● Single user game that requires the program CD. ● Runs at only one registered PC and checks the IP address of the system. Q I can't play the video in full screen mode with the OfficeStation.
FAQ Q I can't connect the OfficeStation to the Host PC anymore. A After you install patch files from Windows update, this can occur. Please uninstall the patch files or download and install the updated OfficeStation software from our FTP site. It might take some time for us to upload the updated software. A Refer to the below items for an increase in the speed: ● Use a CPU which utilizes Hyper-Threading technologies and large L2 Cache memory size. ● Install more RAM.
FAQ Q When “Connect” is clicked in OfficeStation, “TS ERROR - INVALID OR NO SERIAL NUMBER” message appears and no connection is made. A This message appears when there is no serial number in the Host PC that OfficeStation is trying to connect to. To be connected to OfficeStation, serial number should be registered in the NC-2000-XP console of the Host PC. Serial number can be found under the A-8 bottom of OfficeStation purchased.
FAQ Q Connection stops after the message shown in the following figure appears. A MS Windows regularly checks for important updates and install them for you. If automatic update in the “Security Center” of “Control Panel” is selected, update will be automatically downloaded at selected day and time without asking user.
FAQ Q I have changed screen resolution setting in Windows, however, resolution changes after log off and on again. A OfficeStation itself has ability to set screen resolution. In the initial screen of OfficeStation, select “Setup” → “TS Options” → “Edit” and A-10 screen same as the figure shown above appears.
FAQ Q Desktop background selected in Windows disappears whenever OfficeStation is logged on OfficeStation? A User has option to show or not to show the background selected in Windows. After executing NCT-2000-XT, select “Software Setting (local)” → “Information & Settings” → “System Settings” and screen screen, note the item saying “Do not display Desktop Background”. Default setting is “Yes” which means Desktop Background selected in Windows will not be displayed when OfficeStation is logged on.
Glossary Glossary Multi user WoIP(Windows over IP) A-12 New network protocol that enables a PC to operate multi windows simultaneously in virtual memory and the registered multi user can access through TCP/IP by using OfficeStation. This technology does not require a high priced server and supports the multi user access through terminal.
Note This equipment has been tested and found to comply with the limit for a Class B digital device, pursuant 15 of the FCC Rules. These limits are designed to provide reasonable protection against harmful interference in a residential installation. This equipment interference to radio communications. However, there is no guarantee that interference will not occur in a particular installation.
Rev. B Part No. 160-0081 Changing the way of network computing www.ncomputing.com For further product and sales inquiry, please contact us: Headquarter Office 2nd Floor, Daeyoung Bldg, 1423-6, Gwanyang1-Dong, Dongan-Gu, Anyang-City, Gyeonggi-Do, Korea 431-870 TEL : 82-31-422-5157 FAX : 82-31-422-5158 Email : sales@ncomputing.