
Quick Reference Guide


Adding or replacing memory
www.gateway.com
33
4 Disconnect all peripheral devices and remove any PC cards.
5 Turn your notebook over so the bottom is facing up, then remove the
battery. For more information, see “Changing batteries” on page 27.
Tips & Tricks
The keyboard screw hole is marked with
a K. Depending on your model, not all
screws may be captive.
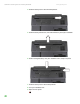
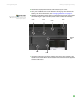
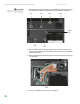
6 Remove the keyboard screw shown in the following picture, then loosen
the remaining six captive screws (these screws cannot be removed).
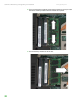
7 Use the thumb notch to lift the memory bay cover, then remove it. Be
careful not to break off the tabs located on the end of the cover opposite
of the thumb notch.
Screw
Screw
Keyboard
screw
Screw
Screw
Screw
Screw