
Quick Reference Guide


CHAPTER 3: Maintaining and Upgrading Your Notebook www.gateway.com
48
22 Lift the black keyboard connector clip and optional EZ Point clip, then
remove the cables. Be careful not to touch or damage any other
components.
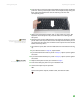
23 Lift the old keyboard away from the notebook. The keyboard is now
completely detached from the notebook.
Installing the keyboard
To install the keyboard:
1 Place the new keyboard keys-down on your notebook with the space bar
away from you.
Important
The keyboard cable is correctly oriented if
the cable is not twisted. The EZ Point
cable is correctly oriented if the blue side
is up.
2 Make sure the black keyboard connector clip and optional EZ Point clip
are fully raised, insert the cables into the connectors, then lower the black
connector clips back to lock the connectors in place.
3 Rotate the keyboard toward the LCD panel until the keyboard is
almost face-up.