8512730.
8512730.
8512730.book Page i Thursday, September 20, 2007 9:38 AM Contents Chapter 1: About This Reference . . . . . . . . . . . 1 About this guide . . . . . . . . . . . . . . . . . . . . . . . . . . . . . . . . . . . . . . . . 2 Accessing your online User Guide . . . . . . . . . . . . . . . . . . . . . . . . 2 Gateway contact information . . . . . . . . . . . . . . . . . . . . . . . . . . . . 3 Microsoft Certificate of Authenticity . . . . . . . . . . . . . . . . . . . . . .
8512730.book Page ii Thursday, September 20, 2007 9:38 AM Contents Playing discs . . . . . . . . . . . . . . . . . . . . . . . . . . . . . . . . . . . . . . Creating discs . . . . . . . . . . . . . . . . . . . . . . . . . . . . . . . . . . . . . Using the memory card reader . . . . . . . . . . . . . . . . . . . . . . . . . Memory card types . . . . . . . . . . . . . . . . . . . . . . . . . . . . . . . . Using a memory card . . . . . . . . . . . . . . . . . . . . . . . . . . . . . .
8512730.book Page iii Thursday, September 20, 2007 9:38 AM www.gateway.com Checking the hard drive for errors . . . . . . . . . . . . . . . . . . . 78 Defragmenting the hard drive . . . . . . . . . . . . . . . . . . . . . . .79 Backing up files . . . . . . . . . . . . . . . . . . . . . . . . . . . . . . . . . . . . 81 Scheduling maintenance tasks . . . . . . . . . . . . . . . . . . . . . . . . . . 82 Using Task Scheduler in Windows Vista . . . . . . . . . . . . . . .
8512730.book Page iv Thursday, September 20, 2007 9:38 AM Contents Sound . . . . . . . . . . . . . . . . . . . . . . . . . . . . . . . . . . . . . . . . . . . Recovering your Windows Vista system . . . . . . . . . . . . . . . . Recovering pre-installed software and drivers . . . . . . . Using Microsoft System Restore . . . . . . . . . . . . . . . . . . . . Recovering your system to its factory condition . . . . . Recovering your system using the Windows DVD . . . . Recovering your Windows XP system . . .
8512730.
512730.book Page 2 Thursday, September 20, 2007 9:38 AM CHAPTER 1: About This Reference About this guide This guide includes information and maintenance instructions that are specific to your model of Gateway computer. Some illustrations in this guide may look different than your computer because hardware options and port locations may vary. For all other computer information, see your online User Guide. For more information For more information about your computer, visit Gateway’s Support page at www.
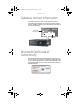
8512730.book Page 3 Thursday, September 20, 2007 9:38 AM www.gateway.com Gateway contact information The label on the top or side of your computer contains information that identifies your computer model and serial number. Gateway Customer Care will need this information if you call for assistance.
8512730.
8512730.
8512730.
8512730.book Page 7 Thursday, September 20, 2007 9:38 AM www.gateway.com Component Icon Description Firewire™ (IEEE 1394) port (optional) Plug a Firewire (also known as IEEE 1394) device (such as a digital camcorder) into this 6-pin port. USB ports Plug USB (Universal Serial Bus) devices (such as a USB external drive, printer, scanner, camera, keyboard, or mouse) into these ports. For more information, see “Installing a printer, scanner, or other device” on page 35.
8512730.
8512730.book Page 9 Thursday, September 20, 2007 9:38 AM www.gateway.com Component Icon Description Power connector Plug the power cord into this connector. Audio in (line in)/side speaker jack (blue) Plug an external audio input source (such as a stereo) into this jack so you can record sound on your computer. For 5.1 surround sound, plug the surround sound side speakers to this jack. Ethernet (network) jack Plug an Ethernet network cable or a device (such as a cable or DSL modem) into this jack.
8512730.book Page 10 Thursday, September 20, 2007 9:38 AM CHAPTER 2: Checking Out Your Computer Component Icon Description PS/2 keyboard port (purple) Plug a PS/2 keyboard into this port. Telephone jack (optional) Plug your telephone into this jack.
8512730.
8512730.book Page 12 Thursday, September 20, 2007 9:38 AM CHAPTER 3: Setting Up and Getting Started Working safely and comfortably Before using your computer, follow these general guidelines for setting up a safe and comfortable work area and avoiding discomfort and strain: • Keep hands and arms parallel to the floor. • Adjust the screen so it is perpendicular to your line of sight, and the top of the screen is no higher than eye level. • Place your feet flat on the floor or on a footrest.
8512730.book Page 13 Thursday, September 20, 2007 9:38 AM www.gateway.com Reducing eye strain Sunlight or bright indoor lighting should not reflect on the monitor screen or shine directly into your eyes. • Position the computer desk and screen so you can avoid glare on your screen and light shining directly into your eyes. Reduce glare by installing shades or curtains on windows and by installing a glare screen filter. • Use soft, indirect lighting in your work area.
8512730.book Page 14 Thursday, September 20, 2007 9:38 AM CHAPTER 3: Setting Up and Getting Started Sitting at your computer • Avoid bending, arching, or angling your wrists. Make sure that they are in a relaxed position when you type. • Do not slouch forward or lean far back. Sit with your back • • straight so your knees, hips, and elbows form right angles when you work. Take breaks to stand and stretch your legs. Avoid twisting your torso or neck.
8512730.book Page 15 Thursday, September 20, 2007 9:38 AM www.gateway.com Preparing power connections Protecting from power source problems Warning High voltages can enter your computer through both the power cord and the modem connection. Protect your computer by using a surge protector. If you have a telephone modem, use a surge protector that has a modem jack. If you have a cable modem, use a surge protector that has an antenna/cable TV jack.
8512730.book Page 16 Thursday, September 20, 2007 9:38 AM CHAPTER 3: Setting Up and Getting Started Connecting a dial-up modem Warning To reduce the risk of fire, use only No. 26 AWG or larger telecommunications line cord. Your computer may have a 56K modem that you can use with a standard telephone line to connect to the Internet or fax documents. To connect the modem: 1 Insert one end of the modem cable into the modem jack at the back of your computer.
8512730.book Page 17 Thursday, September 20, 2007 9:38 AM www.gateway.com 5 To open your computer’s Start menu, click (Start). From that menu, you can run programs and search for files. For more information on using your computer’s menus, see “Using Windows” and “Customizing Windows” in your online User Guide. Waking up your computer Tip For more information about changing the power button mode, see the “Customizing Windows” chapter in your online User Guide.
8512730.book Page 18 Thursday, September 20, 2007 9:38 AM CHAPTER 3: Setting Up and Getting Started To put your computer in Standby (power-saving) mode: 1 In Windows Vista, click (Start), then click (power). The computer saves your session and partially shuts down to save power. - OR In Windows XP, click Start, Shut Down, Stand by, then click OK. 2 To “wake” your computer, press a key on the keyboard. If the computer remains in Standby mode, press the power button.
8512730.book Page 19 Thursday, September 20, 2007 9:38 AM www.gateway.com Restarting (rebooting) your computer If your computer does not respond to keyboard or mouse input, you may need to restart (reboot) your computer. To restart your computer: 1 In Windows Vista, click (Start), click the arrow next to the lock icon, then click Restart. Your computer turns off, then turns on again. - OR In Windows XP, click Start, Shut Down, Restart, then click OK.
8512730.book Page 20 Thursday, September 20, 2007 9:38 AM CHAPTER 3: Setting Up and Getting Started Using the keyboard Premium multimedia keyboard features The keyboard has several different types of keys and buttons. Your keyboard also has status indicators that show which keyboard feature is active.
8512730.book Page 21 Thursday, September 20, 2007 9:38 AM www.gateway.com Feature Icon Description Windows keys Press one of these keys to open the Windows Start menu. These keys can also be used in combination with other keys to open utilities like F (Find/Search), R (Run), and E (Computer/My Computer). Application key Press this key to access shortcut menus and help assistants in Windows. Directional keys Press these keys to move the cursor up, down, right, or left.
8512730.book Page 22 Thursday, September 20, 2007 9:38 AM CHAPTER 3: Setting Up and Getting Started Feature Icon Description Sleep button Press this button to activate your computer’s Sleep (power-saving) mode. Function keys Press these keys to start program actions. Each program uses different function keys for different purposes. See the program documentation to find out more about the function key actions.
8512730.book Page 23 Thursday, September 20, 2007 9:38 AM www.gateway.com Standard keyboard features Function keys Windows keys Navigation keys Application key Indicators Directional keys Numeric keypad Feature Description Function keys Press these keys to start program actions. Each program uses different function keys for different purposes. See the program documentation to find out more about the function key actions.
8512730.book Page 24 Thursday, September 20, 2007 9:38 AM CHAPTER 3: Setting Up and Getting Started Using the mouse Scroll wheel Right button Left button The mouse is a device that controls the pointer movement on the screen. This illustration shows the standard mouse. As you move the mouse, the pointer (arrow) on the screen moves in the same direction. You can use the left and right buttons on the mouse to select objects on the screen.
8512730.book Page 25 Thursday, September 20, 2007 9:38 AM www.gateway.com You can use the scroll wheel on the mouse to move through a document. This feature is not available in all programs. To... Do this... Move the pointer on the screen Move the mouse around. If you reach the edge of your mouse pad and need to move the mouse farther, lift the mouse and place it in the middle of the mouse pad, then continue moving the mouse. Select an object on the screen Position the pointer over the object.
8512730.book Page 26 Thursday, September 20, 2007 9:38 AM CHAPTER 3: Setting Up and Getting Started Using optical drives Features Your optical drive has the following basic components: Disc tray Manual eject hole Activity indicator Eject button Loading an optical disc To insert an optical disc: 1 Press the eject button on the optical disc drive. Important When you place a single-sided disc in the tray, make sure that the label side is facing up or out.
8512730.book Page 27 Thursday, September 20, 2007 9:38 AM www.gateway.com Identifying optical drive types Your computer may contain one of the following drive types. Look on the front of the drive’s disc tray for one or more of the following logos: If your optical drive has this logo... Your drive type is... Use your drive for... CD Installing programs, playing audio CDs, and accessing data. CD-RW Installing programs, playing audio CDs, accessing data, and creating CDs.
8512730.book Page 28 Thursday, September 20, 2007 9:38 AM CHAPTER 3: Setting Up and Getting Started If your optical drive has this logo... Your drive type is... Use your drive for... DVD-RAM/-RW Installing programs, playing audio CDs, playing DVDs, accessing data, and recording video and data to CDs and DVD-RAM, DVD-R, or DVD-RW discs.
8512730.book Page 29 Thursday, September 20, 2007 9:38 AM www.gateway.com Playing a DVD A DVD (Digital Versatile Disc) is similar to a standard CD but has greater data capacity. Because of this increased capacity, full-length movies, several albums of music, or several gigabytes of data can fit on a single disc. DVDs can be played on a DVD player or a DVD drive-equipped computer. For more information about playing DVDs, see your online User Guide.
8512730.book Page 30 Thursday, September 20, 2007 9:38 AM CHAPTER 3: Setting Up and Getting Started Creating discs Recording to optical discs You can use the disc burning program on your computer to copy tracks from a music CD to your hard drive, copy or create data discs, create music CDs, create video DVDs, and more. For more information about creating CDs and DVDs, see your online User Guide. Creating audio and video files You can create audio and music files, either from scratch or from music CDs.
8512730.book Page 31 Thursday, September 20, 2007 9:38 AM www.gateway.com Using a memory card Caution Before inserting a memory card into a slot, make sure that the slot is empty, or you could damage the card reader. To insert a memory card: 1 Insert the memory card into the appropriate memory card slot. 2 To access a file on the memory card, click (Start), then click Computer or My Computer. Double-click the drive (for example, the E: drive), then double-click the file name.
8512730.book Page 32 Thursday, September 20, 2007 9:38 AM CHAPTER 3: Setting Up and Getting Started Using the diskette drive The optional diskette drive uses 3.5-inch diskettes (sometimes called floppy disks). Diskettes are useful for storing files or transferring files to another computer. Drive activity light Diskette slot Eject button To load a diskette: 1 Insert the diskette into the diskette drive with the label facing up or to the right.
8512730.book Page 33 Thursday, September 20, 2007 9:38 AM www.gateway.com Adjusting the volume You can adjust volume using your speakers’ controls, your keyboard controls, or the Windows volume controls. You can also adjust the volume of specific sound devices in your computer. To adjust the overall volume using hardware controls: • If you are using external speakers, turn the knob on the front of the speakers. -ORUse the mute and volume control buttons on the keyboard.
8512730.book Page 34 Thursday, September 20, 2007 9:38 AM CHAPTER 3: Setting Up and Getting Started 4 To adjust device volume levels: In Windows Vista, click Mixer. The Volume Mixer dialog box opens, where you can click and drag sliders to adjust individual devices. - OR In Windows XP, double-click the speaker icon on the taskbar. The Volume Control dialog box opens, where you can click and drag sliders to adjust individual devices.
8512730.book Page 35 Thursday, September 20, 2007 9:38 AM www.gateway.com Installing a printer, scanner, or other device Important Before you install a printer, scanner, or other peripheral device, see the device documentation and installation instructions. Your computer has one or more of the following ports: IEEE 1394 (also known as Firewire®), Universal Serial Bus (USB), serial, and parallel.
8512730.
8512730.
8512730.book Page 38 Thursday, September 20, 2007 9:38 AM CHAPTER 4: Upgrading Your Computer Preventing static electricity discharge Warning To avoid exposure to dangerous electrical voltages and moving parts, turn off your computer and unplug the power cord and modem and network cables before opening the case. To prevent risk of electric shock, do not insert any object into the vent holes of the power supply.
8512730.book Page 39 Thursday, September 20, 2007 9:38 AM www.gateway.com Opening and closing the case Your computer case provides easy access to internal components. Warning To avoid exposure to dangerous electrical voltages and moving parts, turn off your computer, then unplug the power cord and modem cable before opening the case. Important Some details of your computer, such as available ports, may differ from those shown.
8512730.book Page 40 Thursday, September 20, 2007 9:38 AM CHAPTER 4: Upgrading Your Computer Replacing the optical disc drive To replace the optical drive: 1 Remove the side panel by following the instructions in “Opening and closing the case” on page 39. 2 Disconnect the cables from the optical drive. 3 Slide the optical drive lock to the “unlock” position. 4 Slide the optical drive out the front of the computer.
8512730.book Page 41 Thursday, September 20, 2007 9:38 AM www.gateway.com 6 Slide the new drive into the drive bay, then slide the optical drive lock to the “lock” position. 7 Reconnect the drive cables, then replace the side panel by following the instructions in “Opening and closing the case” on page 39. Replacing the diskette drive To replace the optional diskette drive: 1 Remove the side panel by following the instructions in “Opening and closing the case” on page 39.
8512730.book Page 42 Thursday, September 20, 2007 9:38 AM CHAPTER 4: Upgrading Your Computer 3 Slide the optical drive lock to the “unlock” position. 4 Slide the optical drive out the front of the computer. 5 Disconnect the cables from the diskette drive. 6 Slide the 3.5-inch drive lock to the “unlock” position.
8512730.book Page 43 Thursday, September 20, 2007 9:38 AM www.gateway.com 7 Slide the diskette drive out the front of the computer. 8 Slide the new diskette drive into the drive bay, then slide the 3.5-inch drive lock to the “lock” position. 9 Reconnect the diskette drive cables, then slide the optical drive into the drive bay.
8512730.book Page 44 Thursday, September 20, 2007 9:38 AM CHAPTER 4: Upgrading Your Computer 10 Slide the optical drive lock to the “lock” position, then reconnect the optical drive cables. 11 Replace the side panel by following the instructions in “Opening and closing the case” on page 39. Replacing the memory card reader To replace the optional memory card reader: 1 Remove the side panel by following the instructions in “Opening and closing the case” on page 39.
8512730.book Page 45 Thursday, September 20, 2007 9:38 AM www.gateway.com 3 Slide the optical drive lock to the “unlock” position. 4 Slide the optical drive out the front of the computer. 5 Disconnect the cable from the memory card reader. 6 Slide the 3.5-inch drive lock to the “unlock” position. 7 Slide the old card reader out the front of the computer. 8 Slide the new card reader into the 3.5-inch bay.
8512730.book Page 46 Thursday, September 20, 2007 9:38 AM CHAPTER 4: Upgrading Your Computer 9 Slide the 3.5-inch drive lock to the “lock” position. 10 Reconnect the card reader’s cable. 11 Slide the optical drive into the drive bay. 12 Slide the optical drive lock to the “lock” position, then reconnect the optical drive cables. 13 Replace the side panel by following the instructions in “Opening and closing the case” on page 39.
8512730.book Page 47 Thursday, September 20, 2007 9:38 AM www.gateway.com Replacing the hard drive To replace the hard drive: 1 Remove the side panel by following the instructions in “Opening and closing the case” on page 39. 2 Lift the hard drive cage away from the computer. 3 Disconnect the hard drive cables, press the hard drive latch’s release lever, then open the hard drive latch.
8512730.book Page 48 Thursday, September 20, 2007 9:38 AM CHAPTER 4: Upgrading Your Computer 4 Remove the old hard drive from the hard drive cage, then insert the new one. 5 Close the hard drive release latch to secure the hard drive into the hard drive cage. 6 Reconnect the hard drive cables, then insert the hard drive cage into the computer by lining up the slots on the end of the cage with the tabs on the computer.
8512730.book Page 49 Thursday, September 20, 2007 9:38 AM www.gateway.com Installing memory When you upgrade the computer memory, make sure that you install the correct type of memory module for your computer. Your computer uses DIMM memory. To install or replace DIMM memory: 1 Remove the side panel by following the instructions in “Opening and closing the case” on page 39. 2 Remove the drives from the optical and 3.
8512730.book Page 50 Thursday, September 20, 2007 9:38 AM CHAPTER 4: Upgrading Your Computer 4 While holding the release lever, lift the cage up and out of the computer. 5 Lift the hard drive cage away from the computer. You do not need to unplug the hard drive cables.
8512730.book Page 51 Thursday, September 20, 2007 9:38 AM www.gateway.com 6 Remove the four screws that secure the power supply to the computer. Screw Screw Screw Screw 7 Slide the power supply away from the back of the computer, then lift it out of the computer. You do not need to unplug the cables.
8512730.book Page 52 Thursday, September 20, 2007 9:38 AM CHAPTER 4: Upgrading Your Computer 8 Find the memory module banks on your system board. 9 Press the plastic tabs on either side of the memory module bank you are installing the new module into. If a module is already in the slot, remove the module. 10 Align the notches on the new module with the notches on the memory module bank, then press the module firmly into the bank.
8512730.book Page 53 Thursday, September 20, 2007 9:38 AM www.gateway.com 14 Replace the side panel by following the instructions in “Opening and closing the case” on page 39. 15 Reconnect the cables and the power cord. 16 Turn on your computer. Windows starts and the Windows desktop appears. 17 Click (Start), right-click Computer or My Computer, then click Properties. The amount of memory in your computer is displayed.
8512730.book Page 54 Thursday, September 20, 2007 9:38 AM CHAPTER 4: Upgrading Your Computer 4 If you are replacing an expansion card, remove the old card. You can slightly seesaw the card end-to-end to loosen the card, but do not bend the card sideways. Caution Do not touch the contacts on the bottom part of the expansion card. Touching the contacts can cause electrostatic damage to the card. 5 If you are installing a new expansion card, remove the EMI shield from the opening near the expansion slot.
8512730.book Page 55 Thursday, September 20, 2007 9:38 AM www.gateway.com 8 If you have just replaced an expansion card, reconnect the expansion card cables (if any) using your notes from Step 2. If you have added a new expansion card, connect its cables according to its user guide. 9 Replace the side panel by following the instructions in “Opening and closing the case” on page 39. Replacing the heat sink and processor Tools You need a Phillips screwdriver to replace the heat sink.
8512730.book Page 56 Thursday, September 20, 2007 9:38 AM CHAPTER 4: Upgrading Your Computer 4 While holding the release lever, lift the cage up and out of the computer. 5 Unplug the heat sink fan cable from the system board.
8512730.book Page 57 Thursday, September 20, 2007 9:38 AM www.gateway.com 6 Remove the heat sink fan. 7 Lift the hard drive cage away from the computer. You do not need to unplug the hard drive cables.
8512730.book Page 58 Thursday, September 20, 2007 9:38 AM CHAPTER 4: Upgrading Your Computer 8 Loosen the four captive screws that secure the heat sink to the system board (the screws cannot be completely removed), then remove the heat sink and place it on a stable surface with the flat surface of the heat sink (the side with the thermal grease) up. Screw Screw Screw Screw 9 Push the processor release lever down and away from the processor, then lift it completely up.
8512730.book Page 59 Thursday, September 20, 2007 9:38 AM www.gateway.com 10 Lift the processor retention bracket, then remove the processor from the system board. 11 Install the new processor onto the system board. Make sure that Pin 1 on the processor (indicated by the printed triangle on the corner of the processor) aligns with Pin 1 on the processor socket (indicated by a triangle molded into the corner of the processor socket), then return the retention bracket and lever to their locked positions.
8512730.book Page 60 Thursday, September 20, 2007 9:38 AM CHAPTER 4: Upgrading Your Computer Replacing the system battery Warning Danger of explosion if battery is incorrectly replaced. Replace only with the same or equivalent type recommended by the manufacturer. Dispose of used batteries following the manufacturer’s instructions. Caution Any custom BIOS settings you have made will be lost when you remove the system battery. All settings will return to their factory defaults.
8512730.book Page 61 Thursday, September 20, 2007 9:38 AM www.gateway.com 7 Press and hold the cage release lever on the bottom of the drive cage. Drive cage release lever 8 While holding the release lever, lift the cage up and out of the computer.
8512730.book Page 62 Thursday, September 20, 2007 9:38 AM CHAPTER 4: Upgrading Your Computer 9 Locate the old battery on the system board and note its orientation. You will need to install the new battery the same way. Important Your computer’s battery location may vary from the illustration below. Battery release tab Battery 10 Push the battery release tab. The battery pops out of the socket.
8512730.book Page 63 Thursday, September 20, 2007 9:38 AM www.gateway.com Replacing the power supply To replace the power supply: 1 Remove the side panel by following the instructions in “Opening and closing the case” on page 39.
8512730.book Page 64 Thursday, September 20, 2007 9:38 AM CHAPTER 4: Upgrading Your Computer 5 Slide the power supply away from the back of the computer, then remove it. 6 Slide the new power supply into place, then secure it to the computer using the four screws you removed previously. 7 Plug the power supply cables back into the system board, then replace all drive cages and drives and reconnect their cables.
8512730.book Page 65 Thursday, September 20, 2007 9:38 AM www.gateway.com 3 Remove all drives and drive cages by following the instructions in: • • • • 4 “Replacing the optical disc drive” on page 40 “Replacing the diskette drive” on page 41 “Replacing the memory card reader” on page 44 “Replacing the hard drive” on page 47 Remove all memory modules by following the instructions in “Installing memory” on page 49.
8512730.book Page 66 Thursday, September 20, 2007 9:38 AM CHAPTER 4: Upgrading Your Computer 8 Slide the power supply away from the back of the computer, then remove it. 9 Slide the system board tray about one inch (2.5 cm) toward the front of the case, then remove the tray.
8512730.book Page 67 Thursday, September 20, 2007 9:38 AM www.gateway.com 10 Remove the four screws that secure the system board to the tray. Screw Screw Screw Screw 11 Align the new system board on the screw holes in the tray, then secure it into the tray with the four screws. 12 If your replacement system board does not include a processor, install the one you removed previously onto the new system board by following the instructions in “Replacing the heat sink and processor” on page 55.
8512730.
8512730.
8512730.book Page 70 Thursday, September 20, 2007 9:38 AM CHAPTER 5: Maintaining Your Computer Setting up a maintenance schedule Use the following table to set up a regular maintenance schedule.
8512730.book Page 71 Thursday, September 20, 2007 9:38 AM www.gateway.com Caring for your computer To extend the life of your computer: • Be careful not to bump or drop your computer, and do not put any objects on top of it. The case, although strong, is not made to support extra weight. • When transporting your computer, we recommend that you put it in the original packaging materials. • Keep your computer away from magnetic fields. Magnetic fields can erase data on hard drives.
8512730.book Page 72 Thursday, September 20, 2007 9:38 AM CHAPTER 5: Maintaining Your Computer Cleaning your computer Keeping your computer clean and the vents free from dust helps keep your computer performing at its best.
8512730.book Page 73 Thursday, September 20, 2007 9:38 AM www.gateway.com Cleaning the keyboard You should occasionally clean the keyboard to remove dust and lint trapped under the keys. To clean the keyboard: 1 Use an aerosol can of air with a narrow, straw-like extension to remove dust and lint trapped under the keys. 2 If you spill liquid on the keyboard, turn off your computer and turn the keyboard upside down. Let the liquid drain, then let the keyboard dry before trying to use it again.
8512730.book Page 74 Thursday, September 20, 2007 9:38 AM CHAPTER 5: Maintaining Your Computer Cleaning optical discs Optical discs (CDs, DVDs, and Blu-ray Discs) get dirty from frequent handling. To clean an optical disc: • Wipe from the center to the edge, not around in a circle, using a product made especially for the purpose. Updating Windows Windows Update helps you keep your computer up-to-date. Use Windows Update to choose updates for your computer’s operating system, software, and hardware.
8512730.book Page 75 Thursday, September 20, 2007 9:38 AM www.gateway.com Using BigFix Your computer may have BigFix software installed. BigFix monitors your computer for problems and conflicts. It automatically gathers information about the latest bugs, security alerts, and updates from BigFix sites on the Internet. Whenever BigFix detects a problem, it alerts you by flashing the blue taskbar icon. To fix the problem, click on that icon to open BigFix.
8512730.book Page 76 Thursday, September 20, 2007 9:38 AM CHAPTER 5: Maintaining Your Computer Managing hard drive space Windows provides several utilities you can use to check hard drive space, delete unnecessary files, defragment files, and back up files. Checking hard drive space To check hard drive space: Shortcut Start Ö Computer Ö right-click drive Ö Properties 1 Click (Start), then click Computer or My Computer. The Computer or My Computer window opens.
8512730.book Page 77 Thursday, September 20, 2007 9:38 AM www.gateway.com 2 Right-click the drive that you want to check for available file space, then click Properties. Drive space information appears. (Windows Vista version shown) Deleting unnecessary files Delete unnecessary files, such as temporary files and files in the Recycle Bin, to free hard drive space.
8512730.book Page 78 Thursday, September 20, 2007 9:38 AM CHAPTER 5: Maintaining Your Computer 2 Click one of the options (Windows Vista only), then click OK: • My files only cleans only the folders for the currently logged in user. • Files from all users on this computer cleans all folders. 3 In Windows XP, click the drive you want to delete from, click OK, then select the file types to delete.
12730.book Page 79 Thursday, September 20, 2007 9:38 AM www.gateway.com 3 Click Check Now, then click Start. Your drive is checked for errors. This process may take several minutes. Important In Windows Vista, error checking cannot scan a drive while the drive is being used. If you try to check your hard drive for errors, you see a prompt asking you if you want to scan the hard drive later (the next time you restart your computer). If you see this prompt, click Schedule disc check.
8512730.book Page 80 Thursday, September 20, 2007 9:38 AM CHAPTER 5: Maintaining Your Computer To defragment the hard drive: 1 Disconnect your computer from the network. 2 Click (Start), All Programs, Accessories, System Tools, then click Disk Defragmenter. The Disk Defragmenter dialog box opens. (Windows Vista version shown) 3 Click Defragment now or Defragment. This process may take hours to complete, depending on the size of the drive being defragmented.
8512730.book Page 81 Thursday, September 20, 2007 9:38 AM www.gateway.com Backing up files Backing up files and removing them from the hard drive frees space for new files on the hard drive. It also protects you from losing important information if the hard drive fails or you accidentally delete files. You should back up your files regularly to a writable optical disc (if you have a recordable drive). Use a backup device, such as a recordable disc drive, to do a complete hard drive backup.
8512730.book Page 82 Thursday, September 20, 2007 9:38 AM CHAPTER 5: Maintaining Your Computer Scheduling maintenance tasks Using Task Scheduler in Windows Vista Task Scheduler lets you schedule maintenance tasks such as running Disk Defragmenter and checking your drives for errors. Important Your computer must be on during scheduled tasks. If your computer is off, scheduled tasks will not run. To start the Task Scheduler: (Start), All Programs, Accessories, System Tools, then click Task Scheduler.
8512730.book Page 83 Thursday, September 20, 2007 9:38 AM www.gateway.com Using the Scheduled Task Wizard in Windows XP The Scheduled Task Wizard lets you schedule maintenance tasks such as running Disk Defragmenter and Error-checking. To start the Scheduled Task Wizard: 1 Click Start, All Programs, Accessories, System Tools, then click Scheduled Tasks. The Scheduled Tasks window opens. 2 Double-click the Add Scheduled Task icon. The Scheduled Task Wizard opens.
8512730.book Page 84 Thursday, September 20, 2007 9:38 AM CHAPTER 5: Maintaining Your Computer Moving from your old computer Transferring files and settings automatically You can move your files, folders, software settings, and user account settings (such as display, Internet, and e-mail settings) from your old computer to your new one using Windows Easy Transfer (Windows Vista) or the Files and Settings Transfer Wizard (Windows XP).
8512730.book Page 85 Thursday, September 20, 2007 9:38 AM www.gateway.com To move files and settings from your old computer using Windows XP: 1 Click Start, All Programs, Accessories, System Tools, then click Files and Settings Transfer Wizard. 2 Follow the on-screen instructions to complete the transfer.
8512730.book Page 86 Thursday, September 20, 2007 9:38 AM CHAPTER 5: Maintaining Your Computer Finding other files Use Windows Find or Search to locate other personal data files. For more information, see “Using Windows” in your online User Guide. You can often identify different data file types by looking at the file’s extension (the part of the file name following the last period). For example, a document file might have a .DOC extension and a spreadsheet file might have an .XLS extension.
8512730.
8512730.book Page 88 Thursday, September 20, 2007 9:38 AM CHAPTER 6: Troubleshooting Safety guidelines While troubleshooting your computer, follow these safety guidelines: Warning Never open your computer case while your computer is turned on and while the modem cable, network cable, and power cord are connected. Warning Make sure that you are correctly grounded before accessing internal components.
8512730.book Page 89 Thursday, September 20, 2007 9:38 AM www.gateway.com Troubleshooting Troubleshooting topics are listed in alphabetical order. Add-in cards See “Expansion cards” on page 94. Audio See “Sound” on page 108. CD or DVD drives The computer does not recognize a disc or the CD or DVD drive • Make sure that the disc label is facing up or out, then try again. • Try a different disc. Occasionally, discs are flawed or become scratched and cannot be read by the CD or DVD drive.
8512730.book Page 90 Thursday, September 20, 2007 9:38 AM CHAPTER 6: Troubleshooting An audio CD does not produce sound • Make sure that the disc label is facing up or out, then try again. • Some music CDs have copy protection software. You may not be able to play these CDs on your computer. • Make sure that the volume controls are turned up. For more information, see “Adjusting the volume” on page 33. • Make sure that the mute controls are turned off.
8512730.book Page 91 Thursday, September 20, 2007 9:38 AM www.gateway.com Diskette drive The diskette drive is not recognized • Shut down and restart your computer. You cannot save a file to diskette or you see the message “disk is full or write-protected” • Make sure that the write-protection tab on the upper-right corner of the diskette is down (unprotected). • The diskette may be full. Delete unnecessary files on the diskette and try again. • Make sure that the diskette you are using is IBM-compatible.
8512730.book Page 92 Thursday, September 20, 2007 9:38 AM CHAPTER 6: Troubleshooting The diskette drive LED is lit continuously • Remove the diskette from the drive. If the light stays on, try restarting your computer. Display The screen resolution is not correct • Change the screen resolution from the Display Settings dialog box. For more information, see the “Customizing Windows” chapter in your online User Guide.
8512730.book Page 93 Thursday, September 20, 2007 9:38 AM www.gateway.com Ethernet You cannot see the other computers on your network • Make sure that your Ethernet cable is plugged into the Ethernet jack on your computer. Make sure that the other end is plugged into a network router, switch, hub, or other network device. • Make sure that all computers are plugged into a powered electrical outlet and turned on.
8512730.book Page 94 Thursday, September 20, 2007 9:38 AM CHAPTER 6: Troubleshooting Your Ethernet network is running slower than you expect • If your Ethernet network is running slower than you expect, check the speed of each Ethernet component. For best results, all Ethernet components should be standard Ethernet (10 Mbps), Fast Ethernet (100 Mbps or 10/100 Mbps), or Gigabit Ethernet (1000 Mbps or 10/100/1000 Mbps).
8512730.book Page 95 Thursday, September 20, 2007 9:38 AM www.gateway.com Floppy drive See “Diskette drive” on page 91. Hard drive You see an “Insufficient disk space” error message • Delete unnecessary files from the hard drive using Disk Cleanup. For instructions on deleting unnecessary files, see “Deleting unnecessary files” on page 77. Help For more information about file management, click Start, then click Help and Support. Type the phrase file management in the Search Help box, then press ENTER.
8512730.book Page 96 Thursday, September 20, 2007 9:38 AM CHAPTER 6: Troubleshooting You see a “Non-system disk” or “disk error” error message • Eject the diskette from the diskette drive, then press ENTER. Internet See also “Modem (dial-up)” on page 99. You cannot connect to the Internet • If you are using a dial-up modem, make sure that the modem cable is plugged into the modem jack and not the Ethernet network jack. See your setup poster to make sure that the connections have been made correctly.
8512730.book Page 97 Thursday, September 20, 2007 9:38 AM www.gateway.
8512730.book Page 98 Thursday, September 20, 2007 9:38 AM CHAPTER 6: Troubleshooting Liquid spilled in the keyboard • If you spilled liquid in the keyboard, turn off your computer and unplug the keyboard. Clean the keyboard and turn it upside down to drain it. Let the keyboard dry before using it again. If the keyboard does not work after it dries, you may need to replace it. Memory Help For more information about troubleshooting memory errors, click Start, then click Help and Support.
8512730.book Page 99 Thursday, September 20, 2007 9:38 AM www.gateway.com Modem (cable or DSL) My computer cannot connect to the Internet. • Make sure that your modem is connected to the network jack. Tip For the location of your network jack, see your setup poster or “Back” on page 8. • See the documentation that came with your modem for additional troubleshooting information. Modem (dial-up) See also “Internet” on page 96.
8512730.book Page 100 Thursday, September 20, 2007 9:38 AM CHAPTER 6: Troubleshooting 4 Click the Dialing Rules tab, click the location from which you are dialing, then click Edit. 5 Make sure that all settings are correct. Help For more information about dialing properties, click Start, then click Help and Support. Type the keyword dialing in the Search Help box, then press ENTER. To check the dialing properties in Windows XP: 1 Click Start, then click Control Panel. The Control Panel window opens.
8512730.book Page 101 Thursday, September 20, 2007 9:38 AM www.gateway.com • Try another telephone line (either a different telephone • number in your house or a telephone line at a different location). If you can connect on this line, call your telephone service. Try connecting with the modem at a lower connection speed. If reducing the connect speed lets you connect, call your telephone service. The telephone line may be too noisy.
8512730.book Page 102 Thursday, September 20, 2007 9:38 AM CHAPTER 6: Troubleshooting The modem is not recognized by your computer • Make sure that the line connected to the modem is working and plugged into the appropriate port on your computer. To make sure that the connections have been made correctly, see your setup poster or “Connecting a dial-up modem” on page 16.
8512730.book Page 103 Thursday, September 20, 2007 9:38 AM www.gateway.com To run modem diagnostics in Windows XP: 1 Close all open programs. 2 Click Start, then click Control Panel. The Control Panel window opens. If your Control Panel is in Category View, click Printers and Other Hardware. 3 Click/Double-click the Phone and Modem Options icon, then click the Modems tab. 4 Click your modem, then click Properties. The Modem Properties dialog box opens.
8512730.book Page 104 Thursday, September 20, 2007 9:38 AM CHAPTER 6: Troubleshooting To turn down the modem volume in Windows XP: 1 Click Start, then click Control Panel. The Control Panel window opens. If your Control Panel is in Category View, click Printers and Other Hardware. 2 Click/Double-click the Phone and Modem Options icon, then click the Modems tab. 3 Click the modem you want to adjust, then click Properties. 4 Click the Modem tab, then adjust the Speaker volume control.
8512730.book Page 105 Thursday, September 20, 2007 9:38 AM www.gateway.com Networks You cannot connect to your company network Every network is unique. Contact your company computer department or network administrator for help. For more information about setting up a network in your home, see “Connecting to a broadband modem or network” on page 15, your online User Guide, or “Ethernet” on page 93. Help For more information about network troubleshooting, click Start, then click Help and Support.
8512730.book Page 106 Thursday, September 20, 2007 9:38 AM CHAPTER 6: Troubleshooting The printer is on but will not print • Check the cable between the printer and your computer. Make sure that it is connected to the correct type of port. • Make sure that the printer is online. Many printers have an online/offline button that you may need to press so the printer can start printing. Press the button to put the printer online. • Check the cable for bent or broken pins.
8512730.book Page 107 Thursday, September 20, 2007 9:38 AM www.gateway.com 3 Right-click the printer you want to use. If the menu shows a check mark next to Use Printer Offline, click Use Printer Offline to clear the check mark. To make sure that the printer is not set to work offline in Windows XP: 1 Click Start, then click Control Panel. The Control Panel window opens. If your Control Panel is in Category View, click Printers and Other Hardware. 2 Click/Double-click the Printers and Faxes icon.
8512730.book Page 108 Thursday, September 20, 2007 9:38 AM CHAPTER 6: Troubleshooting Sound You are not getting sound from the speakers • Make sure that the volume controls are turned up. For more information, see “Adjusting the volume” on page 33. • Make sure that mute controls are turned off. For more information, see “Adjusting the volume” on page 33. • If you are using external speakers: • Make sure that the speakers are turned on. • See the speaker setup poster to check your speaker connections.
8512730.book Page 109 Thursday, September 20, 2007 9:38 AM www.gateway.com Recovering your Windows Vista system You can solve most computer problems by following the information in “Troubleshooting” on page 89 or in the technical support pages at www.gateway.com. Problem solving may also involve re-installing some or all of the computer’s software (also called recovering or restoring your system). Gateway provides everything you need to recover your system under most conditions.
8512730.book Page 110 Thursday, September 20, 2007 9:38 AM CHAPTER 6: Troubleshooting Recovering pre-installed software and drivers You can perform a partial recovery by recovering the software and device drivers that were pre-installed at the factory. If you need to recover software that did not come pre-installed on your system, you need to follow that software’s installation instructions.
8512730.book Page 111 Thursday, September 20, 2007 9:38 AM www.gateway.com 2 Click Applications and drivers external media, then click Next. The What would you like to do? dialog box opens. 3 Click Create system recovery discs, then click Next. 4 Insert a blank, recordable disc into a recordable disc drive, then click Next. If an AutoPlay dialog box opens, click the x in the upper-right corner to close it.
8512730.book Page 112 Thursday, September 20, 2007 9:38 AM CHAPTER 6: Troubleshooting 9 Remove your final disc, then label all of the discs and store them in a safe place. Recovering pre-installed software and drivers using Gateway Recovery Center To recover specific drivers and software: (Start), All Programs, Gateway Recovery Center, then click Gateway Recovery Center. The Gateway Recovery Center opens.
8512730.book Page 113 Thursday, September 20, 2007 9:38 AM www.gateway.com 2 To recover software that was pre-installed, click Programs, then click Application recovery. - OR To recover device drivers that were pre-installed, click Hardware, then click Device driver recovery. 3 Click the software or driver you want to recover, then click Next.
8512730.book Page 114 Thursday, September 20, 2007 9:38 AM CHAPTER 6: Troubleshooting Recovering pre-installed software and drivers using recovery discs If you created a multiple-disc set of recovery discs, each disc contains a unique set of software and drivers. If a recovery disc does not offer the software or driver you need to recover, try another disc. To recover software and drivers using recovery discs: 1 Insert a software and driver recovery disc into a CD or DVD drive.
8512730.book Page 115 Thursday, September 20, 2007 9:38 AM www.gateway.com 2 To recover pre-installed software, click Application recovery, then click the software you want to recover. - OR To recover pre-installed device drivers, click Device driver recovery, then click the type of driver you want to recover. 3 Click Next. 4 If the software or driver is not shown on the list, and you have a multiple-disc set of recovery discs, close Gateway Recovery Center and try another disc.
8512730.book Page 116 Thursday, September 20, 2007 9:38 AM CHAPTER 6: Troubleshooting Using Microsoft System Restore Microsoft System Restore periodically takes “snapshots” of your system settings and saves them as restore points. In most cases of hard-to-resolve software problems, you can return to one of these restore points to get your system running again. Windows automatically creates an additional restore point each day, and also each time you install software or device drivers.
8512730.book Page 117 Thursday, September 20, 2007 9:38 AM www.gateway.com 2 On the left side of the window, click Repair Windows using System Restore, then click Next. The Choose a restore point dialog box opens. 3 Click the restore point you want, click Next, then click Finish. A confirmation message box appears. 4 Click Yes. Your system is restored using the restore point you specified. This process may take several minutes, and may restart your computer.
8512730.book Page 118 Thursday, September 20, 2007 9:38 AM CHAPTER 6: Troubleshooting Manually creating a restore point To manually create a restore point: (Start), Control Panel, System and Maintenance, then click Backup and Restore Center. The Backup and Restore Center opens. 1 Click 2 On the left side of the window, click Create a restore point or change settings, then click Next. The System Properties dialog box opens to the System Protection tab. 3 Click Create.
8512730.book Page 119 Thursday, September 20, 2007 9:38 AM www.gateway.com Recovering your system to its factory condition If your computer’s problems are not solved by any of the other recovery options, you may need to recover its hard drive to its factory condition. This process is called a factory recovery. Caution A complete factory recovery deletes everything on your hard drive, then reinstalls Windows and any pre-installed software and device drivers.
8512730.book Page 120 Thursday, September 20, 2007 9:38 AM CHAPTER 6: Troubleshooting 8 To perform a recovery with data backup (recommended), click Recovery with automatic data backup, then click Next. Important Before your hard drive is recovered, your personal files will be automatically backed up to c:\backup. - OR To perform a full factory recovery without data backup, click Full factory recovery, then click Next.
8512730.book Page 121 Thursday, September 20, 2007 9:38 AM www.gateway.com 3 When the prompt “Press any key to boot from CD or DVD” appears, press any key on your keyboard. A list of valid boot devices appears. 4 Press the arrow keys to select the drive containing the Windows DVD, then press ENTER and follow the on-screen instructions. 5 After Windows is completely re-installed, use the software and driver recovery discs you created to recover your computer’s pre-installed software and device drivers.
8512730.book Page 122 Thursday, September 20, 2007 9:38 AM CHAPTER 6: Troubleshooting If you are still experiencing problems, you may need to reinstall specific software, such as a device driver. • “Recovering pre-installed software and drivers” on page 110 describes how to install specific, factory-installed software and device drivers. Finally, in order to recover your system you may need to reinstall everything, including the operating system, so your computer has its original factory settings.
8512730.book Page 123 Thursday, September 20, 2007 9:38 AM www.gateway.com To restore your system from the driver and application recovery discs: 1 Click Start, All Programs, System Recovery, then click Application & Driver Recovery. - OR Turn on your computer, then insert the driver and application recovery disc #1 (if available) into the CD or DVD drive. The Application Recovery program opens. 2 Click the driver or application you want to install.
8512730.book Page 124 Thursday, September 20, 2007 9:38 AM CHAPTER 6: Troubleshooting Recovering your system using Microsoft System Restore Before using Gateway System Recovery, you should try Microsoft System Restore to determine whether you can restore your system to a previous condition. Every time you install new device drivers or software, and every 24 hours (while your computer is turned on), Microsoft System Restore takes a “snapshot” of your system settings and saves it as a restore point.
8512730.book Page 125 Thursday, September 20, 2007 9:38 AM www.gateway.com 2 Click Undo changes to your computer with System Restore. The Welcome to System Restore dialog box opens. 3 Click Restore my computer to an earlier time, then click Next. The Select a Restore Point dialog box opens. 4 Click a bold date on the calendar (Step 1 on the screen), then click a restore point in the list (Step 2 on the screen).
8512730.book Page 126 Thursday, September 20, 2007 9:38 AM CHAPTER 6: Troubleshooting 5 Click Next. The Confirm Restore Point Selection dialog box opens. 6 Make sure that you want to use the restore point you selected, and read all notices on the screen. 7 Click Next, then follow the on-screen instructions to finish the restoration. If completing Microsoft System Restore does not solve your problem, restart Gateway System Recovery.
8512730.book Page 127 Thursday, September 20, 2007 9:38 AM www.gateway.com Recovering your system from the hard drive Caution Because of virus and spyware activity on the Internet, you should disconnect all Internet connections before recovering your system. After you recover your system, you can reinstall antivirus and firewall software, then re-enable the Internet connection to update antivirus definitions and install Windows Updates.
8512730.book Page 128 Thursday, September 20, 2007 9:38 AM CHAPTER 6: Troubleshooting 4 Click a system recovery option: Caution The Full System Restore option deletes all files on your hard drive except the restore files. Make sure that you back up all personal data files before continuing this process. • Full System Restore (Destructive) reformats the • hard drive and restores the system software as it was when you purchased your computer. This process deletes your data files.
8512730.book Page 129 Thursday, September 20, 2007 9:38 AM www.gateway.com Telephone support Before calling Gateway Customer Care If you have a technical problem with your computer, follow these recommendations before contacting Gateway Customer Care: • Make sure that your computer is connected correctly to a grounded AC outlet that is supplying power. If you use a surge protector, make sure that it is turned on.
8512730.book Page 130 Thursday, September 20, 2007 9:38 AM CHAPTER 6: Troubleshooting Telephone numbers Gateway offers a wide range of customer service, Customer Care, and information services. To access Customer Care services, contact Gateway at the telephone number or Web address listed on your computer’s Customer Care label.
8512730.book Page 131 Thursday, September 20, 2007 9:38 AM www.gateway.com Training Gateway provides the following computer-based training: Resource Service description For more information Gateway Learning Libraries A variety of courses and tutorials are available on CD. Select from several easy-to-use learning libraries. www.gateway.com/training Online Training from Learn With Gateway More than 450 online courses are available from Learn With Gateway. All you have to do is go online and log in.
8512730.
8512730.
8512730.book Page 134 Thursday, September 20, 2007 9:38 AM APPENDIX A: Legal Notices Important safety information Warning Always follow these instructions to help guard against personal injury and damage to your Gateway system. Your Gateway system is designed and tested to meet the latest standards for safety of information technology equipment. However, to ensure safe use of this product, it is important that the safety instructions marked on the product and in the documentation are followed.
8512730.book Page 135 Thursday, September 20, 2007 9:38 AM www.gateway.com • • • • • • • • • • Do not walk on the power cord or allow anything to rest on it. Do not spill anything on the system. The best way to avoid spills is to avoid eating and drinking near your system. Some products have a replaceable CMOS battery on the system board. There is a danger of explosion if the CMOS battery is replaced incorrectly. Replace the battery with the same or equivalent type recommended by the manufacturer.
8512730.book Page 136 Thursday, September 20, 2007 9:38 AM APPENDIX A: Legal Notices FCC declaration of conformity Responsible party: Gateway, Inc. 7565 Irvine Center Drive Irvine, CA 92618 Phone: 800-846-2000 Caution Changes or modifications not expressly approved by Gateway could void the FCC compliance and negate your authority to operate the product. This device complies with Part 15 of the FCC Rules.
8512730.book Page 137 Thursday, September 20, 2007 9:38 AM www.gateway.com Canada Industry Canada (IC) Unintentional emitter per ICES-003 This digital apparatus does not exceed the Class B limits for radio noise emissions from digital apparatus as set out in the radio interference regulations of Industry Canada.
8512730.book Page 138 Thursday, September 20, 2007 9:38 AM APPENDIX A: Legal Notices Television antenna connectors protection (for systems fitted with TV/cable TV tuner cards) External television antenna grounding Important The instructions are for the person who installs cable to the system. Gateway assumes you are qualified in the servicing of computer equipment and trained in recognizing hazards in products with electric shock.
8512730.book Page 139 Thursday, September 20, 2007 9:38 AM www.gateway.com Power lines Warning When installing or realigning an outside antenna system, extreme care should be taken to keep from touching such power lines or circuits. Contact with them could be fatal. Do not locate the antenna near overhead light or power circuits, or where it could fall into such power lines or circuits.
8512730.book Page 140 Thursday, September 20, 2007 9:38 AM APPENDIX A: Legal Notices Environmental information The product you have purchased contains extracted natural resources that have been used in the manufacturing process. This product may contain substances known to be hazardous to the environment or to human health.
8512730.book Page 141 Thursday, September 20, 2007 9:38 AM www.gateway.com Trademark acknowledgments Gateway and the Black-and-White Spot Design are trademarks or registered trademarks of Gateway, Inc. in the U.S. and other countries. Intel, Intel Inside logo, and Pentium are registered trademarks and MMX is a trademark of Intel Corporation. Microsoft, MS, MS-DOS, and Windows are trademarks or registered trademarks of Microsoft Corporation.
8512730.
8512730.
8512730.
8512730.book Page 145 Thursday, September 20, 2007 9:38 AM www.gateway.
8512730.
8512730.book Page 147 Thursday, September 20, 2007 9:38 AM www.gateway.
8512730.
8512730.book Page 149 Thursday, September 20, 2007 9:38 AM www.gateway.
8512730.
8512730.book Page 151 Thursday, September 20, 2007 9:38 AM www.gateway.
8512730.
8512730.
8512730.