
User's Manual


www.gateway.com
41
7 Lift the processor (3) out of the socket and place it in a static-free bag or case for storage.
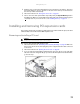
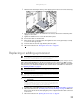
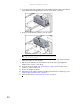
8 Insert the new processor into the socket, making sure that the gold triangle on the corner
is situated as shown in the following illustration.
9 When the processor is oriented correctly and in place, press it firmly into the socket, rotate
the load plate into place, and push down the load lever until it clicks into place.
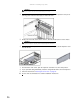
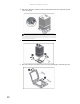
10 Place the heatsink on the installed processor, aligning it so that it fits squarely in the
heatsink socket.
11 Push down the heatsink retaining levers and lock them under the retaining hooks on the
heatsink socket.
12 Follow the instructions in “Closing the server case” on page 26.
Caution
The processor only fits the socket when oriented as indicated. Do not force
the processor into the socket to avoid bending the pins or damaging the processor.
If the processor does not fit completely, check its orientation and check for bent
pins.
Caution
The heatsink has Thermal Interface Material (TIM) located on the bottom of
it. Use caution when you unpack the heatsink so you do not damage the TIM. If
you are reusing the original heatsink, make sure that the TIM on the bottom of
the heatsink is not damaged. If the TIM is damaged, you should apply new TIM
to the bottom of the heatsink.