your Gateway Windows network installationguide 802.
Contents 1 Introduction . . . . . . . . . . . . . . . . . . . . . . . . . . . . . . . . . . . . . . . . . . . . . . . . . . . . . . 1 Features . . . . . . . . . . . . . . . . . . . . . . . . . . . . . . . . . . . . . . . . . . . . . . . . . . . . . . . . . . . Important safeguards . . . . . . . . . . . . . . . . . . . . . . . . . . . . . . . . . . . . . . . . . . . . . . . . . Precautions . . . . . . . . . . . . . . . . . . . . . . . . . . . . . . . . . . . . . . . . . . . . . . . . . . . . .
Establishing a router security scheme . . . . . . . . . . . . . . . . . . . . . . . . . . . . . . . .51 Change log settings . . . . . . . . . . . . . . . . . . . . . . . . . . . . . . . . . . . . . . . . . . . . . .52 Set the MAC address . . . . . . . . . . . . . . . . . . . . . . . . . . . . . . . . . . . . . . . . . . . . .54 Configure routing . . . . . . . . . . . . . . . . . . . . . . . . . . . . . . . . . . . . . . . . . . . . . . . .55 5 Troubleshooting . . . . . . . . . . . . . . . . . . . . . . . .
Introduction 1 This chapter introduces the Gateway Wireless 802.11b access point router.
Chapter 1: Introduction Features Your Gateway Wireless Router features: 2 ■ Compact, modern design ■ High speed (11 Mbps in the 2.4 GHz band - 802.11b) ■ Remote administration and firmware upgrades through the Internet ■ DHCP service to your network ■ Sophisticated security features, including up to 128-Bit WEP encryption, Web and port filtering, WAN request blocking and DMZ hosting ■ Virtual Private Networking (VPN) over the Internet (with IPSec, L2TP, and PPTP pass-through) www.gateway.
Important safeguards Important safeguards Warning Do not attempt to remove the cover. There are no user-serviceable parts inside. Removing the cover voids the warranty. Have your wireless router repaired by qualified service personnel only. Precautions ■ Do not place your wireless router in direct sunlight or near a heat source, as this may damage the housing or electronic components of the device. ■ Do not open or try to repair the device yourself.
Chapter 1: Introduction Package contents Along with your wireless router, the package also contains the following items: AC Adapter Ethernet cable User’s guide 4 www.gateway.
Parts and accessories Parts and accessories The following additional parts and accessories may be helpful in setting up your wireless network: ■ Wireless Network Controller cards (for computers or notebooks) ■ RJ-45 (Cat-5) network cables (various lengths) Contact Gateway for information on ordering these and other accessories. www.gateway.
Chapter 1: Introduction Front LED Description Power Off - The router is turned off On (green) - Power on Flashing (green) - After a firmware upgrade 6 Wireless On (green) - The wireless mode is on WAN Flashing (green) - Activity on the WAN connection www.gateway.
Front LED Description LAN 4 - 1 Off - The connection does not have an Ethernet link On (green) - Ethernet link detected on indicated connection Flashing (green) - Data traffic on indicated connection www.gateway.
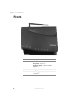
Chapter 1: Introduction Back Antenna Power connection WAN Port LAN Ports 8 Reset switch Connector/control Description Power connection Plug the AC adapter into this connection and plug the power cord into the AC adapter. Use only the AC adapter and power cord that came with the wireless router. Use of any other AC adapter or power cord may damage your router and void the warranty. Reset switch Press the reset button to return all configuration settings to the default settings.
Initial setup 2 Read this chapter to learn how to: ■ Make connections ■ Configure the computers ■ Contact and configure the router 9
Chapter 2: Initial setup Making connections Preparation If you intend to use the router to connect your network to the Internet, you need a broadband Internet connection (DSL or cable). You also need the following information and equipment: ■ A host computer (initially connected to router to enter configuration information) that has a network interface card.
Making connections Warning 4 Use only the AC adapter and power cord provided with the router. Use of any other adapter or power cord your router and void your warranty Plug the AC adapter into the power cord, then plug the power cord into an electrical outlet. Connect the other end of the adapter to the power connector on the back of the router. (see the illustration on “Back” on page 8) ■ The green Power LED turns on ■ The green Wireless LED turns on 5 Turn on the DSL or cable modem.
Chapter 2: Initial setup Configuring the computers Now that you have the hardware connected, you need to configure the computers you want to include in your network to let them obtain an IP address automatically. An IP address lets the computers communicate with and operate on your new network. Use the configuration procedure specific to your computer’s operating system: To configure computers using Windows XP: 1 Click Start, then click Control Panel. The Control Panel window opens.
Configuring the computers 3 Double-click the Local Area Connection icon for your network interface card. If you see more than one icon, select the one that connects to your local network. The Local Area Connection Status dialog box opens. Click Properties. 4 In the Components checked are used by this connection list, click Internet Protocol (TCP/IP), then click Properties. 5 Check Obtain an IP address automatically, and make sure that Obtain DNS server address automatically is selected.
Chapter 2: Initial setup Contacting and configuring the router Now that all the hardware connections have been made, you must configure the router must to operate on your network and to connect to the Internet through an ISP. Initial configurations vary somewhat, depending on your ISP.
Contacting and configuring the router 2 In the address box, type 192.168.1.1, then press ENTER. A message tells you to enter a User name and Password. 3 When a message tells you to enter a User name and Password, type admin in both boxes (the default), then click OK. The Setup page opens. 4 Go to “Configuring the router” on page 16. www.gateway.
Chapter 2: Initial setup Configuring the router Use the router Setup Wizard to do the initial configuration of the router. The Setup Wizard steps you through the process by asking you a series of questions. If you cannot answer some of the questions, contact your ISP for additional information. After the Setup Wizard has finished, the initial configuration of your router should be complete.
Contacting and configuring the router 2 In the Setup Wizard - Internet Access window, click the type of Internet access you have. If you are not sure what kind of service you have, look on your modem (it may say Cable Modem or DSL Modem) or contact your ISP for the information. When you have made your selection, click Next to continue. 3 If you selected Cable Modem, type the Hostname and Domain Name (if required by your ISP), and the Login method.
Chapter 2: Initial setup 4 If you selected DSL/ADSL Modem, select the type of Login (if any) used for Internet access. Click Next to continue. ■ PPPoE - Type the User Name and Password provided by your ISP. Also, indicate if you connect automatically, and the interval that elapses before you are automatically disconnected. Click Next to continue. - OR ■ PPTP (Europe only) - Enter the PPTP Server IP Address, the User Name and Password provided by your ISP.
Contacting and configuring the router 7 If you selected Other (e.g., Fixed Wireless): ■ 8 Indicate how the IP Address is assigned by your ISP. If they assign one automatically each time you connect, select Dynamic. If they specify an IP address that does not change, select Static and type the IP Address, the subnet mask, the default gateway, and the DNS. Click Next to finish. Click Finish to complete the initial router configuration.
Chapter 2: Initial setup 20 www.gateway.
Routine Router Settings and Status 3 Read this chapter to learn how to: ■ Set up LAN settings ■ Set up wireless settings ■ Reset the password ■ Check router status ■ Set up security for wireless operation ■ Restore the router’s default settings 21
Chapter 3: Routine Router Settings and Status Using router settings and features The router comes with pre-set settings that let it operate in most situations. You can make changes to these settings if you want to turn on additional features on your router or to make your router conform to your ISP’s requirements for Internet access. The Gateway Wireless Router Setup utility lets you turn many of the router’s features on and off to customize your network.
Using router settings and features 2 If the IP address and subnet mask must be changed, type the new IP address and subnet mask in the boxes provided, otherwise leave the default settings. 3 In the DHCP Server box, make sure that the check box is selected (default) if you want the router to provide DHCP service to your network (by assigning an IP address automatically to each computer on your network when they sign on).
Chapter 3: Routine Router Settings and Status Configuring wireless settings To configure the wireless settings: 1 After accessing the Setup page (see “Contacting the router” on page 14), click Wireless in the left column. The Wireless window opens. In the Identification area, the Regulatory Domain and Station Name are automatically provided. 2 Type the name of your wireless LAN in the SSID (service set identifier) box. This must be consistent for your entire local network.
Using router settings and features 3 In the Options section, click the arrow to open the Channel list, then click the channel number (1 - 11) you want. We recommend that you leave the default setting (6) unless another wireless network in your area is using that channel. Select an unused channel if that is the case. 4 If you want to configure WEP (Wired Equivalent Privacy) security for your wireless network: a Click Configure WEP. The Wireless - WEP Data Encryption window opens.
Chapter 3: Routine Router Settings and Status d In the Key input area, click the type of encryption key you want to use: Hex (64 bit = 10 characters, or 128 bit = 26 characters) ASCII (64 bit = 5 characters, or 128 bit = 13 characters). e Select the Default Key to use on your wireless network, then type a key value in the field provided (see Step d).
Using router settings and features 7 In the Access Point section, under Allow Internet access by, click ALL Wireless stations or Selected Wireless stations only. If you clicked Selected Wireless stations only, click Select Stations. The computers listed are current DHCP clients or have been added manually to the PC Database on the Advanced menu. If a DHCP client is not listed, restart the computer. Select the computers you want to have access to your wireless network.
Chapter 3: Routine Router Settings and Status Checking router status The current settings and status of the router can be determined by accessing the Status screen. The information provided includes Internet, LAN, and System status/settings. To review the router status: 1 28 Click Status in the left column. The Status window opens. www.gateway.
Using router settings and features 2 For detailed information on the connection, click Connection Details. The Connection Details screen opens. 3 Click Release if the wireless router is using a dynamic IP address assigned by your ISP’s DHCP server. Release will release the IP address and break the connection. - OR Click Renew if the wireless router has not been assigned a dynamic IP address by your ISP’s DHCP server. Renew will re-establish the connection with the ISP and obtain an IP address.
Chapter 3: Routine Router Settings and Status 6 Click System Data to open a window that provides additional information about the current configuration and system status. Close the window when you want to return to the Status window. 7 Click Refresh Screen to update the information on the screen. Setting up wireless operation After the initial configuration is done, you can set up your network to work in wireless mode.
Using router settings and features Configuring WEP security in Windows XP Windows XP does not automatically configure the wireless adapter to use the encryption key generated when a WEP passphrase is entered. On computers running Windows XP, after the WEP encryption key has been generated (see “Configuring the router” on page 16), the key must be entered manually to let the system communicate with the router.
Chapter 3: Routine Router Settings and Status 10 11 Close all applications and reboot the computer. Repeat Step 1 through Step 10 for each computer on your network running Windows XP. Returning the router settings to the default settings The router comes with pre-set settings that let it operate in most situations. If you make changes to these settings and have difficulty contacting or operating the router, you can return the router settings to the default.
Advanced Features and Configuration 4 Read this chapter to how to: ■ Configure advanced Internet settings ■ Configure access control settings ■ Turn on remote management ■ Set up a virtual server ■ Use a dynamic DNS service ■ Upgrade the firmware ■ Use the PC Database ■ Change router options ■ Change security settings ■ Change log settings ■ Set the MAC address ■ Configure routing 33
Chapter 4: Advanced Features and Configuration Advanced features Customizable settings are available under the Advanced Features heading for special applications, access control, remote management, establishing virtual servers, and upgrading the firmware on your router. To access the Advanced Features/Configuration window, first open the Gateway Wireless Router Setup utility (see “Contacting the router” on page 14), then click Advanced. The Advanced Features/Configuration window opens.
Advanced features Configuring advanced Internet settings To configure the advanced Internet settings: 1 Begin on the Advanced Features/Configuration screen, then click Advanced Internet in the Advanced Features section. The Advanced Internet window opens. 2 In the Communication Applications area click an application in the Select an Application list. Included on the list are applications which may generate incoming connections to an unspecified address on your LAN.
Chapter 4: Advanced Features and Configuration 3 If an application does not work through your LAN firewall, click Special Applications. The Special Applications window opens. Click the check box next to a line, then type the name of the application in the Name box. Under Incoming Ports, click the arrow to open the Type list, click the protocol you use to receive data, then type the beginning and ending port numbers.
Advanced features 5 In the URL Filter area, click the Enable check box to turn on URL filtering, then click Configure URL Filter. The URL Filter screen opens. The Current Entries list shows the text strings currently being filtered (blocked) by the router. To add new strings of text (words or phrases) to be filtered, type the text in the Add Filter String box, then click Add. The new text string is moved to the Current Entries list.
Chapter 4: Advanced Features and Configuration Configuring access control settings To configure the Access Control settings: 1 Click Access Control in the Advanced Features section. The Access Control window opens. 2 Click the arrow to open the Group list, then click the group whose access you want to control. Click Members to open the Group Members screen, which shows a list of Members (by IP address) of the selected group and a list of Other computers (all other non-member computers).
Advanced features 3 In the Internet Access section, click the arrow to open the Restriction list, then click one of the following: ■ None for no blocking (lease restriction). ■ Block selected Services for selective blocking (moderate restriction). ■ Block all Internet access for maximum blocking (maximum restriction). Click the arrow to open the Block by Schedule list, then click one of the following: ■ None (for no scheduled blocking) ■ Default (for scheduled blocking).
Chapter 4: Advanced Features and Configuration 4 Click View Log to see a log of blocked attempts to access the Internet. Click Clear Log to remove existing log entries and restart the log. 5 In the Services section, click the services you want to block in the Select Services to Block list. To edit the list of services available to block, click Edit Service List. The Services screen opens. To delete a service from the Available Services list, click the service and click Delete.
Advanced features Turning on remote management To turn on remote management: 1 2 Click Remote Management in the Advanced Features section. The Remote Management window opens. To enable remote control of the router through, click to select the Enable Remote Management check box. 3 4 Type the port number (between 1024 and 65535) by which the router will be remotely accessed in the Port Number field. We recommend not using port 80 (the default Web connection port). The default is port 8080.
Chapter 4: Advanced Features and Configuration Setting up a virtual server To set up a virtual server: 42 1 Click Virtual Servers in the Advanced Features section. The Virtual Servers window opens. 2 In the Servers section, click the type of server to set up in the Servers list. Click Defaults to delete servers you have added to the list. Click Disable All to disable all virtual servers. To delete a single virtual server, click the server in the list, then click Delete. www.gateway.
Advanced features 3 To enable the selected virtual server, click to select the Enable check box in the Properties section, then click the arrow to open the PC (Server) list and click the computer you want to act as the server. Default settings for Internal Port No. and External Port No. are shown for pre-defined servers. If you have made changes to a pre-defined server, click Update Selected Server to save the changes.
Chapter 4: Advanced Features and Configuration To use a Dynamic DNS service: 44 1 Click Dynamic DNS in the Advanced Features section. The DDNS (Dynamic DNS) window opens. 2 To register for this free service, click the link provided in the DDNS (Dynamic DNS) window. After you have registered, use the information provided by the DDNS service to complete the setup process.
Advanced features Upgrading the firmware New firmware for your router is made available periodically by Gateway. Firmware upgrades may provide enhanced features, increased compatibility, or an updated interface. Check your firmware version and date (found on the Status page) against the latest version on the Gateway Web site (www.gateway.com). If a new version is available, download it to a computer on your network, then complete the following procedure.
Chapter 4: Advanced Features and Configuration Important Do not turn off or reset the router while the firmware is being upgraded. This may cause problems with the router. 7 After the firmware upgrade is complete, return to the Status window and make sure that the new firmware version and date are shown. 8 Close the Upgrade Firmware window to return to the Advanced Features/Configuration window.
Advanced features To use the PC Database: 1 Click PC Database in the Advanced Configuration section. The PC Database window opens. 2 To add a computer to the PC Database, type the name in the Name box and the address in the IP Address box, then click Add. The computer is added to the Known PC’s list (and the PC Database). 3 To see a report listing all of the computers in the PC Database, click Generate Report.
Chapter 4: Advanced Features and Configuration 4 To make detailed changes to the PC Database, click Advanced Administration. The PC Database (Admin) window opens. 5 To edit any computer in the database, click a computer in the Known PC’s list, then click Edit. Information about the computer’s networking configuration is shown in the PC Properties box. 6 To edit the computer configuration, make changes as required, then click Update Selected PC. The PC Database is updated with the new information.
Advanced features 11 Close the PC Database window to return to the Advanced Features/Configuration window. Changing router options To change router Options: 1 Click Options in the Advanced Configuration section. The Options window opens. 2 In the Backup DNS section, type the backup DNS IP addresses (obtained from your ISP) if the primary DNS is unavailable. 3 In the TFTP section, click the Enable Firmware Upgrade using TFTP check box.
Chapter 4: Advanced Features and Configuration Checking the Allow Internet access to be disabled check box lets you disable Internet access for this device. Leaving it unchecked prevents this. 50 5 In the MTU section, type a value for PPPoE and PPTP connections (between 1 and 1500) in the MTU (Maximum Transmission Unit) box. This setting should only be changed if advised to do so by Technical Support. 6 Click Save to save your entries, or Cancel to remove your entries.
Changing security settings Changing security settings Network security is important for home networks to protect personal information, such as credit card numbers, Social Security numbers, tax records, and other private information. Network security is vital for business, corporate, or government networks, where the safety of the organization, and possibly the safety of the employees, may be at stake.
Chapter 4: Advanced Features and Configuration 2 In the Firewall section, the Enable DoS (Denial of Service) Firewall check box is selected (default). We recommend that you enable this security feature to prevent Denial of Service attacks from overloading your Internet connection and making it unavailable. Set the Threshold to match the bandwidth of your Internet connection (check with your ISP).
Changing security settings To make log settings: 1 Click Logs in the Advanced Configuration section. The Logs window opens. 2 In the Enable Logs section, click to select any of the check boxes for the logs you want to keep: ■ Outgoing (Internet) connections - Records all outgoing Internet connections. ■ Access Control - Records attempted outgoing connections which were blocked by Access Control.
Chapter 4: Advanced Features and Configuration 3 In the E-Mail Reports section, you can elect to have any or all logs e-mailed to a designated recipient at the time specified. Place a check next to the log you want sent, then specify when it will be sent. 4 In the E-Mail Address section, type the e-mail address of the person you want to receive the e-mailed logs. Also enter the subject of the e-mail and specify the outgoing mail (SMTP) server and port from which the e-mail will be sent.
Changing security settings Click Copy from PC to automatically find and copy the MAC address of the computer into the MAC Address box. The computer’s MAC address appears in the MAC Address field. 3 Click Save to save your entry or Cancel to remove your entry. Close the window to return to the Advanced Features/Configuration window. Configure routing The Routing window lets you configure your router to operate as part of a network with other routers.
Chapter 4: Advanced Features and Configuration The Properties box shows the details of the highlighted Routing Table entry. ■ Destination Network - The network address of the remote LAN segment of the static route. For standard networks, the first three fields are used and the fourth is set to “0”. ■ Network Mask - The network mask for the remote LAN segment of the static route. The default is 255.255.255.0.
Troubleshooting 5 This chapter provides information on how to resolve common problems experienced with router setup and configuration.
Chapter 5: Troubleshooting Ping utility You can use the ping utility to help determine whether a connection has been established on a network or to determine a numerical IP address (xxx.xxx.xxx.xxx) based on an alphanumeric Internet or Web address such as www.gateway.com. Also, your router may have difficulty sending and receiving e-mail or connecting to the Internet if your ISP’s mail and server addresses are configured with single words, such as “mail,” “home,” or “pop3”.
Ping utility In the above example, note the line that states “Pinging mail.adelphia.net [64.8.50.100] with 32 bytes of data.” In this case “mail.adelphia.net” is the actual Web address of the mail server and does not need to be resolved. Write down this Web address and use it to replace your ISP’s one word mail server address (in your Web browser or e-mail program). However, if the ping utility returned only the IP address, you will need to determine the Web address.
Chapter 5: Troubleshooting Setting a static IP address Typically, the computers on your network are set to obtain an IP address dynamically (using the DHCP server function of the router) whenever they contact your local network. However, in certain cases, such as DMZ hosting or port forwarding, you have to assign a static IP address to a computer so that its address remains constant and it can be contacted at the same address over time.
Setting a static IP address To set a static IP address using Windows 2000: 1 2 Click Start, Settings, then click Control Panel. 3 In the Components checked are used by this connection list, click Internet Protocol (TCP/IP), then click Properties. 4 5 Click Use the following IP address. 6 7 8 In the Subnet Mask box, type 255.255.255.0. 9 Double-click Network and Dial-Up Connections, right-click the Local Area Connection that is associated with your network adapter card, then click t Properties.
Chapter 5: Troubleshooting 5 In the IP Address box, type a unique IP address that will not be used by any other computer on your network. You can use IP addresses between 192.168.1.2 and 192.168.1.99 (IP address 192.168.1.1 is assigned to the router and the router’s DHCP server assigns addresses from 192.168.1.100 up to 192.168.1.254). 6 7 In the Subnet Mask box, type 255.255.255.0. 8 9 Click the DNS Configuration tab, then click Enable DNS. 10 62 Click the Gateway tab.
Problem resolution Problem resolution Your wireless router will not turn on (no LEDs) ■ Make sure that the power cord and AC adapter are plugged in and connected to the router. ■ Make sure that the power strip, surge protector, or UPS (uninterruptable power supply) is operating correctly. Warning Use only the power cord and AC adapter provided with the router.
Chapter 5: Troubleshooting ■ If the problem is isolated: ■ ■ Make sure that the configuration settings are correct (DHCP setting, IP address, subnet mask, default gateway, and DNS), then restart the computer. If the problem is general: ■ Make sure that the router is on and configured correctly (see “Configuring the router” on page 16). ■ Make sure that the DSL or cable modem is on and operating correctly (check the LEDs on the front to make sure that it is receiving power and is not on standby).
Problem resolution ■ Make sure that all computers are using the same subnet mask. ■ If you are using DHCP though the router, make sure that the other computers are set to obtain IP addresses from DHCP. ■ If you assigned IP addresses to the computers, make sure that all computers have different IP addresses. For home networks, IP addresses should be 192.168.N.N where N is a number you assign between 0 and 254.
Chapter 5: Troubleshooting 3 66 Right-click Wireless Network Connection, then click Status. The Wireless Network Connection Status dialog box opens. The meter shows the signal strength for wireless Ethernet networking on your computer if other computers with the same network name are within range of your computer. www.gateway.
Problem resolution To check the signal strength of your wireless Ethernet network in Windows 2000, Windows Me, or Windows 98SE: 1 Double-click the Gateway Wireless Monitor icon The Gateway Wireless Monitor program opens. 2 Click the Available Networks tab and make sure that you are connected to the network. 3 Click the Link Information tab. www.gateway.com on the taskbar.
Chapter 5: Troubleshooting 4 68 Click More. The following screen opens. The meter shows the signal strength for wireless Ethernet networking on your computer if other computers with the same network name are within range of your computer. www.gateway.
Technical Support Technical Support Gateway offers a wide range of customer service, technical support, and information services. Automated troubleshooting system Service description How to reach Use an automated menu system and your telephone keypad to find answers to common problems.
Chapter 5: Troubleshooting 70 www.gateway.
Glossary A This appendix provides information on terms that relate to routers and networking.
Appendix A: Glossary Terms you should know adapter (network) - A circuit board that plugs into a computer to let the computer connect to a network. beacon interval - A beacon is a periodic broadcast by the router to keep the network synchronized. The interval indicates how often the router broadcasts the beacon. broadband - When multiple signals or channels (such as voice, data, and video) share the bandwidth of a single medium.
Terms you should know DTIM (Delivery Traffic Indication Message) - A message sent by the router to a wireless network device to indicate when the next broadcast or multicast message will be sent. This parameter is necessary to accommodate devices using power save mode. dynamic IP address - An IP address that is temporarily assigned by a DHCP server. Many ISPs use dynamic IP addresses. When a computer connects the Internet, an ISP provides an IP address.
Appendix A: Glossary IP address - A a number that uniquely identifies a computer on the network. IPSec (Internet Protocol Security) - A standard method for providing data confidentiality, integrity, and the authentication between participating hosts. ISP (Internet service provider) - A company that provides access to the Internet. Most ISPs also provide e-mail addresses.
Terms you should know PPPoE (Point to Point Protocol over Ethernet) - A communications protocol that combines the Ethernet and Point-to-Point Protocol (PPP) standards. PPPoE is sometimes used with broadband modems. PPTP (Point-to-Point Tunneling Protocol) - A protocol that lets a private network connect securely to another private network through private "tunnels" over the public Internet. This kind of interconnection is known as a virtual private network (VPN). protocol - A set of communication rules.
Appendix A: Glossary TCP/IP (Transmission Control Protocol/Internet Protocol) - A combination of two protocols (TCP and IP) that lets computers communicate with Web servers. UDP (User Datagram Protocol) - UDP is a simpler, faster protocol than TCP. UDP is used with IP. Unlike TCP, UDP drops packets without retries and packets are received in a different order than they were sent. UDP is often used in videoconferencing applications or games where speed is preferred over guaranteed message delivery.
Specifications B This appendix provides information on your router specifications.
Appendix B: Specifications Specifications Specifications are subject to change without notice or obligation. Dimensions 7.32 × 6.89 × 1.89 ins. (186 x 175 x 48 mm) Weight 17 oz. (0.
Safety, Regulatory, and Legal Information C Regulatory compliance statements Wireless Guidance The WBR-100 802.11b wireless LAN, (low power Radio Frequency, RF, transmitting device), operates in the 2400 - 2483.5 MHz band. The following section is a general overview of considerations while operating the wireless LAN. Limitations, cautions, and concerns are listed below and in the specific country sections (or country group sections).
Appendix C: Safety, Regulatory, and Legal Information recommendations, Gateway believes these devices are safe for use. Regardless of the power levels, care should be taken to minimize human contact during normal operation. Measurements have been performed to show that the RF exposure is below what is considered safe limits; however care should be taken to make sure the user or bystanders keep the transmitter away from their body when the wireless device is transmitting.
Some circumstances require restrictions on using wireless devices. Examples of common restrictions are listed below: Warning High voltages can enter your computer through both the power cord and the modem connection. Protect your computer by using a surge protector. If you have a telephone modem, use a surge protector that has a modem jack. If you have a cable modem, use a surge protector that has an antenna/cable TV jack. During an electrical storm, unplug both the surge protector and the modem.
Appendix C: Safety, Regulatory, and Legal Information Warning Only use drivers approved for the country in which the device will be used. See the Gateway System Restoration Kit, or contact Gateway Technical Support for additional information. Warning In order to comply with FCC requirements this transmitter must not be operated (or co-located) in conjunction with any other transmitter or antenna.
interference to radio and television reception, which can be determined by turning the equipment off and on, the user is encouraged to try to correct the interference by one or more of the following measures: ■ Reorient or relocate the receiving antenna ■ Increase the separation between the equipment and receiver ■ Connect the equipment into an outlet on a circuit different from that to which the receiver is connected ■ Consult the dealer or an experienced radio/TV technician for help.
Appendix C: Safety, Regulatory, and Legal Information FCC declaration of conformity Responsible party: Gateway Companies, Inc. 610 Gateway Drive, North Sioux City, SD 57049 (605) 232-2000 Fax: (605) 232-2023 Product: ■ Gateway WBR-100 This device complies with Part 15 of the FCC Rules.
Notices Copyright © 2003 Gateway, Inc. All Rights Reserved 14303 Gateway Place Poway, CA 92064 USA All Rights Reserved This publication is protected by copyright and all rights are reserved. No part of it may be reproduced or transmitted by any means or in any form, without prior consent in writing from Gateway. The information in this manual has been carefully checked and is believed to be accurate. However, changes are made periodically. These changes are incorporated in newer publication editions.
Appendix C: Safety, Regulatory, and Legal Information 86 www.gateway.
MAN 802.