8512322_XHD3000 Usr Gde.
8512322_XHD3000 Usr Gde.
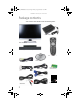
8512322_XHD3000 Usr Gde.book Page i Friday, August 10, 2007 12:33 PM Contents Chapter 1: Checking Out Your Monitor . . . . . . 1 Package contents . . . . . . . . . . . . . . . . . . . . . . . . . . . . . . . . . . . . . . . 2 Monitor features . . . . . . . . . . . . . . . . . . . . . . . . . . . . . . . . . . . . . . . 3 Front . . . . . . . . . . . . . . . . . . . . . . . . . . . . . . . . . . . . . . . . . . . . . . . 3 Back . . . . . . . . . . . . . . . . . . . . . . . . . . . . . . . . . . . . . . . . .
8512322_XHD3000 Usr Gde.book Page ii Friday, August 10, 2007 12:33 PM Contents Chapter 4: Troubleshooting . . . . . . . . . . . . . . . 43 Troubleshooting guidelines . . . . . . . . . . . . . . . . . . . . . . . . . . . . 44 Troubleshooting symptoms . . . . . . . . . . . . . . . . . . . . . . . . . . . . 44 No power . . . . . . . . . . . . . . . . . . . . . . . . . . . . . . . . . . . . . . . . . 44 No picture . . . . . . . . . . . . . . . . . . . . . . . . . . . . . . . . . . . . . . . .
8512322_XHD3000 Usr Gde.book Page iii Friday, August 10, 2007 12:33 PM www.gateway.com Appendix A: Specifications . . . . . . . . . . . . . . . 71 Monitor specifications . . . . . . . . . . . . . . . . . . . . . . . . . . . . . . . . . . 72 Video modes . . . . . . . . . . . . . . . . . . . . . . . . . . . . . . . . . . . . . . . 74 Speaker bar specifications . . . . . . . . . . . . . . . . . . . . . . . . . . . . . . 76 Remote control specifications . . . . . . . . . . . . . . . . . . . . . . . . . . .
8512322_XHD3000 Usr Gde.
8512322_XHD3000 Usr Gde.
512322_XHD3000 Usr Gde.
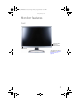
8512322_XHD3000 Usr Gde.book Page 3 Friday, August 10, 2007 12:33 PM www.gateway.com Monitor features Front Menu touch button* Power touch button*/Power LED IR remote sensor * For instructions on using the touch buttons, see “Using the EzTouch menu” on page 29.
8512322_XHD3000 Usr Gde.
8512322_XHD3000 Usr Gde.book Page 5 Friday, August 10, 2007 12:33 PM www.gateway.com Monitor connections Although this guide covers basic setup, refer to the following illustration for advanced audio and video setup help.
8512322_XHD3000 Usr Gde.book Page 6 Friday, August 10, 2007 12:33 PM CHAPTER 1: Checking Out Your Monitor Connector Use Speaker bar audio Connect to the optional speaker bar. VGA mode audio Connect to the headphone/speakers jack on your computer for the VGA display mode’s audio source. IR blaster Connect to the IR blaster sensor. S-Video Connect to the S-Video out jack on an S-Video video source, such as a DVD player. VGA Connect to a VGA jack on a VGA video source, such as your computer.
8512322_XHD3000 Usr Gde.book Page 7 Friday, August 10, 2007 12:33 PM www.gateway.
8512322_XHD3000 Usr Gde.book Page 8 Friday, August 10, 2007 12:33 PM CHAPTER 1: Checking Out Your Monitor Important Your remote control works for your monitor, but you must program it to work for your other devices (such as cable or satellite set-top boxes and DVD players). For more information, see “Programming the universal remote control” on page 54. Button Function Select cable/satellite remote mode For universal remote control functions, press to control your cable or satellite set-top box.
8512322_XHD3000 Usr Gde.book Page 9 Friday, August 10, 2007 12:33 PM www.gateway.com Button Function Channel/skip chapter/tune (depends on mode) Press to change the channel or skip chapters. (Function depends on the current mode.) Mute Press to mute the sound, and press again to restore sound. Numeric keypad Press to directly enter channel numbers, chapter numbers, or values in menu settings. Menu Press to open the LCD panel’s on-screen menu.
8512322_XHD3000 Usr Gde.
8512322_XHD3000 Usr Gde.
8512322_XHD3000 Usr Gde.book Page 12 Friday, August 10, 2007 12:33 PM CHAPTER 2: Setting Up Your Monitor Connecting the monitor Connecting video inputs Important To use the monitor’s full (highest) resolution (2560 × 1600), you must use the included dual-link DVI cable to connect the monitor to a dual-link capable video card on your computer. A single-link DVI cable or video card limits resolution to 1920 × 1200. VGA and HDMI connections are also limited to a maximum 1920 × 1200 resolution.
8512322_XHD3000 Usr Gde.book Page 13 Friday, August 10, 2007 12:33 PM www.gateway.com 3 Connect the other end of the video cable to the matching video port on the back of your monitor. OR 4 Connect other video sources (such as a DVD player, video camera, or video receiver) to the appropriate video jacks on the back of the monitor. • For basic video quality, connect your video device’s • • COMPOSITE jack to the corresponding jack on the back of your monitor (cable not included).
8512322_XHD3000 Usr Gde.book Page 14 Friday, August 10, 2007 12:33 PM CHAPTER 2: Setting Up Your Monitor Important When displaying standard-definition video (480i or 480p), you should set your video source device’s output to 480i. Your monitor has superior deinterlacing and video processing features that are best utilized on 480i video. When displaying high-definition video (720p, 1080i, and 1080p), you should set your video source device’s output to 1080i for best performance.
8512322_XHD3000 Usr Gde.book Page 15 Friday, August 10, 2007 12:33 PM www.gateway.com 2 Connect the stereo patch cable to your computer’s headphone jack (green) and your monitor’s DVI audio or VGA audio jack. This is the most basic audio connection for your computer.
8512322_XHD3000 Usr Gde.book Page 16 Friday, August 10, 2007 12:33 PM CHAPTER 2: Setting Up Your Monitor 3 Connect other audio sources (such as a DVD player or audio receiver) to the appropriate audio jacks on the back of the monitor. • For basic audio quality, connect your audio source to • the L/R (two-channel stereo) audio in jacks for the device. Your monitor has L/R stereo jack pairs that are associated with S-Video, Composite (standard), and Component video modes (cables not included).
8512322_XHD3000 Usr Gde.book Page 17 Friday, August 10, 2007 12:33 PM www.gateway.com To connect your monitor to a receiver or other audio device: • For basic audio quality, connect your audio device to the L/R (two-channel stereo) audio out jacks on the back of the monitor. -ORFor best audio performance, you can connect your audio device to one of the S/PDIF output jacks. All analog audio inputs routed into the monitor are output on the S/PDIF output ports.
8512322_XHD3000 Usr Gde.book Page 18 Friday, August 10, 2007 12:33 PM CHAPTER 2: Setting Up Your Monitor 3 Plug the AC power cord into the AC power adapter, then plug the AC power cord into a power outlet. We recommend using a surge protector to protect your monitor from voltage spikes. Caution Do not block the ventilation openings in the power adapter. Make sure to place the adapter in a well-ventilated area.
8512322_XHD3000 Usr Gde.book Page 19 Friday, August 10, 2007 12:33 PM www.gateway.com 2 Touch (Main Menu), (Advanced), (Integrated Product Tour), then touch The product tour is disabled. (Disable). After the tour is disabled, you can view it again at any time by pressing and holding the power button for five seconds. For more information on using the touch buttons, see “Using the EzTouch menu” on page 29.
8512322_XHD3000 Usr Gde.book Page 20 Friday, August 10, 2007 12:33 PM CHAPTER 2: Setting Up Your Monitor 4 Plug the speaker bar’s power and audio plugs into the appropriate connectors underneath the monitor. Speaker bar power Speaker bar audio For information on using the speaker bar, see “Using the speaker bar” on page 40. Connecting the USB hub Your monitor has a built-in, powered, USB 2.0 6-port hub.
8512322_XHD3000 Usr Gde.book Page 21 Friday, August 10, 2007 12:33 PM www.gateway.com 3 Connect the included USB cable to the USB-B port on the back of the monitor, then connect the other end of the cable to a USB-A (standard) port on your computer. Important Only the computer and monitor should be connected during the first installation and bootup. Do not plug any devices into the USB-A ports at this time.
8512322_XHD3000 Usr Gde.book Page 22 Friday, August 10, 2007 12:33 PM CHAPTER 2: Setting Up Your Monitor Connecting a security cable You can secure your monitor and speaker bar to your desk (or to another heavy object) with a cable lock, such as a Kensington™ lock. To connect a cable lock, follow the cable lock’s instructions to connect it to the cable lock slot on the back of your monitor (cable lock not included).
8512322_XHD3000 Usr Gde.book Page 23 Friday, August 10, 2007 12:33 PM www.gateway.com To install batteries into the remote control: 1 Remove the battery compartment cover on the back of the remote control.
8512322_XHD3000 Usr Gde.book Page 24 Friday, August 10, 2007 12:33 PM CHAPTER 2: Setting Up Your Monitor 2 Insert the batteries while matching the + and - symbols on the diagram inside the battery compartment, then close the battery compartment cover. Important Your remote control works for your monitor, but you must program it to work for your other devices (such as cable satellite set-top boxes and DVD players). For more information, see “Programming the universal remote control” on page 54.
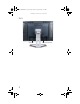
8512322_XHD3000 Usr Gde.book Page 25 Friday, August 10, 2007 12:33 PM www.gateway.com Positioning the monitor You can adjust the monitor for left and right pan and up and down tilt angle.
8512322_XHD3000 Usr Gde.book Page 26 Friday, August 10, 2007 12:33 PM CHAPTER 2: Setting Up Your Monitor Ergonomic guidelines The recommended screen positioning is based upon the following guidelines. These guidelines are based on available scientific literature and published standards.
8512322_XHD3000 Usr Gde.
8512322_XHD3000 Usr Gde.book Page 28 Friday, August 10, 2007 12:33 PM CHAPTER 3: Using Your Monitor Starting the monitor Caution If you plan to connect your monitor’s USB hub to the computer’s USB port, first install the included EzTune software onto your computer. Turning on the monitor To start the monitor: 1 Touch the power button on the front of monitor. The power LED on the power button changes from purple (off) to blue (on), then turns amber/orange (standby) if no video source is detected.
8512322_XHD3000 Usr Gde.book Page 29 Friday, August 10, 2007 12:33 PM www.gateway.com • Amber—The monitor is not detecting a video source. Check the video input connections and make sure that the computer is turned on and connected correctly to the monitor. • Blue—The monitor is detecting a video source. For more troubleshooting information, see “Troubleshooting” on page 43. Tip The first prompt you see is the language selection menu settings.
8512322_XHD3000 Usr Gde.book Page 30 Friday, August 10, 2007 12:33 PM CHAPTER 3: Using Your Monitor Using the shortcut menu To use the shortcut menu: Tip To use an EzTouch menu button, lightly touch it. 1 Touch (Menu) on the front of your monitor. The rest of the buttons light up and the shortcut menu opens. (The menu’s appearance and choices vary, depending on the currently active video input and whether the speaker bar is attached.
8512322_XHD3000 Usr Gde.book Page 31 Friday, August 10, 2007 12:33 PM www.gateway.com • Touch (PIP On) to turn on Picture-in-Picture, and press (PIP Settings) to adjust the PIP position, size, and other advanced PIP settings. PIP adjustments may also be made using the included EzTune software. You must have multiple video sources connected for these options to be available.
8512322_XHD3000 Usr Gde.book Page 32 Friday, August 10, 2007 12:33 PM CHAPTER 3: Using Your Monitor Using the main menu To use the main menu: 1 Touch (Menu) on the front of your monitor. The rest of the buttons light up and the shortcut menu opens. Choose Option Select Menu Off Important The EzTouch menu buttons are very sensitive, and may be “pressed” by holding your finger just above their surface. To completely “release” a touch button, make sure that you lift your finger well away from the button.
8512322_XHD3000 Usr Gde.book Page 33 Friday, August 10, 2007 12:33 PM www.gateway.com • PIP Settings—Lets you change the PIP position, size, and other advanced PIP settings. • Video Adjust—Lets you change Theme Mode, Color Temp, and Video Scaling settings. • Geometry—Lets you change Horizontal Position, • • • Vertical Position, Clock, and Phase settings. Audio—Lets you change Volume, Bass, Treble, 3D Audio, Audio Source, Auto Delay, and Manual Delay settings.
8512322_XHD3000 Usr Gde.book Page 34 Friday, August 10, 2007 12:33 PM CHAPTER 3: Using Your Monitor Using monitor menus Use the monitor’s on-screen display (OSD) menus to change settings and select inputs. OSD Menu Description Main menu Auto—Automatically adjusts your monitor to its optimum settings. (VGA input only) Picture—Opens the Picture menu, where you can adjust brightness, contrast, and gamma.
8512322_XHD3000 Usr Gde.book Page 35 Friday, August 10, 2007 12:33 PM www.gateway.com OSD Menu Description PIP Settings menu PIP Display—Toggles the display of the PIP window. PIP Source—Sets the source of the video used in the PIP window. PIP Position—Sets the position of the PIP window on the main screen. PIP Size—Sets the size of the PIP window. PIP Transparency—Sets the transparency of the PIP window.
8512322_XHD3000 Usr Gde.book Page 36 Friday, August 10, 2007 12:33 PM CHAPTER 3: Using Your Monitor OSD Menu Description Video Adjust menu (cont) Video Scaling—Sets video aspect ratios and scaling between Wide, Zoom, and 1:1 modes. PC input: sets resolution aspect ratios and scaling between Wide, Zoom, and 1:1. Wide mode stretches a standard broadcast or full-frame image to fill the entire screen. Widescreen (1.76:1) images fill the entire screen without distortion, while widescreen (1.85:1 and 2.
8512322_XHD3000 Usr Gde.book Page 37 Friday, August 10, 2007 12:33 PM www.gateway.com OSD Menu Description Geometry menu Horizontal Position—Moves the display image left and right. You can also press the Auto button to configure the vertical and horizontal position automatically. Important: Auto only works with VGA input. Vertical Position—Moves the display image up and down. You can also press the Auto button to configure the vertical and horizontal position automatically.
8512322_XHD3000 Usr Gde.book Page 38 Friday, August 10, 2007 12:33 PM CHAPTER 3: Using Your Monitor OSD Menu Description Advanced menu Color—Customizes the color levels. Language—Changes the language of the OSD. LED Mode—Changes the brightness of the Menu, Standby, and Power LED to Day Mode or Nite Mode. When watching movies in a darkened room, you may want to change the LED mode to Nite Mode to avoid an over-bright, distracting power LED indicator.
8512322_XHD3000 Usr Gde.book Page 39 Friday, August 10, 2007 12:33 PM www.gateway.com Screen resolution is the number of pixels (individual colored dots) your computer uses to display images on your monitor. The higher the resolution, the more information and screen components (such as icons and menu bars) can be displayed on the monitor.
8512322_XHD3000 Usr Gde.book Page 40 Friday, August 10, 2007 12:33 PM CHAPTER 3: Using Your Monitor To change the color depth and screen resolution in Windows XP: 1 Click Start, then click Control Panel. The Control Panel opens. If your Control Panel is in Category View, click Appearance and Themes. Shortcut You can also right-click on your Windows desktop, then click Properties. 2 Click Display. The Display Properties dialog box opens. 3 Click the Settings tab.
8512322_XHD3000 Usr Gde.book Page 41 Friday, August 10, 2007 12:33 PM www.gateway.com To use headphones: • Plug headphones into either of the speaker bar’s headphone jacks. The speaker bar’s volume is muted, and sound is played through the connected headphones. You can connect headphones to both headphone jacks, and sound plays out of both sets of headphones. Power management Whenever no video signal is detected by your monitor, it enters Standby mode, a mode that uses very little power.
8512322_XHD3000 Usr Gde.book Page 42 Friday, August 10, 2007 12:33 PM CHAPTER 3: Using Your Monitor To “wake” the monitor when it is in Standby/Active Off mode, move the mouse or press any keyboard key. You can change the monitor’s power management settings using the Windows Control Panel. For more information, see your computer’s User Guide. Maintaining To keep the monitor in optimal working order: • Do not block the ventilation holes. • Do not expose the monitor to rain or use near water.
8512322_XHD3000 Usr Gde.
8512322_XHD3000 Usr Gde.book Page 44 Friday, August 10, 2007 12:33 PM CHAPTER 4: Troubleshooting Troubleshooting guidelines • If you have problems with the monitor, the information • in this chapter may help you solve them without needing to call Customer Care. Make sure that the monitor has warmed up for about 30 minutes before making any judgments about the picture quality.
8512322_XHD3000 Usr Gde.book Page 45 Friday, August 10, 2007 12:33 PM www.gateway.com • If the power LED is orange, it means that the monitor is not detecting a video source or input detection is disabled. Complete the following steps: • Move the mouse or press any key on the keyboard to bring the computer monitor out of sleep mode. • Press Input on the remote control to choose another input or touch (Menu), then touch (Input Select) to choose another input. • Make sure that your computer is turned on.
8512322_XHD3000 Usr Gde.book Page 46 Friday, August 10, 2007 12:33 PM CHAPTER 4: Troubleshooting Display colors are wrong • Touch • • • • (Menu), (Main Menu), then (Auto) to automatically adjust the display image to the ideal settings. (VGA input only.) Restart your computer with the monitor turned on. Make sure that the video cable is connected securely to the back of the monitor and your computer. For more information about connecting the video cable, see “Connecting video inputs” on page 12.
8512322_XHD3000 Usr Gde.book Page 47 Friday, August 10, 2007 12:33 PM www.gateway.com Image is not sized or centered correctly • Touch • (Menu), (Main Menu), then (Auto) to automatically adjust the display image to the ideal settings. (VGA input only.) Use the position controls to adjust the image. For instructions on how to adjust the display image position, see “Adjusting monitor settings” on page 33.
8512322_XHD3000 Usr Gde.book Page 48 Friday, August 10, 2007 12:33 PM CHAPTER 4: Troubleshooting • This may be caused by older video drivers on your computer. See the Gateway support Web site at www.gateway.com for updated video drivers for your computer. You can also go directly to your video card’s support Web site for the most up-to-date video drivers. The Web sites for the major video card manufacturers are: ATI®: www.ati.com Intel®: www.intel.com Nvidia®: www.nvidia.
8512322_XHD3000 Usr Gde.book Page 49 Friday, August 10, 2007 12:33 PM www.gateway.com The monitor has pixels that are always dark or too bright • This condition is normal and inherent in the TFT technology used in active-matrix LCD screens. Gateway’s inspection standards keep these to a minimum. If you feel these pixels are unacceptably numerous or dense on your display, contact Gateway Customer Care to identify whether a repair or replacement is justified based on the number of pixels affected.
8512322_XHD3000 Usr Gde.book Page 50 Friday, August 10, 2007 12:33 PM CHAPTER 4: Troubleshooting You want to plug in your headphones, but there is a headphone jack on both sides of the speaker bar. • You can use either jack or both jacks at the same time. When headphones are connected, no sound comes out of the speaker bar’s speakers. You do not get sound from your headphones.
8512322_XHD3000 Usr Gde.book Page 51 Friday, August 10, 2007 12:33 PM www.gateway.com How does HDCP work? • Implementation of HDCP requires a license obtainable from the Digital Content Protection, LLC, which then issues a set of unique secret device keys to all authorized devices. During authentication, the receiving device only accepts content after it acknowledges the keys.
8512322_XHD3000 Usr Gde.book Page 52 Friday, August 10, 2007 12:33 PM CHAPTER 4: Troubleshooting Video FAQs When I display video from S-Video, composite, or component, why does the video look overly compressed? • See your video device user manual to adjust the video or TV format output to 16:9. Setting this option to 4:3 results in compressed video.
8512322_XHD3000 Usr Gde.
8512322_XHD3000 Usr Gde.book Page 54 Friday, August 10, 2007 12:33 PM CHAPTER 5: Using the Universal Remote Control Programming the universal remote control You can program the remote control directly (by entering a five-digit code) or by browsing codes. To directly program the remote control with a code: 1 Press and hold the mode button (CBL/SAT, DVD, LCD, or MEDIA CENTER) for the device you want to program for about four seconds.
8512322_XHD3000 Usr Gde.book Page 55 Friday, August 10, 2007 12:33 PM www.gateway.com 3 Press the control buttons (power, Vol+, play, stop, and Mute) to test whether the current code is valid. If the buttons work as they should, press the mode button you pressed in step 1 once to save the code. The LED blinks twice. You are done. - OR If the buttons do not work as they should, press CH+ to temporarily program the next most common code, then press the control buttons again.
8512322_XHD3000 Usr Gde.book Page 56 Friday, August 10, 2007 12:33 PM CHAPTER 5: Using the Universal Remote Control To test your remote control’s batteries: • Press and release any button on the remote control. If the batteries need to be replaced, the LED flashes five times. Important While the batteries are low, the remote control cannot enter programming mode.
8512322_XHD3000 Usr Gde.book Page 57 Friday, August 10, 2007 12:33 PM www.gateway.
8512322_XHD3000 Usr Gde.
8512322_XHD3000 Usr Gde.book Page 59 Friday, August 10, 2007 12:33 PM www.gateway.
8512322_XHD3000 Usr Gde.
8512322_XHD3000 Usr Gde.book Page 61 Friday, August 10, 2007 12:33 PM www.gateway.
8512322_XHD3000 Usr Gde.
8512322_XHD3000 Usr Gde.book Page 63 Friday, August 10, 2007 12:33 PM www.gateway.
8512322_XHD3000 Usr Gde.
8512322_XHD3000 Usr Gde.book Page 65 Friday, August 10, 2007 12:33 PM www.gateway.
8512322_XHD3000 Usr Gde.
8512322_XHD3000 Usr Gde.book Page 67 Friday, August 10, 2007 12:33 PM www.gateway.
8512322_XHD3000 Usr Gde.
8512322_XHD3000 Usr Gde.book Page 69 Friday, August 10, 2007 12:33 PM www.gateway.
8512322_XHD3000 Usr Gde.
8512322_XHD3000 Usr Gde.
8512322_XHD3000 Usr Gde.book Page 72 Friday, August 10, 2007 12:33 PM APPENDIX A: Specifications Monitor specifications Specifications are subject to change without notice or obligation. Many products for Gateway and its subsidiaries are custom engineered by our suppliers to Gateway specifications and may vary from similarly marketed products.
8512322_XHD3000 Usr Gde.book Page 73 Friday, August 10, 2007 12:33 PM www.gateway.com Connections and inputs ■ ■ ■ ■ ■ ■ ■ ■ ■ ■ ■ ■ ■ Included cables Power consumption Power input Certifications Wall mount bracket Weight Dimensions Temperature Humidity Analog (VGA): 15-pin mini d-sub VGA Digital (DVI-D): 24-pin DVD-D (supports 480p, 720p, and 1080i).
8512322_XHD3000 Usr Gde.book Page 74 Friday, August 10, 2007 12:33 PM APPENDIX A: Specifications IR extender Shock and vibration Adhesive side: Straight to target: >5 feet (1.52 m). Angle: 30° up/down, 30° left/right from center at 5 feet (1.52 m) Shock (non-operating): 50G Vibration (non-operating): 1.5G Video modes Your monitor supports several video modes. If you do not use the best mode for the monitor, the display image may look slightly “fuzzy.
8512322_XHD3000 Usr Gde.book Page 75 Friday, August 10, 2007 12:33 PM www.gateway.com Resolution Refresh Rate (Hz) Horizontal frequency (kHz) Pixel frequency (MHz) Aspect Ratio VGA EDD DVI EDD HDMI EDD 1920 x 1200 60 RB 74.0 154.0 1.6 Y Y Y 1920 x 1440 60 90.0 234.0 1.3 N Y N 2048 x 1536 60 94.769 209.25 1.3 N Y N 2560 x 1600 60 RB 98.713 268.5 1.6 N Y N 480i 59.94 15.734 27.0 1.33 N N Y 480p 59.94 31.469 27.0 1.33 N N Y 720p 60 45.0 74.25 1.
8512322_XHD3000 Usr Gde.book Page 76 Friday, August 10, 2007 12:33 PM APPENDIX A: Specifications Speaker bar specifications Specifications are subject to change without notice or obligation. Many products for Gateway and its subsidiaries are custom engineered by our suppliers to Gateway specifications and may vary from similarly marketed products.
8512322_XHD3000 Usr Gde.book Page 77 Friday, August 10, 2007 12:33 PM www.gateway.com Remote control specifications Specifications are subject to change without notice or obligation. Many products for Gateway and its subsidiaries are custom engineered by our suppliers to Gateway specifications and may vary from similarly marketed products. Range (straight to target) Operating angle Temperature Power Keypress confirmation 50 feet (15.24 m) 20° up/down, 25° left/right from center at 20 feet (6.
8512322_XHD3000 Usr Gde.
12322_XHD3000 Usr Gde.
8512322_XHD3000 Usr Gde.book Page 80 Friday, August 10, 2007 12:33 PM APPENDIX B: Safety, Regulatory, and Legal Information Important safety information Warning Always follow these instructions to help guard against personal injury and damage to your Gateway product. Warning Do not use Gateway products in areas classified as hazardous locations. Such areas include patient care areas of medical and dental facilities, oxygen-laden environments, or industrial facilities.
8512322_XHD3000 Usr Gde.book Page 81 Friday, August 10, 2007 12:33 PM www.gateway.com • Unplug the system from the wall outlet and refer servicing to qualified personnel if: • The power cord or plug is damaged. • Liquid has been spilled into the system. • The system does not operate properly when the operating instructions are followed. • The system was dropped or the cabinet is damaged. • The system performance changes.
8512322_XHD3000 Usr Gde.book Page 82 Friday, August 10, 2007 12:33 PM APPENDIX B: Safety, Regulatory, and Legal Information Regulatory compliance statements United States of America Federal Communications Commission (FCC) Unintentional emitter per FCC Part 15 This device has been tested and found to comply with the limits for a Class B digital device, pursuant to Part 15 of the FCC rules. These limits are designed to provide reasonable protection against harmful interference in a residential installation.
8512322_XHD3000 Usr Gde.book Page 83 Friday, August 10, 2007 12:33 PM www.gateway.com Le présent appareil numérique n’émet pas de bruits radioélectriques dépassant les limites applicables aux appareils numériques de Classe B prescrites dans le règlement sur le brouillage radioélectrique édicté par Industrie Canada. Notices © 2007 Gateway, Inc. All rights reserved. Gateway, Inc.
8512322_XHD3000 Usr Gde.
8512322_XHD3000 Usr Gde.
8512322_XHD3000 Usr Gde.