
Logic HE Balanced Flue Combined Controls Installation User Instructions

36
15
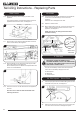
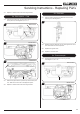
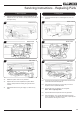
Slide Control
3.12 Undo the thermocouple nut in the pilot unit by half a turn.
This will release the thermocouple.
LOGIC HE STONE
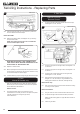
3.13 Remove the sealing plate, see Diagram 16, by removing
the pozi head screw.
NOTE: The sealing plate needs to be re-sealed after
the new thermocouple is fitted.
16
WHEN REPLACING WITH A NEW THERMOCOUPLE
TAKE CARE TO BEND THE NEW COMPONENT TO THE
EXACT SHAPE OF THE ORIGINAL ONE.
3.14 Replace in reverse order.
3.15 When replacing the thermocouple into the pilot unit ensure
the component is pushed fully into the hole. There is a stop
on the thermocouple to set the height.
3.16 Lock the retaining nut just enough to grip the thermocouple.
4. Piezo
Manual & Remote only
Note: For the Manual Control Valve the Ignition lead and
Piezo are part of one complete unit and must be replaced
at the same time, see Section 6.
Remote Control:
4.1 The Piezo assembly used on this appliance is not
serviceable and is unlikely to fail. If a new piezo is required
it will be necessary to change the gas valve,
refer to Section 5.
5. Gas Valve
Manual Control &
Remote Control
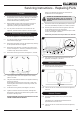
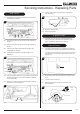
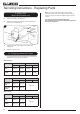
5.1 To remove the gas valve first remove the thermocouple,
see Diagram 17 or 18, Arrow A.
A
D
C
B
E
17
Manual Control
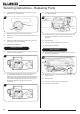
A
B
CD
18
Remote Control
E
5.2 Undo the pilot pipe from the gas valve, see Diagram 17 or
18, Arrow B.
5.3 Undo the inlet pipe from the gas valve, see Diagram 17 or
18, Arrow C.
5.4 Undo the main injector feed pipe from the gas valve,
see Diagram 17 or 18, Arrow D.
5.5 Disconnect the ignition lead from the pilot unit, see
Diagram 17 or 18, Arrow E. (For Logic HE Stone, the
sealing plate needs to be removed, see Diagram 16).
Manual model only:
5.6 Pull off the gas valve control knob and remove the locking
nut using a 17mm spanner.
Manual and Remote:
5.7 The gas valve can now be removed from the burner unit.
5.8 To replace the gas valve reverse the above procedure.
Make sure the sealing plate on Logic HE Stone models is
re-sealed.
5.9 Check for gas leaks.
Servicing Instructions - Replacing Parts