BOOKLET MAKER BM 2000 Operating Instruction Booklet Maker Reference Part no: 87967 Doc no: T10170 Rev.
Table of Contents What You Can Do With This Machine............................................................................................. 5 Guide To Components..................................................................................................................... 7 Booklet Maker................................................................................................................................ 7 Options..........................................................................
. Jobs Storing and Deleting Jobs............................................................................................................. 33 Storing a Job................................................................................................................................ 33 Recalling a Job............................................................................................................................ 34 5. Clearing a Paper Jam Clearing a Paper Jam...............................
What You Can Do With This Machine SQF 2000 SquareFolder (option) FTR 2000 Trimmer (option) BM 2000 Booklet Maker Belt Stacker The Booklet Maker BM 2000, Trimmer FTR 2000 and SquareFolder SQF 2000 form a booklet making system that works on-line with Feeder/Collators. The sheets from the Feeder/Collator are transported into the BM 2000 Booklet Maker and collected in the stapler area of the BM 2000 Booklet Maker. The Booklet Maker now jogs and then staples the set.
The entire BM 2000 Booklet making system is controlled from a single control panel on the Booklet Maker. The control panel has only six buttons which will allow you to easily set up, adjust and operate the complete system. Buttons 1 2 3 4 5 6 1 2 3 The buttons are multi functional, meaning that the function of each button depends on the information displayed. For example: In this screen, the icon next to button 1 indicates you will go up one level in the menu when the button is pressed.
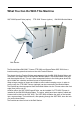
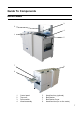
Guide To Components Booklet Maker 3 2 4 1 5 7 8 6 1 2 3 4 Control panel Top cover Power switch Infeed assembly 5 6 7 8 Hand feed tray (optional) Belt Stacker Belt Stacker Cover Hand feed slot (for on-line mode)
Booklet Maker, continued 1 2 3 4 5 6 7 1 2 3 4 DFA. Not in use. Not in use.
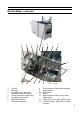
Booklet Maker, continued 1 2 3 4 5 6 7 8 9 10 11 1 2 3 4 5 6 7 12 13 Tool box Ball cage Fold adjust lever, right side Left side not shown in picture Thumb screws for Stapler assy. Cartridge locking levers Stapler lift brackets Side guide extension 7 8 14 Booklet maker, top view 8 9 10 11 12 Thumb screw for Side guide extension Stapler heads Side guides Guide Staple detection leads, one on each stapler head 13 Locking pin, one on each stapler head 14 Clincher, left side.
Options Trimmer 1 2 1 2 10 Top cover Trim bin
Trimmer, continued 2 1 3 4 6 7 5 8 Trimmer, top view 1 2 3 4 5 Trimmer fan Outfeed latch Transport belt Exit compression brackets Trimmer stop 6 7 8 9 9 Docking bracket Infeed roller shaft Knives (not visible in picture) Infeed latch 11
SquareFolder 1 2 1 2 3 5 4 3 Top cover Upper feed belts (lifted position) Docking bracket (not visible in picture Lower feed belts Latches SquareFolder, top view 4 12 5
1. Basics Booklet Maker Turning On / Off the Power Plug the Booklet Maker power cord into the wall outlet. Trimmer (optional) and SquareFolder (optional) are powered from the Booklet Maker. Open the Top cover (A). Set power switch (B) on Booklet Maker to ON position. Note The Power switch also controls Trimmer (optional) and SquareFolder (optional). Close the Top cover.
1. Basics Control Panel State Current Job The Main screen. When the system power is switched on the Main screen will be shown. Here you will find information showing the actual set up. From this screen you can also access other screens, that will help you operate the complete BM 2000 Booklet making system. At the top, throughout the screens you can see the current state of the machine and the current job. Changing settings.
Removing / replacing Staple Cartridge B A 1. Basics Staples, Staple Cartridge, Stapler Head & Clinchers You may remove and replace the staple cartridge while the stapler head assembly is in place. Open the top cover. Raise the staple cartridge locking lever (A) as indicated in the drawing. Gently twist the staple cartridge (B) from side to side, and pull out the staple cartridge (B) from the stapler head. C If the staple cartridge is empty, discard it and replace it with a new one.
1. Basics Removing / replacing Staple Cartridge, continued After staple jam or empty staple cartridge has been detected, the BM 2000 will automatically advance and feed staples. This feature is called staple recovery. Follow procedure below after a staple jam or empty staple cartridge indication. Follow step 1-6 on the previous page. Close the top cover. Feed in a four page set. The staple recovery will commence now. Now the BM 2000 has recovered and production can continue.
Note Whenever you remove a stapler head, be sure to manually eject some staples before replacing it in the BM 2000. To do this, rest the stapler head on a firm surface (for example, the top of a table) and actuate the staple driver post up/down through full travel. Do this a number of times to ensure that the staples are ejected on each down movement. If you need to change the staple cartridge, see previous section, removal/replacement of staple cartridge. 1.
1. Basics Changing Staple position and Narrow width Paper Sizes Note Some situations require that the stapler assemblies are repositioned and/or that the side guide extensions are removed. This to avoid that the side guide extensions collide with the stapler assembly. If such collision should occur, the message “Side jogger collision. Check side joggers. Width setting reseted” will be shown in the control panel.
If you are setting up a paper width less than 210 mm (8.27”) and the stapler assemblies are in the default position, the side guide extensions (B) must be removed. 1. Basics Setting up narrow width paper sizes Loosen thumb screws (A), one on each side guide. Remove both side guide extensions (B). If required, also move the Stapler and Clincher positions closer together. See “Changing Stapler and Clincher position” above. B A Note Make sure to re-install the side guide extensions after the run.
1. Basics Trimmer Emptying the Trim Bin Remove the trim bin by pulling handle (1). 1 2 20 Lift out the Trim Bin by grasping the rod (2) and handle (1).
2. Making Booklets Changing Settings General Procedure Changing settings can be performed in two ways. Temporary, which means that the changes will remain until a new job is loaded or permanent, which means that the changes will be stored as a job. This job can later be recalled. Procedure for temporary changes: From the Main screen, select the option you wish to change and press the [Enter] button. Confirm changes by pressing the [Enter] button in the next screen.
2. Making Booklets Custom Paper Size From the Main screen, select [Size] and press the [Enter] button. Select [Length] or [Width] and press the [+] or [-] button to correct paper size. The paper size can be changed in increments of 0.1 mm or approx.. 0.01 inches. Press the [Enter] button to confirm. Note In the main screen the paper size is shown without the decimal point. The machine has however recognised and set up according to the exact size including the decimal point.
Select [Edge staple] when you want to make edge stapled sets. Press the [Enter] button to confirm. Note Finished sets will be delivered to the Trim Bin in the Trimmer. 2. Making Booklets Edge staple Saddle staple Select [Saddle staple] when you want make saddle stapled booklets. Staple position and fold line can be adjusted both individually and together. If adjustment is needed, see Staple and Fold Alignment below. Otherwise, press the [Enter] button to confirm.
2. Making Booklets Corner staple Select [Corner staple] when you want to make corner stapled sets. Press the [Enter] button to confirm. Remove either stapler head and position the other stapler head and clincher as needed. See section 1. Basics. Note Finished sets will be delivered to the Trim Bin in the Trimmer. Trimming Selecting Trimming On or Off From the Main screen, select Front Trim and press the [Enter] button. Press the [+] or [-] button to change Front Trim on or off. If the cutting margin i.
General The SquareFolder has five different settings; [Off], [Mode 1], [Mode 2], [Mode 3] and [Auto]. Select [Off] to bypass the SquareFolding action. 2. Making Booklets SquareFolding Select manual mode as follows depending on the number of sheets in the set. Mode 1: Mode 2: Mode 3: Approximately 6 to 11 sheets. Decreased amount of square forming. Approximately 12 to 16 sheets. Medium amount of square forming. Approximately 17 to 25 sheets. Maximum amount of square forming.
2. Making Booklets On-line / Off-line The Booklet Maker can be operated in two modes. On-line mode, when used together with the Feeder/Collator, or off line mode, when used for hand feeding. On-line Mode Make necessary settings according to “Changing settings” earlier in this section. The Booklet Maker is now in stand-by and will start automatically when a set is fed from the Feeder/Collator.
Close the Booklet Maker top cover. The message “Finish set?” will be shown in the control panel. 2. Making Booklets On-line Mode, continues There are now two choices: • Press the “Yes” button on the Booklet Maker. The set will be finished and fed to the belt stacker. or • Press the “No” button on the Booklet Maker. The message “Open cover and remove set” will be shown in the Booklet Maker control panel. Open the Booklet Maker top cover and remove the set. Close the top cover.
2. Making Booklets Off-line Mode Make sure Booklet Maker is in stand-by mode, i.e. that a job is not in progress. Make necessary settings according to “Changing settings” earlier in this section. The Booklet Maker is now in stand-by mode and will start automatically when a set is manually fed into the Booklet Maker. Sets can be fed either to the optional hand feed tray (A) or to the hand feed slot (B) in the top cover. Note The Booklet Maker can be hand fed while it is still docked to a Collator/Feeder.
3. Admin The Admin Screen From the Main screen, press the [Admin] button to get to the Admin screen. Here you will find additional features and settings. Paper size check Use [Paper size check] to verify that the Booklet Maker paper size setup corresponds to the actual hand fed sheets. If sheets/sets instead are fed from a Feeder/ Collator, this control can be made after a calibration set has been sent from the Feeder/Collator, see Online mode under section 2.
Paper size check, continues 3. Admin Close the Booklet Maker top cover. The message “Finish set?” will be displayed. There are now two choices: • Press the [Yes] button on the Booklet Maker. The set will be finished and fed to the belt stacker. or • Press the [No] button on the Booklet Maker. The message “Open cover and remove set” will be shown in the Booklet Maker control panel. Open the Booklet Maker top cover and remove the set. Close the top cover.
By changing the paper size standard, the preset paper sizes are altered to best fit your regional standard. Also, the units will change between millimetres and inches accordingly. Select [Standard Paper Size] and press the [Enter] button. Select the desired standard and then press the [Enter] button. 3. Admin Standard Paper Size Language From this screen you can change the language in the user interface. Select [Language] and press the [Enter] button.
3.
4. Jobs Storing and Deleting Jobs The Booklet Maker has a maximum storage capacity of 10 different jobs. Also see section 2 Making Booklets. Storing a Job Change all settings according to section 2 for a particular job. Now the changes are just temporary. You can run the system with these changes but as soon as you change something again the previous settings will be lost. To store the settings, press [Jobs] from the Main screen.
Recalling a Job 4. Jobs To recall a stored job press the [Jobs] button from the Main screen. Then press the [Jobs] button from the Jobs screen. Select one of the previously stored jobs from the list. Press the [Enter] button to recall the job. This Job is now uploaded and becomes the current job.
5. Clearing a Paper Jam Clearing a Paper Jam General If an error such as a paper jam condition should occur, it is indicated in the control panel on the Booklet Maker. The nature of the fault is generally displayed in clear text at the top. In the centre of the display the diagram shows in which module and where the error has occurred. At the bottom of the display an error code is displayed and a text explaining the error. See examples below.
5. Clearing a Paper Jam Booklet Maker Clearing a Paper Jam Inside the Booklet Maker To clear a paper jam in the infeed or staple area Open the top cover. Remove jammed sheets. Close the top cover. To clear a jam indicated in the folding area Open the top cover. Close top cover. If the jam still remains: Switch off the Power. Switch on the Power.
If the jam still remains: Switch off the Power Set the fold adjust levers (A) on both sides to “8” to separate the fold rollers. Lift up the guide (B) from below the upper fold roller (C). Use the key (D) from the tool box and crank the upper fold roller to remove jammed sheets. 5. Clearing a Paper Jam Inside the Booklet Maker, continues If a Trimmer is installed, removing the Trim Bin gives you access to the fold stop area from the outfeed side of the Booklet Maker. Put the key back in the tool box.
5. Clearing a Paper Jam Trimmer Clearing a Paper Jam The upper trimmer blade on the trimmer is protected by a knife protection plate that moves away during the cutting stroke. Jams can occur in the input area or the exit area. WARNING: Never put fingers or other parts of the body between the upper and lower trimmer knives. Clearing Jam in Input Area Lift up the infeed roller shaft (A). Secure under latch (B) Remove the jammed sheets in the infeed area.
Clearing Jam in Exit Area Lift the exit compression brackets (A). Secure them under the latch (B). Remove the jammed sheets from the exit area. After the jammed sheets are removed, lift up the latch (B) and place the compression brackets in the operating position. 5.
5. Clearing a Paper Jam SquareFolder Clearing a Paper Jam Inside the SquareFolder Open the top cover. B A Lift up both upper feed belts (A). Note Press the green-labelled latches (B) to release. Remove the jams. Place the upper feed belts in normal position. Close the top cover. Exit Area Open the top cover (A). A Lift up the Belt Stacker Cover (B). Remove the jam. Place the Belt Stacker Cover in normal position. Close the top cover.
6. Troubleshooting Fault codes General When there is a jam or fault condition in the Booklet Maker system, a fault code and a short description will be displayed in the control panel on the Booklet Maker. Some faults can be rectified by the operator and some faults only by an authorized technician.
Booklet Maker Fault Codes 6. Troubleshooting Remove stacked sheets This message will be displayed if there is a miss-feed or double-feed in the Feeder/Collator when the set is delivered to the Booklet Maker. Either: • Open the top cover, remove the set and close the top cover. or • Press the “Purge” button on the Feeder/Collator. The set will be fed to the belt stacker. and/or • Press the green button on the Feeder/Collator to directly start making booklets.
• • • • If booklet quality is inconsistent, first make sure the actual paper size is matching the paper size set on the control panel. Perform a Paper size check, see section 3. If booklet quality is consistently poor such as staples not aligned with the fold or staple and fold line do not match the print, see Staple and Fold Alignment under section 2. If the folding action is poor of if the cover of the booklet tends to be torn from the set, see Fold Quality below.
6. Troubleshooting Fold Quality, continues Under extreme circumstances, when the cover sheet tends to be torn from the rest of the set, this can be rectified by adjusting the Fold Adjust Levers located above the pre-fold transport. There are eight positions for each lever. The topmost notch is the default position. Move the lever notch by notch until performance is satisfactory.
7. General Remarks Do’s And Don’ts • Always follow all warnings marked on, or supplied with, the equipment. • Always exercise care in moving or relocating the equipment. Caution Unplug the power cord from the wall outlet and machine before you move or relocate the equipment. • Do not remove the covers or guards that are fastened with screws. • Do not override or bypass electrical or mechanical interlock devices. • Do not operate the equipment if you notice unusual noises or odours.
Placing Your Machine 7. General Remarks Machine Environment • Always locate the equipment on a solid support surface with adequate strength for the weight of the machine. • Always keep magnets and all devices with strong magnetic fields away from the machine. If the place of installation is air-conditioned or heated, do not place the machine where it will be: • Subjected to sudden temperature changes. • Directly exposed to cool air from an air-conditioner.
Access to Machine 1 (3) 2 1. Left: more than 400 mm / 15 3/4” 2. Front: more than 555 mm / 21 7/8” (3). Right: more than 400 mm / 15 3/4” (for stand alone installation only) 7. General Remarks Place the machine near the power source, providing clearance as shown.
Maintaining Your Machines Caution Never attempt any maintenance function that is not specifically described in this documentation. 7. General Remarks Booklet Maker Lubricating Staplers and Clinchers The parts that need lubrication are shown in the table below.
SquareFolder Cleaning Feed Belts Open the top cover. Clean the upper feed belts (A). The upper feed belts can easily be rotated in either direction. Lift up the upper feed belts to access the lower feed belts. Clean the lower feed belts (B). Rotate the lower feed belts towards the outfeed side for complete cleaning. Place the upper feed belts in normal position. Close the top cover. 7.
Cleaning Square Folding Clamps 7. General Remarks Clean/Peal off any silicon residue from upper and lower clamps (A), which is the area clamping/contacting the booklet. Pay special attention to the right angled corners of the clamp profiles.
8. Specifications Machine Specifications Booklet Maker BM 2000 Specifications Remarks Maximum Speed 3000 booklets / hour (A4 / 8.5x11” sheets) Paper Size, minimum (booklet making) Width 120 mm / 4 3/4” Length 210 mm / 8 1/4” Paper Size, maximum (booklet making) Width 320 mm / 12 5/8” Length 470 mm / 18 1/2” Paper Length, minimum (edge & corner stapling) 111 mm / 4 3/8” Paper Length, maximum (edge & corner stapling) 240 mm / 9 7/16” Paper Weight (Minimum) 60 gsm/16 lb.
Trimmer FTR 2000 (option) 8. Specifications Specifications Maximum Speed 2000 booklets / hour (A4 / 8.5x11” sheets) Minimum input sheet length for trimming 250 mm / 9.84” Minimum trimming *4 mm / 0.16” Maximum trimming 16 mm / 0.63” Minimum length, trimmed booklet 120 mm / 4.72” Maximum length, trimmed booklet 220 mm / 8.
Notes
Notes