
Laminator User Manual

Operations Manual Polaris II
Page 6-1 © 2004 General Binding Corporation
6.0 Applications
The Polaris will accommodate rolls of film on a 3 inch
core. This section will describe how to load and thread
film and start an application. This section will also give
some helpful hints and important points to remember.
WARNING: Do not wear ties, loose fitting clothes
or dangling jewelry while operating or servicing the
laminator. These items may get caught in the nip
and choke you or you can be crushed or burned.
6.1 Film loading and threading
(1) Turn power ON.
(2) Slide the roll of laminating film onto the unwind shaft
so the adhesive is facing away from the heat roller when
placed on the laminator.
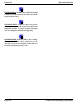
CAUTION: The dull side of the film contains the
adhesive. Use extreme caution when loading
delustered (matte) film as both sides appear dull.
(3) Load the sheet stack on the feed table. Make sure to
“fan” the paper when loading to ensure proper feeding.
Left justify the paper and adjust paper guides as required.
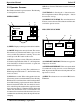
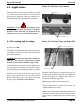
(4) Adjust suction cups on the feeder so that only the
suction cups needed are being used. To adjust, turn off
the first suction cup that does not come in contact with
the paper stack. See Figures 6.1.1 and 6.1.2
Figure 6.1.1 Suction Cup Control
SUCTION CUPS
ON
OFF
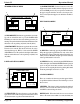
Figure 6.1.2 Suction Cups and Paper Pile
SUCTION CONTROLS
PAPER PILE
(5) Adjust suction cup pressure and blower pressure. As
a starting point, the blower should be set at 20 Kpa and
the suction should be set to -40 Kpa. This may have to
be adjusted for different applications.
(6) Select paper length on main control panel.
(7) Select Nip Pressure on main control panel. See
“Application Guide” for settings.
(8) The Polaris is left justified and the film should be lined
up from the left to the right. Once the film is mounted,
secure in place by tightening the screws on the locking
collars.