AIR CONDITIONER 26” Built-In Wi-Fi SAFETY INFORMATION USING THE AIR CONDITIONER . . . . . . . . . .3 . . . . . . . . . . . . . 4 WI-FI SETUP . . . . . . . . . . . . . . . . . . . . . .7 CARE AND CLEANING . . . . . . . . . . .9 INSTALLATION INSTRUCTIONS . . . . . . . . . . . . . . 10 TROUBLESHOOTING TIPS. . . . . . 12 CONSUMER SUPPORT Warranty . . . . . . . . . . . . . . . . . . . . . . . . . . . . 15 Consumer Support . . . . . . . . . . . . . . . . . . . .
THANK YOU FOR MAKING GE APPLIANCES A PART OF YOUR HOME. Whether you grew up with GE Appliances, or this is your first, we’re happy to have you in the family. We take pride in the craftsmanship, innovation and design that goes into every GE Appliances product, and we think you will too. Among other things, registration of your appliance ensures that we can deliver important product information and warranty details when you need them. Register your GE appliance now online.
READ ALL INSTRUCTIONS BEFORE USING THE APPLIANCE For your safety, the information in this manual must be followed to minimize the risk of WARNING fire, electric shock or personal injury. Ŷ 8VH WKLV DSSOLDQFH RQO\ IRU LWV LQWHQGHG SXUSRVH DV described in this Owner’s Manual. Ŷ This air conditioner must be properly installed in accordance with the Installation Instructions before it is used. Ŷ Never unplug your air conditioner by pulling on the power cord.
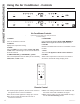
USING THE AIR CONDITIONER Using the Air Conditioner - Controls Appearance may vary. Air Conditioner Controls • Lights below the touch pads on the control panel indicate the selected settings 1. POWER 5. FAN SPEED Turns air conditioner on and off. 2. DISPLAY 8VH WR VHW WKH IDQ VSHHG DW AUTO, LOW, MEDIUM, or HIGH. Indicator lights will show the speed selected. Displays the temperature setting. 6. FILTER 3. MODE Monitors accumulated fan run time as a reminder to clean the filter.
To Adjust Fan Speeds Press the FAN SPEED button to select the FAN SPEED in four steps - AUTO, LOW, MED, or HIGH. Each time the button is pressed, the fan speed mode is shifted. For some models, the fan speed can not be adjusted under HEAT mode. In DRY mode, the fan speed is controlled at low automatically. In AUTO, the fan speed will automatically operate at the speed needed to provide optimum comfort. If the room needs faster cooling to meet the set temperature, the fan will automatically increase.
USING THE AIR CONDITIONER Using the Air Conditioner - Features Additional Features The “Cool” circuit has an automatic 3 minute delayed start if the unit is turned off and on quickly. This prevents overheating of the compressor and possible circuit breaker tripping. The fan will continue to run during this time. There is a 2 second delay for the compressor to stop when selecting fan or heat. This is to cover the possibility of having to roll through to select another mode.
GE Appliances SmartHQ (for customers in the United States) GE Appliances SmartHQ Enabled. If your Air Conditioner (AC) has a Connected Appliance Information label located on the outside as shown below, your AC is GE Appliances SmartHQ Enabled. A WiFi communication card is built into the product allowing it to communicate with your smart phone for remote monitoring, control and notifications. Please visit GEAppliances.
WIFI SETUP WiFi Setup How it Works Download the GE Appliances App 8VH WKH DSS WR FRQQHFW \RXU URRP DLU conditioner to WiFi Once connected, use the app to turn down your air conditioner as you leave work. CHANGE TEMP TO 65 Getting Started To connect your room air conditioner, you’ll need the GE Appliances SmartHQ App. The app will walk you through the connection process. Download the app from iTunes or Google Play.
Air filter To access the filter, grasp the front grille louvers on both sides at the recess and pull forward. Remove the filter by lifting up and out. Note the filter direction when re-installing. Wash the filter using liquid dishwashing detergent and warm water. Rinse the filter thoroughly. Gently shake H[FHVV ZDWHU IURP WKH ILOWHU Be sure the filter is thoroughly dry before replacing. Or, instead of washing, you may vacuum the filter until clean.
INSTALLATION INSTRUCTIONS Installation Instructions For more help, visit GEAppliances.com BEFORE YOU BEGIN Read these instructions completely and carefully. IMPORTANT – Save these • IMPORTANT NOTE For optimal energy efficiency and performance, we recommend using the RAB26 or the RAB46B wall sleeves with the RAG13A rear grille. instructions for local inspector’s use. IMPORTANT – Observe all • • • • • • • • governing codes and ordinances.
Weather Seal Strips Installation Ŷ 7R LPSURYH VHDOLQJ RQ QRQ *( :DOO 6OHHYHV RU older wall sleeves that have damaged or missing gaskets, we have provided two foam pads with adhesive that can be installed on the sides of the chassis per the below instructions. Note: These gaskets may not be necessary with a new RAB26A sleeve install. 1. Remove all packaging and packing material from the unit. 2. Put the chassis on a table or install it DSSUR[LPDWHO\ ô RI WKH ZD\ LQWR WKH VOHHYH 3.
TROUBLESHOOTING TIPS Troubleshooting Tips... Before you call for service Problem Solution Air conditioner does not start Wall plug disconnected. Push plug firmly into wall outlet. House fuse blown or circuit breaker tripped. Replace fuse with time delay type or reset circuit breaker. Plug current device tripped. Press the RESET button. Power is OFF. Turn power ON. Air from the unit does not feel cold enough Room temperature below 62°F (17°C).
Notes 49-5000492 Rev.
Notes 14 49-5000492 Rev.
All warranty service must be provided by our Factory Service Centers, or an authorized Customer Care® technician. To schedule service, visit us on-line at GEAppliances.com/service, or call 800.GE.CARES (800.432.2737). Have serial number and model number available when calling for service. In Canada, contact your distributor.
CONSUMER SUPPORT Consumer Support GE Appliances Website Have a question or need assistance with your appliance? Try the GE Appliances Website 24 hours a day, any day of the year! You can also shop for more great GE Appliances products and take advantage of all our on-line support VHUYLFHV GHVLJQHG IRU \RXU FRQYHQLHQFH ,Q WKH 86 GEAppliances.com In Canada, contact your distributor.
Le climatiseur Climatiseur 26 po avec Wi-Fi intégré INFORMATION DE SÉCURITÉ . . .3 UTILISANT LE CLIMATISEUR . . 4 CONFIGURATION DU WI-FI . . . . . . . . . . . . . . . . . . . . . . . . . . .7 ENTRETIEN ET NETTOYAGE . . . .9 INSTRUCTIONS D’INSTALLATION . . . . . . . . . . . . . . 10 CONSEILS DE DÉPANNAGE . . . . 12 SOUTIEN AU CONSOMMATEUR Garantie limitée . . . . . . . . . . . . . . . . . . . . . . 13 Soutien au consommateur . . . . . . . . . . . . .
NOUS VOUS REMERCIONS D’ACCUEILLIR GE APPLIANCES CHEZ VOUS Que vous ayez grandi avec GE Appliances ou qu’il s’agisse de votre première acquisition, nous sommes heureux de vous accueillir dans notre famille. Nous sommes fiers du savoir-faire, de l’innovation et de l’esthétique qui composent chaque appareil GE Appliances, et nous pensons que vous le serez aussi.
LISEZ TOUTES LES DIRECTIVES AVANT D'UTILISER L'APPAREIL Pour votre sécurité, vous devez suivre les instructions de ce manuel pour réduire les risques d’incendie, d’explosion, de choc électrique, de dommage à la propriété, de blessure ou de décès. AVERTISSEMENT Ŷ 1¶XWLOLVH] FHW DSSDUHLO TXH SRXU VRQ XVDJH SUpYX WHO que décrit dans le Manuel de l’utilisateur. Ŷ 9RXV GHYH] ELHQ PRQWHU FH FRQGLWLRQQHXU conformément aux Instructions de montage, avant de l’utiliser.
UTILISANT LE CLIMATISEUR Utilisant le climatiseur - Commandes L’aspect peut varier. Commandes du climatiseur Les témoins lumineux au-dessus des touches sur le panneau de commande du climatiseur indiquent les réglages choisis. 1. POWER (Mise sous/Hors tension) 5. FAN SPEED (Vitesse du ventilateur) Allume ou éteint le climatiseur. Cette option permet de régler la vitesse du ventilateur à AUTO, LOW, MEDIUM ou HIGH. Les témoins lumineux indiqueront la vitesse sélectionnée. 2.
Réglage de la vitesse du ventilateur 3UHVVH] OH ERXWRQ )DQ 6SHHG SRXU VpOHFWLRQQHU OD YLWHVVH VHORQ quatre étapes : Auto, Low, Med ou High. À chaque pression du bouton, la vitesse passe à la suivante. Sur certains modèles, le réglage de la vitesse est impossible GDQV OH PRGH +($7 'DQV OH PRGH '5< OD YLWHVVH SDVVH j /RZ automatiquement. Dans le mode AUTO, la vitesse du ventilateur fonctionne automatiquement à la vitesse nécessaire pour procurer le confort optimal.
UTILISANT LE CLIMATISEUR Utilisant le climatiseur - Fonctions Fonctions supplémentaires Le circuit « Cool » (refroidissement) est doté d’un démarrage différé automatique de 3 minutes si l’appareil est éteint ou allumé rapidement. Cela prévient la surchauffe du compresseur HW OH GpFOHQFKHPHQW pYHQWXHO GX GLVMRQFWHXU /H YHQWLODWHXU continuera de fonctionner pendant ce temps. Le compresseur met 2 secondes à s’arrêter lorsqu’on sélectionne FAN ou HEAT.
Application SmartHQ de GE Appliances (clients aux États-Unis) Compatibilité GE Appliances SmartHQ. 9RXV VDXUH] TXH YRWUH FOLPDWLVHXU $& HVW FRPSDWLEOH 6PDUW+4 V¶LO SUpVHQWH XQH étiquette de renseignements sur la connectivité réseau apposée sur l’extérieur comme illustré ci-dessous .
CONFIGURATION DU WI-FI Configuration du WI-FI Comment ça fonctionne Téléchargez l’application GE Appliances Utilisez l’application pour connecter votre climatiseur au Wi-Fi Une fois connecté, utilisez l’application pour diminuer la température de votre climatiseur en quittant pour le travail. CHANGE TEMP TO 65 Pour commencer 3RXU FRQQHFWHU YRWUH FOLPDWLVHXU YRXV DXUH] EHVRLQ GH l’application SmartHQ de GE Appliances. L’application vous guidera le long de la procédure de connexion.
Filtre à air 3RXU DFFpGHU DX ILOWUH DJULSSH] OD JULOOH IURQWDOH SDU OHV renfoncements des deux côtés et inclinez-la vers l’avant. 5HWLUH] OH ILOWUH HQ OH VRXOHYDQW YHUV OH KDXW SXLV O¶H[WpULHXU Notez la direction du filtre pour la réinstallation. Lavez le filtre à l’aide d’un détergent liquide pour lave-vaisselle HW G¶HDX PRGpUpPHQW FKDXGH 5LQFH] OH ILOWUH j IRQG 6HFRXH] délicatement le filtre pour évacuer l’eau excédentaire. Assurez-vous que le filtre est complètement sec avant de le replacer.
INSTRUCTIONS D’INSTALLATION Instructions d’installation Pour de l’aide, visitez GEAppliances.ca AVANT DE COMMENCER Lisez ces instructions attentivement et en totalité. • IMPORTANT – Conservez ces instructions pour l’inspecteur local. • IMPORTANT – Observez tous les codes et règlements en vigueur. • Note au monteur – Conservez le Manuel du propriétaire. • Note au consommateur – Conservez ces instructions pour consultation ultérieure.
Installation des bandes d’étanchéité Ŷ 3RXU DPpOLRUHU O¶pWDQFKpLWp GHV PDQFKRQV PXUDX[ autres que ceux de GE ou les manchons muraux plus XVpV FRPSRUWDQW GHV MRLQWV G¶pWDQFKpLWp PDQTXDQWV ou endommagés, nous fournissons deux coussins de mousse adhésifs pouvant être installés sur les côtés du châssis selon les instructions ci-dessous.
CONSEILS DE DÉPANNAGE Conseils de dépannage… Avant d’appeler un réparateur Problème Solution Le climatiseur ne démarre pas La fiche du cordon est débranchée. Poussez la fiche fermement dans la prise murale. Un fusible de la maison est grillé ou le disjoncteur est déclenché. Remplacez le fusible par un fusible temporisé ou réenclenchez le disjoncteur. Le dispositif de courant de la fiche est déclenché. Pressez le bouton RESET (réinitialisation). L’appareil est éteint (OFF). Allumez l’appareil (ON).
Toute réparation sous garantie doit être réalisée par nos Centres de service en usine ou un technicien Customer Care® DXWRULVp 3RXU SUpYRLU XQH UpSDUDWLRQ FRQVXOWH] QRWUH VLWH electromenagersge.car/soutien/demande-deservice RX DSSHOH] OH 9HXLOOH] DYRLU YRWUH QXPpUR GH VpULH HW YRWUH QXPpUR GH PRGqOH j SRUWpH GH main lorsque vous appelez pour obtenir un service. Au Canada, contactez votre distributeur.
SOUTIEN AU CONSOMMATEUR Soutien au consommateur Site Web de GE Appliances 9RXV DYH] XQH TXHVWLRQ RX YRXV DYH] EHVRLQ G¶DLGH SRXU YRWUH DSSDUHLO pOHFWURPpQDJHU" 9LVLWH] OH VLWH :HE GH *( $SSOLDQFHV KHXUHV SDU MRXU WRXV OHV MRXUV GH O¶DQQpH 9RXV SRXYH] DXVVL \ WURXYHU G¶DXWUHV IRUPLGDEOHV SURGXLWV *( $SSOLDQFHV HW WLUHU DYDQWDJH GH WRXV QRV VHUYLFHV G¶DVVLVWDQFH HQ OLJQH $X[ eWDWV 8QLV GEAppliances.com Au Canada : GEAppliances.ca Au Canada, contactez votre distributeur.
ACONDICIONADORES DE AIRE con WI-FI Incorporado de 26” INFORMACIÓN DE SEGURIDAD . . .3 USO DEL ACONDICIONADOR DE AIRE . . . . . . . . . . . . . . . . . . . . . . . . . 4 CONFIGURACIÓN DE WI-FI . . . . .7 CUIDADO Y LIMPIEZA . . . . . . . . . . . . .9 INSTRUCCIONES DE INSTALACIÓN . . . . . . . . . . . . . . 10 SOLUCIÓN DE PROBLEMAS . . . . . . 12 CONSUMER SUPPORT Garantía limitada . . . . . . . . . . . . . . . . . . . . . 13 Soporte al cliente . . . . . . . . . . . . . . . . . . . . .
GRACIAS POR HACER QUE GE APPLIANCES SEA PARTE DE SU HOGAR. Ya sea que haya crecido usando GE Appliances, o que ésta es su primera vez, nos complace tenerlo en la familia. Sentimos orgullo por el nivel de arte, innovación y diseño de cada uno de los electrodomésticos de GE Appliances, y creemos que usted también. Entre otras cosas, el registro de su electrodoméstico asegura que podamos entregarle información importante del producto y detalles de la garantía cuando los necesite.
Para su seguridad, siga las instrucciones de este manual a fin de minimizar riesgos de incendio, descargas eléctricas o heridas personales. Ŷ 8VH HVWH HOHFWURGRPpVWLFR VyOR SDUD VX SURSyVLWR Ŷ &RORTXH OD XQLGDG HQ 2)) $SDJDGR \ GHVHQFKXIH HO original, como se describe en el Manual del Propietario. acondicionador de aire antes de usar el mismo.
USO DEL ACONDICIONADOR DE AIRE Uso del acondicionador de aire - Controles La apariencia puede variar. Controles del Acondicionador de Aire Las luces que están sobre las teclas táctiles del panel de control del acondicionador de aire indican las configuraciones seleccionadas. 1. POWER (Encendido) 5. FAN SPEED (Velocidades del ventilador) Enciende y apaga el acondicionador de aire.
Para Ajustar las Velocidades del Ventilador Presione el botón Fan Speed para seleccionar la velocidad del ventilador en cuatro pasos: Auto, Low, Med o High. Cada vez que se presiona el botón, se cambia el modo de velocidad del ventilador. En algunos modelos, la velocidad del ventilador no se puede DMXVWDU HQ HO PRGR +($7 (Q HO PRGR '5< OD YHORFLGDG GHO ventilador es controlada en el nivel bajo de forma automática.
USO DEL ACONDICIONADOR DE AIRE Uso del acondicionador de aire - Caracteristicas Funciones Adicionales (O FLUFXLWR ³&RRO´ )UtR FXHQWD FRQ XQ LQLFLR UHWUDVDGR automático de 3 minutos, si la unidad es apagada y encendida rápidamente. Esto evita el sobrecalentamiento del compresor y posibles desconexiones del disyuntor. El ventilador continuará funcionando durante este tiempo Hay un retraso de 2 segundos hasta que se detiene el compresor al seleccionar las funciones del ventilador o calefacción.
GE Appliances SmartHQ (Para clientes en Estados Unidos) GE Appliances SmartQ Habilitado. Si su acondicionador de aire posee una etiqueta de Información del Electrodoméstico Conectado ubicada en la parte externa como se muestra a continuación, su acondicionador de aire cuenta con GE SmartHQ +DELOLWDGR 8QD WDUMHWD GH FRPXQLFDFLyQ GH :L)L HVWi LQFRUSRUDGD HQ HO SURGXFWR SHUPLWLHQGR OD FRPXQLFDFLyQ GHO PLVPR con su teléfono inteligente para el monitoreo remoto, control y notificaciones.
CONFIGURACIÓN WIFI Configuración WiFi Cómo Funciona 'HVFDUJXH OD $SOLFDFLyQ GH *( Appliances 8VH OD DSOLFDFLyQ SDUD FRQHFWDU VX acondicionador de aire para sala al WiFi 8QD YH] FRQHFWDGD XVH OD DSOLFDFLyQ para apagar su acondicionador de aire al salir del trabajo. CHANGE TEMP TO 65 Puesta en marcha A fin de conectar su acondicionador de aire para sala, necesitará la Aplicación de GE Appliances SmartHQ. La aplicación lo guiará a través del proceso de conexión.
Filtro de Aire Para acceder al filtro, tome la rejilla frontal sobre ambos lados del espacio libre y realice la inclinación hacia adelante. Retire HO ILOWUR OHYDQWDQGR HO PLVPR KDFLD DUULED \ DIXHUD 2EVHUYH OD dirección del filtro al volver a realizar la instalación. Lave el filtro usando detergente líquido para lavavajillas y agua FDOLHQWH (QMXDJXH HO ILOWUR FRPSOHWDPHQWH 'H IRUPD VXDYH sacuda el exceso de agua del filtro.
INSTRUCCIONES DE INSTALACIÓN Instrucciones de Instalación Para acceder a más ayuda, visite GEAppliances.com ANTES DE INICIAR Lea estas instrucciones completa y cuidadosamente. IMPORTANTE – Guarde estas • NOTA IMPORTANTE Para una óptima eficiencia y rendimiento energético, le recomendamos el uso de la Carcasa de Pared RAB24 y la rejilla exterior de aluminio estampado o la RAB46B con la rejilla exterior de aluminio estampado RAG13. instrucciones para uso del inspector local.
Instalación de la Faja Sellada Anti Clima Ŷ $ ILQ GH PHMRUDU HO VHOODGR HQ &DUFDVDV GH 3DUHG que no sean de GE o carcasas de pared antiguas que sufrieron daños o con juntas faltantes, brindamos dos almohadillas de gomaespuma con adhesivo que se podrán instalar sobre ambos lados del chasis siguiendo las instrucciones que aparecen a continuación. Nota: Es posible que estas juntas no sean necesarias con la instalación de la nueva carcasa RAB26A. 1.
CONSEJOS PARA SOLUCIONAR PROBLEMAS Consejos para Solucionar Problemas…Antes de solicitar servicio Problema Solución El acondicionador de aire no se inicia El cable de pared está desconectado. Presione el cable de manera firme en el tomacorriente de pared. Fusibles hogareños quemados o disyuntores desactivados. Reemplace el fusible por uno con retraso de tiempo o reinicie el disyuntor. Enchufe el dispositivo actualmente activado. Presione el botón RESET (Reiniciar). La corriente está en OFF (Apagado).
Todo el servicio de garantía deberá ser provisto por nuestros Centros de Servicio de Fabricación, o por un técnico DXWRUL]DGR GHO 6HUYLFLR DO &OLHQWH &XVWRPHU &DUH® 3DUD SURJUDPDU XQD YLVLWD GHO VHUYLFLR WpFQLFR D WUDYpV GH ,QWHUQHW visítenos en GEAppliances.com/service R OOiPHQRV DO *( &$5(6 &XDQGR OODPH SDUD VROLFLWDU HO servicio, tenga los números de serie y modelo disponibles.
SOPORTE PARA EL CONSUMIDOR Soporte para el Consumidor Sitio Web de GE Appliances ¢'HVHD UHDOL]DU XQD FRQVXOWD R QHFHVLWD D\XGD FRQ VX HOHFWURGRPpVWLFR" £,QWHQWH D WUDYpV GHO 6LWLR :HE GH *( $SSOLDQFHV ODV KRUDV GHO GtD FXDOTXLHU GtD GHO DxR 8VWHG WDPELpQ SXHGH FRPSUDU PiV HOHFWURGRPpVWLFRV PDUDYLOORVRV GH *( $SSOLDQFHV \ aprovechar todos nuestros servicios de soporte a través de Internet, diseñados para su conveniencia. (Q (( 88 GEAppliances.com En Canadá, comuníquese con su distribuidor.