AIR CONDITIONER RV SAFETY INFORMATION . . . . . . . . .3 INSTALLATION INSTRUCTIONS Before You Begin . . . . . . . . . . . . . . . . . . . . . .4 Tools You will Need . . . . . . . . . . . . . . . . . . . .4 RARMN_ _ Parts List . . . . . . . . . . . . . . . . . . .5 RAREN_ _ Parts List . . . . . . . . . . . . . . . . . . .6 RARED_ _ Parts List . . . . . . . . . . . . . . . . . . .7 Roof Requirements . . . . . . . . . . . . . . . . . . . .8 Roof Requirements and Prep . . . . . . . . . . . .
THANK YOU FOR MAKING GE APPLIANCES A PART OF YOUR RV Whether you grew up with GE Appliances, or this is your first, we’re happy to have you in the family. We take pride in the craftsmanship, innovation and design that goes into every GE Appliances product, and we think you will too. Among other things, registration of your appliance ensures that we can deliver important product information and warranty details when you need them. Register your GE appliance now online.
READ ALL INSTRUCTIONS BEFORE USING THE APPLIANCE For your safety, the information in this manual must be followed to minimize the risk of WARNING fire, electric shock or personal injury. Ŷ 8VH WKLV DSSOLDQFH RQO\ IRU LWV LQWHQGHG SXUSRVH DV described in this Owner’s Manual. Ŷ This air conditioner must be properly installed in accordance with the Installation Instructions before it is used. Ŷ Replace immediately all electric service cords that have become frayed or otherwise damaged.
INSTALLATION INSTRUCTIONS Installation Instructions Questions? Call 1-877-540-7837 or Visit our Website at: GEAppliances.com BEFORE YOU BEGIN TOOLS YOU WILL NEED Read these instructions completely and carefully. • Save these instructions for local inspector’s use. • Observe all governing codes and ordinances. • Note to Installer – Be sure to leave these instructions with the Consumer. • Note to Consumer – Keep these instructions for future reference.
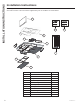
RARMN_ _- Mechanical Non-Ducted Check the contents of the accessories supplied with your air conditioner as shown below: 10 8 12 9 7 6 5 13 INSTALLATION INSTRUCTIONS Installation Instructions 11 4 2 3 1 Number Part Name 49-5000406 Rev. 5 QTY.
INSTALLATION INSTRUCTIONS Installation Instructions RAREN_ _- Electronic Non-Ducted Check the contents of the accessories supplied with your air conditioner as shown below: 8 10 11 7 6 5 4 9 3 2 1 Number Part Name 6 QTY. 1 Filter Cover 1 2 Filter 1 3 Ceiling Panel 1 4 Side Discharge Ports 4 5 Direct Discharge Guide 1 6 Mounting template 1 7 Blanking Plate 1 8 Air division baffle 1 9 M8 Mounting Bolts 4 10 Wood screws 8 11 Sheet metal screws 8 49-5000406 Rev.
RARED_ _- Electronic Ducted Check the contents of the accessories supplied with your air conditioner as shown below: 9 8 6 INSTALLATION INSTRUCTIONS Installation Instructions 3 5 7 4 2 1 Number Part Name 49-5000406 Rev. 5 QTY.
INSTALLATION INSTRUCTIONS Installation Instructions WARNING ELECTRICAL SHOCK HAZARD Death or serious injury can result from failure to follow these instructions. • Disconnect 115VAC and 12VDC power supply before beginning installation and/or servicing • Ensure product is properly grounded according to the applicable codes • Replace all parts and panels before operating A.
B. ROOF REQUIREMENTS AND PREPARATION If a preexisting roof vent opening will be used: 8QVFUHZ DQG UHPRYH URRI YHQW IURP 59 2. Seal all holes and seams with a weather resistant sealant. 3. Measure the width and length of the vent opening. If the opening doesn’t comply with the requirements from section A, it must be resized. If a preexisting opening will not be used, a new opening will be cut through both the roof and ceiling of the RV. 7KLV RSHQLQJ 0867 EH EHWZHHQ VWUXFWXUDO URRI members. 2.
INSTALLATION INSTRUCTIONS Installation Instructions E. MECHANICAL NON-DUCTED INSTALLATION (RARMN_ _) E. MECHANICAL CONTROL INSTALLATION (cont.) 1. From inside the RV, double check the gasket’s position and alignment above the roof opening. Adjust if necessary. The air conditioner can be moved and adjusted by pushing upwards from inside the RV. 10. Plug 6 pin connector from the roof mounted air conditioner into the electronic control box. 2.
F. ELECTRONIC DUCTED (RARED_ _) INSTALLATION F. ELECTRONIC DUCTED (RARED_ _) INSTALLATION 1. From inside the RV, double check the gasket’s position and alignment above the roof opening. Adjust if necessary. The air conditioner can be moved and adjusted by pushing upwards from inside the RV. 15. The Indoor Coil Freeze sensor should be installed in the Thermistor Well on the outdoor unit (pictured below). The sensor has a 2-pin connector that needs to be plugged into “T2” on the circuit board.
USING THE AIR CONDITIONER Controls Features and appearance will vary. 4 1 OFF 2 3 Air Conditioner Controls Controls 1. Power Off 3. Fan Only Modes The air conditioner is off in this position. 2. Air Conditioning Modes In these positions, the compressor and fans will run to provide cold air. The three modes correspond to low, medium, and high fan speeds. OFF In these modes, the fans will run to circulate air in the RV. The three modes correspond to low, medium, and high fan speeds. 4.
IMPORTANT: • When you turn off the air conditioner, wait at least 3 minutes before turning it back on. This prevents the compressor from overloading. This 3 minute delay also applies when switching from cool mode to fan and back. • Do not operate your air conditioner in the Cool mode when the outside temperature is below 60°F (15° C). The inside evaporator coil may freeze up, and the air conditioner will not operate properly. Air Direction 8VH WKH OHYHU WR RSHQ RU FORVH YHQW RQ IDFH RI FRQWURO panel.
CARE AND CLEANING Care and Cleaning Indoor Panel Turn the air conditioner off and disconnect power from the air conditioner before cleaning. To clean, use water and a mild detergent. Do not use bleach or abrasives. Air Filter The air filter should be checked every 2 weeks and cleaned if necessary. DO NOT operate the air conditioner without a filter because dirt and lint will clog it and reduce performance. Cleaning the Air Filter 1. Turn off the air conditioner. 2.
Save time and money! Review the charts on the following pages first and you may not need to call for service. Problem Possible Cause What To Do Air Conditioner does not operate An RV fuse has blown, or circuit breaker has tripped. Replace the fuse or reset the circuit breaker. If the problem continues, call an electrician. See “Electrical Requirements.” The mode setting is in the OFF position. Press POWER or turn the Mode control to an active setting. The local power has failed.
SCHEMATIC DIAGRAMS 16 Schematic Diagrams RVAC Roof Top Units, Cool Only RVHC Roof Top Units, Heat-Pump ARC13AHC_ _ _ ; ARC13AAC_ _ _ ; ARC15AAC_ _ _ ARH13AHC_ _ _ ; ARH15AAC_ _ _ Mechanical Ceiling Assembly Electronic Controls RARMN1A_ RARWT_ _ ; RARMC_ _ ; RAREC_ _ 49-5000406 Rev.
All warranty service must be provided by certified RV Service Centers. To schedule service call 1-877-540-7837 Have serial number and model number available when calling for service. For The Period Of: GE Appliances Will Replace: Two Years From the date of the original purchase Any part of the air conditioner which fails due to a defect in materials or workmanship. During this limited two-year warranty, GE Appliances will also cover all labor and related service to replace the defective part.
CONSUMER SUPPORT Consumer Support GE Appliances Website Have a question or need assistance with your appliance? Try the GE Appliances Website 24 hours a day, any day of the year! You can also shop for more great GE Appliances products and take advantage of all our on-line support VHUYLFHV GHVLJQHG IRU \RXU FRQYHQLHQFH ,Q WKH 86 GEAppliances.
individuel CLIMATISEUR INFORMATION DE SÉCURITÉ . . .3 INSTRUCTIONS D’INSTALLATION MANUEL D’UTILISATION Avant de commencer . . . . . . . . . . . . . . . . . .4 Outils dont vous pouvez avoir besoin . . . . . .4 RARMN_ _: Pièces incluses . . . . . . . . . . . . . .5 RAREN_ _: Pièces incluses . . . . . . . . . . . . . .6 RARED_ _: Pièces incluses . . . . . . . . . . . . . .7 Exigences et détermination de l’emplacement d’installation sur le toit . . .8 Exigences et préparation du toit . . . . . . . . .
NOUS VOUS REMERCIONS D’ACCUEILLIR GE APPLIANCES CHEZ VOUS RV Que vous ayez grandi avec GE Appliances ou qu’il s’agisse de votre première acquisition, nous sommes heureux de vous accueillir dans notre famille. Nous sommes fiers du savoir-faire, de l’innovation et de l’esthétique qui composent chaque appareil GE Appliances, et nous pensons que vous le serez aussi.
LISEZ TOUTES LES DIRECTIVES AVANT D'UTILISER L'APPAREIL AVERTISSEMENT Pour votre sécurité, vous devez suivre les instructions de ce manuel pour réduire les risques d’incendie, d’explosion, de choc électrique, de dommage à la propriété, de blessure ou de décès. Ŷ 1¶XWLOLVH] FHW DSSDUHLO TXH SRXU VRQ XVDJH SUpYX WHO TXH décrit dans le Manuel de l’utilisateur. Ŷ 9RXV GHYH] ELHQ PRQWHU FH FRQGLWLRQQHXU FRQIRUPpPHQW aux Instructions de montage, avant de l’utiliser.
INSTRUCTIONS D’INSTALLATION Instructions d’installation Questions? Composez le 1.800.361.3400 ou visitez notre site web à : electromenagersge.ca OUTILS DONT VOUS POUVEZ AVOIR BESOIN AVANT DE COMMENCER Lisez ces instructions attentivement et en totalité. • IMPORTANT – Conservez ces instructions pour l’inspecteur local. • IMPORTANT – Observez tous les codes 3HUFHXVH HW IRUHW SR et règlements en vigueur. • Note au monteur – Conservez le Manuel du 7RXUQHYLV j WrWH 3KLOOLSV propriétaire.
RARMN_ _ - Mécanique sans conduit Assurez-vous que tous les accessoires suivants ont été livrés avec votre climatiseur : 10 8 12 9 7 6 5 13 INSTRUCTIONS D’INSTALLATION Instructions d’installation 11 4 2 3 1 Numéro Nom de la pièce 49-5000406 Rev.
INSTRUCTIONS D’INSTALLATION Instructions d’installation RAREN_ _-Électronique non canalisé Assurez-vous que tous les accessoires suivants ont été livrés avec votre climatiseur : 8 10 11 7 6 5 4 9 3 2 1 Numéro Nom de la pièce QTÉ Couvercle du filtre 2 Filtre 3 3DQQHDX GH SODIRQG Orifices de sortie latéraux Guide de sortie directe Gabarit de montage 7 3ODTXH G¶REWXUDWLRQ Chicane pour division d’air 9 %RXORQV GH PRQWDJH 0 9LV j ERLV
RARED_ _- Conduit électronique Assurez-vous que tous les accessoires suivants ont été livrés avec votre climatiseur : 9 8 6 INSTRUCTIONS D’INSTALLATION Instructions d’installation 3 5 7 4 2 1 Numéro Nom de la pièce 49-5000406 Rev.
INSTRUCTIONS D’INSTALLATION Instructions d’installation AVERTISSEMENT RISQUE D’ÉLECTROCUTION Des blessures graves ou mortelles peuvent survenir si ces instructions ne sont pas respectées. 'pEUDQFKH] OD VRXUFH G¶DOLPHQWDWLRQ GH 9&$ DYDQW GH FRPPHQFHU O¶LQVWDOODWLRQ RX OHV UpSDUDWLRQV $VVXUH] YRXV TXH FH SURGXLW HVW PLV j OD WHUUH FRQIRUPpPHQW DX[ FRGHV HQ YLJXHXU • Installez toutes les pièces et les panneaux avant de mettre l’appareil en marche. A.
B. EXIGENCES ET PRÉPARATION DU TOIT Si une ouverture d’aération de toit est utilisée : 'pYLVVH] HW UHWLUH] O¶pYHQW GH WRLW GX YpKLFXOH récréatif. 2. Scellez tous les trous et toutes les rainures avec un calfeutrant résistant aux intempéries. 3. Mesurez la largeur et la longueur de l’ouverture GH O¶pYHQW 9RXV GHYUH] DMXVWHU O¶RXYHUWXUH VL cette dernière ne correspond pas aux exigences mentionnées ci-dessus.
INSTRUCTIONS D’INSTALLATION Instructions d’installation E. MECHANICAL INSTALLTION NON-DUCTED (RARMN_ _) E. MECHANICAL INSTALLTION NON-DUCTED (RARMN_ _) 'HSXLV O¶LQWpULHXU GX YpKLFXOH UpFUpDWLI YpULILH] j QRXYHDX OD SRVLWLRQ HW O¶DOLJQHPHQW GX MRLQW d’étanchéité au-dessus de l’ouverture du toit. (IIHFWXH] GHV DMXVWHPHQWV VL QpFHVVDLUH /H FOLPDWLVHXU SHXW rWUH GpSODFp HW DMXVWp HQ OH poussant vers le haut depuis l’intérieur du véhicule récréatif. 2.
F. INSTALLATION ÉLECTRONIQUE AVEC CONDUIT (RARED_ _) F. INSTALLATION ÉLECTRONIQUE AVEC CONDUIT (RARED_ _) 'HSXLV O¶LQWpULHXU GX YpKLFXOH UpFUpDWLI YpULILH] j QRXYHDX OD SRVLWLRQ HW O¶DOLJQHPHQW GX MRLQW d’étanchéité au-dessus de l’ouverture du toit. (IIHFWXH] GHV DMXVWHPHQWV VL QpFHVVDLUH /H FOLPDWLVHXU SHXW rWUH GpSODFp HW DMXVWp HQ OH poussant vers le haut depuis l’intérieur du véhicule récréatif. 2.
UTILISATION DU CLIMATISEUR Commandes Les fonctions et l’aspect peut varier. 4 1 OFF 2 3 Commandes du conditionneur 3. Modes de ventilation seulement Commandes 1. Hors tension Le climatiseur est éteint dans cette position. 2. Modes de climatisation Avec ces positions, le compresseur et les ventilateurs fonctionnent pour fournir de l’air froid. Ces trois modes sont pour les vitesses du ventilateur : faible, moyenne et élevée.
IMPORTANTE: /RUVTXH OH FOLPDWLVHXU HVW PLV j O¶DUUrW DWWHQGUH DX PRLQV 3 minutes avant de le remettre en marche. Ceci prévient la surcharge du compresseur.
UTILISANT LE CONDITIONNEUR D’AIR / ENTRETIEN ET NETTOYAGE Utilisant le conditionneur d’air Panneau intérieur Eteignez le climatiseur et débranchez le climatiseur avant le nettoyage. 3RXU QHWWR\HU XWLOLVH] GH O¶HDX HW XQ GpWHUJHQW GRX[ N’utilisez pas d’eau de Javel ou d’abrasifs. Filtre à air /H ILOWUH j DLU GRLW rWUH YpULILp WRXWHV OHV VHPDLQHV HW nettoyé, le cas échéant.
eFRQRPLVH] WHPSV HW DUJHQW ([DPLQH] G¶DERUG OHV WDEOHDX[ VXLYDQWV XQ DSSHO GH VHUYLFH VHUD SHXW rWUH LQXWLOH Problème Cause possible Solution Le climatiseur ne fonctionne pas. Un fusible est grille ou le disjoncteur est déclenché. 5HPSODFH] OH IXVLEOH RX HQFOHQFKH] j QRXYHDX OH GLVMRQFWHXU 6L OH SUREOqPH SHUVLVWH DSSHOH] XQ pOHFWULFLHQ Consultez le chapitre “Exigences électriques.” Le réglage du mode est en position OFF. $SSX\H] VXU 32:(5 RX UpJOH] OH PRGH VXU XQ SDUDPqWUH actif.
SCHÉMAS DE PRINCIPE Schémas de principe RVAC Roof Top Units, Cool Only RVHC Roof Top Units, Heat-Pump ARC13AHC_ _ _ ; ARC13AAC_ _ _ ; ARC15AAC_ _ _ ARH13AHC_ _ _ ; ARH15AAC_ _ _ Mechanical Ceiling Assembly Electronic Controls RARMN1A_ RARWT_ _ ; RARMC_ _ ; RAREC_ _ 49-5000406 Rev.
7RXWH UpSDUDWLRQ VRXV JDUDQWLH GRLW rWUH UpDOLVpH SDU QRV &HQWUHV GH VHUYLFH HQ XVLQH RX XQ WHFKQLFLHQ &XVWRPHU Care® DXWRULVp 3RXU SUpYRLU XQH UpSDUDWLRQ FRQVXOWH] QRWUH VLWH electromenagersge.car/soutien/demande-deservice RX DSSHOH] OH 9HXLOOH] DYRLU YRWUH QXPpUR GH VpULH HW YRWUH QXPpUR GH PRGqOH j SRUWpH GH main lorsque vous appelez pour obtenir un service.
SOUTIEN AU CONSOMMATEUR Soutien au consommateur Site Web de GE Appliances 9RXV DYH] XQH TXHVWLRQ RX YRXV DYH] EHVRLQ G¶DLGH SRXU YRWUH DSSDUHLO pOHFWURPpQDJHU" 9LVLWH] OH VLWH :HE GH *( $SSOLDQFHV KHXUHV SDU MRXU WRXV OHV MRXUV GH O¶DQQpH 9RXV SRXYH] DXVVL \ WURXYHU G¶DXWUHV IRUPLGDEOHV SURGXLWV *( $SSOLDQFHV HW WLUHU DYDQWDJH GH WRXV QRV VHUYLFHV G¶DVVLVWDQFH HQ OLJQH $X[ eWDWV 8QLV GEAppliances.
PARA SALA ACCONDICIONADORES DE AIRE INFORMACIÓN DE SEGURIDAD . . .3 Instrucciones de instalación Antes de comenzar . . . . . . . . . . . . . . . . . . . .4 Herramientas Que Necesitará . . . . . . . . . . .4 RARMN_ _ . . . . . . . . . . . . . . . . . . . . . . . . . . . .5 RAREN_ _ . . . . . . . . . . . . . . . . . . . . . . . . . . . .6 RARED_ _ . . . . . . . . . . . . . . . . . . . . . . . . . . . .7 A. Requisitos para instalaciones . . . . . . . . .8 B. Requisitos y preparación del techo . . . .9 C.
GRACIAS POR HACER QUE GE APPLIANCES SEA PARTE DE SU HOGAR. Ya sea que haya crecido usando GE Appliances, o que ésta es su primera vez, nos complace tenerlo en la familia. Sentimos orgullo por el nivel de arte, innovación y diseño de cada uno de los electrodomésticos de GE Appliances, y creemos que usted también. Entre otras cosas, el registro de su electrodoméstico asegura que podamos entregarle información importante del producto y detalles de la garantía cuando los necesite.
Para su seguridad, siga las instrucciones de este manual a fin de minimizar riesgos ADVERTENCIA de incendio, descargas eléctricas o lesiones personales. Ŷ 8VH HVWH HOHFWURGRPpVWLFR VyOR SDUD VX SURSyVLWR original, como se describe en el Manual del Propietario. Ŷ (VWH DFRQGLFLRQDGRU GH DLUH GHEHUi VHU LQVWDODGR GH IRUPD apropiada de acuerdo con las Instrucciones de Instalación antes de su uso. Ŷ 5HHPSODFH GH LQPHGLDWR WRGRV ORV FDEOHV GH FRUULHQWH pelados o con cualquier tipo de daño.
INSTRUCCIONES DE INSTALACIÓN Instrucciones de instalación ¿Preguntas? Llame 800.GE.CARES (800.432.2737) o visite nuestra página en la red en: GEAppliances.com ANTES DE INICIAR HERRAMIENTAS QUE NECESITARÁ Lea estas instrucciones completa y cuidadosamente. • Guarde estas instrucciones para uso del inspector local. 7DODGUR \ EURFD GH ´ • Observe todos los códigos y órdenes de ley. 8Q GHVWRUQLOODGRU GH HVWUHOOD • Nota al instalador – Asegúrese de dejar estas instrucciones con el consumidor.
RARMN_ _-Mecánica Sin Conducto Verifique el contenido de los accesorios suministrados con su aire acondicionado como se muestra a continuación: 10 8 12 9 7 6 5 13 INSTRUCCIONES DE INSTALACIÓN Instrucciones de instalación 11 4 2 3 1 Número Nombre de parte 49-5000406 Rev.
INSTRUCCIONES DE INSTALACIÓN Instrucciones de instalación RAREN_ _-Electrónica Sin Conducto Verifique el contenido de los accesorios suministrados con su aire acondicionado como se muestra a continuación: 8 10 11 7 6 5 4 9 3 2 1 Número Nombre de parte Cantidad 7DSD GHO )LOWUR 2 Filtro 3 Panel de techo Puertos de descarga lateral Guía de descarga directa Plantilla de montaje 7 Placa Ciega Deflector de división aérea 9 3HUQRV GH PRQWDMH 0
RARED_ _-Electrónica Con Conducto Verifique el contenido de los accesorios suministrados con su aire acondicionado como se muestra a continuación: 9 8 6 3 5 INSTRUCCIONES DE INSTALACIÓN Instrucciones de instalación 7 4 2 1 Número Nombre de parte 49-5000406 Rev.
INSTRUCCIONES DE INSTALACIÓN Instrucciones de instalación ADVERTENCIA RIESGO DE DESCARGA ELÉCTRICA Se podrá producir la muerte o daños graves como resultado de no seguir estas instrucciones. 'HVFRQHFWH HO VXPLQLVWUR GH FRUULHQWH GH 9$& DQWHV GH LQLFLDU OD LQVWDODFLyQ \ R HO VHUYLFLR WpFQLFR • Asegúrese de que el producto se encuentre correctamente conectado a tierra, de acuerdo con los códigos aplicables. • Reemplace todas las piezas y paneles antes del uso. A.
B. REQUISITOS Y PREPARACIÓN DEL TECHO C. REQUISITOS ELÉCTRICOS Si se usará una abertura de ventilación del techo ya existente: (VWRV PRGHORV UHTXLHUHQ XQ WRPDFRUULHQWH GH YROWLRV \ +] SURWHJLGR FRQ XQ IXVLEOH GH UHWUDVR GH DPSHUHV R XQ GLV\XQWRU 'HVWRUQLOOH \ UHWLUH OD YHQWLODFLyQ GHO WHFKR GHO vehículo recreativo. 8VH XQ PtQLPR GH FDEOH GH FREUH GH $:* enfundado, sin conexión a tierra. 2. Selle todos los agujeros y juntas con un sellador resistente al clima.
INSTRUCCIONES DE INSTALACIÓN Instrucciones de instalación E. INSTALACIÓN MECÁNICA SIN CONDUCTO (RARMN_ _) E. INSTALACIÓN MECÁNICA SIN CONDUCTO (RARMN_ _) 'HVGH GHQWUR GHO YHKtFXOR UHFUHDWLYR UHDOLFH XQ control doble del posicionamiento y alineación de la junta sobre la abertura del techo. De ser necesario, realice ajustes. El acondicionador de aire podrá ser movido y ajustado empujando hacia arriba desde dentro del vehículo recreativo.
F. INSTALACIÓN ELECTRÓNICA SIN CONDUCTO (RARED_ _) F. INSTALACIÓN ELECTRÓNICA SIN CONDUCTO (RARED_ _) 'HVGH GHQWUR GHO YHKtFXOR UHFUHDWLYR UHDOLFH XQ control doble del posicionamiento y alineación de la junta sobre la abertura del techo. De ser necesario, realice ajustes. El acondicionador de aire podrá ser movido y ajustado empujando hacia arriba desde dentro del vehículo recreativo. 2.
CONTROLES Controles Las funciones y la apariencia podrán variar. 4 1 OFF 2 3 Controles del Acondicionador de Aire Controles 3. Modo de Sólo Ventilador 1. Apagado En estos modos, los ventiladores hacen circular aire en el vehículo recreativo. Los tres modos corresponden a las velocidades baja, media y alta del ventilador. El acondicionador de aire está en la posición de apagado. 2.
IMPORTANTE: • Al apagar el acondicionador de aire, espere por lo menos 3 minutos antes de volver a encenderlo. Esto evitará que el compresor se sobrecargue. Este retraso de 3 minutos también se aplica cuando se pasa del modo frío a ventilador y a frío nuevamente. • No utilice el acondicionador de aire en el modo Cool )UtR FXDQGR OD WHPSHUDWXUD H[WHULRU VH HQFXHQWUH SRU GHEDMR GH ORV ) & /D ERELQD GHO HYDSRUDGRU interior se congelará, y el acondicionador de aire no funcionará correctamente.
CONSEJOS PARA LA SOLUCIÓN DE PROBLEMAS Cuidado y limpieza Parrilla y Caja Apague el acondicionador de aire y retire el enchufe del tomacorriente antes de limpiar. Para limpiar, use agua y un detergente suave. No use blanqueadores ni abrasivos. Filtro de Aire El filtro de aire se deberá controlar cada 2 semanas y se lo deberá limpiar, de ser necesario. No utilice el acondicionador de aire sin un filtro, ya que la suciedad y las pelusas producirán atascamientos y reducirán su funcionamiento.
¡Ahorre tiempo y dinero! Primero revise los cuadros que aparecen en las siguientes páginas y es posible que no necesite solicitar reparaciones. Problema Causas posibles Qué hacer El aire acondicionado no funciona. El cable de suministro eléctrico se disparó (el botón Reset se elevó). 2SULPD \ VXHOWH 5(6(7 HVSHUH HVFXFKDU XQ FOLF HO ERWyQ 5HVHW VH EORTXHDUi \ HQ DOJXQRV GLVSRVLWLYRV VH HQFHQGHUi XQD OX] YHUGH SDUD reanudar el funcionamiento.
DIAGRAMAS ESQUEMÁTICOS Diagramas Esquemáticos RVAC Roof Top Units, Cool Only RVHC Roof Top Units, Heat-Pump ARC13AHC_ _ _ ; ARC13AAC_ _ _ ; ARC15AAC_ _ _ ARH13AHC_ _ _ ; ARH15AAC_ _ _ Mechanical Ceiling Assembly Electronic Controls RARMN1A_ RARWT_ _ ; RARMC_ _ ; RAREC_ _ 49-5000406 Rev.
7RGR HO VHUYLFLR GH JDUDQWtD GHEHUi VHU SURYLVWR SRU QXHVWURV &HQWURV GH 6HUYLFLR GH )DEULFDFLyQ R SRU XQ WpFQLFR autorizado del Servicio al Cliente (Customer Care® 3DUD SURJUDPDU XQD YLVLWD GHO VHUYLFLR WpFQLFR D WUDYpV GH ,QWHUQHW visítenos en GEAppliances.com/service, o llámenos al *( &$5(6 &XDQGR OODPH SDUD VROLFLWDU HO VHUYLFLR WHQJD ORV Q~PHURV GH VHULH \ PRGHOR GLVSRQLEOHV Por el período de: GE Appliances Reemplazará: Dos Años A partir de la fecha de la compra original
SOPORTE PARA EL CONSUMIDOR Soporte para el Consumidor Sitio Web de GE Appliances ¿Desea realizar una consulta o necesita ayuda con su electrodoméstico? ¡Intente a través del Sitio Web de GE Appliances las KRUDV GHO GtD FXDOTXLHU GtD GHO DxR 8VWHG WDPELpQ SXHGH FRPSUDU PiV HOHFWURGRPpVWLFRV PDUDYLOORVRV GH *( $SSOLDQFHV \ aprovechar todos nuestros servicios de soporte a través de Internet, diseñados para su conveniencia. (Q (( 88 GEAppliances.