
Installation Instructions


4 49-5000406 Rev. 5
Installation Instructions
BEFORE YOU BEGIN
Read these instructions completely and carefully.
•
Save these instructions for local inspector’s use.
•
Observe all governing codes and ordinances.
• Note to Installer – Be sure to leave these
instructions with the Consumer.
• Note to Consumer – Keep these instructions for
future reference.
• Skill level – Installation of this appliance requires a
qualified RV technician.
• Completion time – Approximately 1 hour
• We recommend that two people install this product.
• Proper installation is the responsibility of the
installer.
• Product failure due to improper installation is not
covered under the Warranty.
<RX0867XVHDOOVXSSOLHGSDUWVDQGXVHSURSHU
installation procedures as described in these
instructions when installing this air conditioner.
Questions? Call 1-877-540-7837 or Visit our Website at: GEAppliances.com
TOOLS YOU WILL NEED
Phillips head screwdriver
Ruler or tape measure
Pencil
Level
Scissors or knife
Torque Wrench (0-60 in-lbs)
Drill and 1/8” drill bit
CAUTION
Be cautious of sharp edges as they may cause injury.
When lifting the air conditioner, use 2 people to lift.
Electrical wiring may be present between roof and
ceiling. Be sure that power is disconnected at the
mains and battery. Be sure that the gas supply is shut
off. Failure to do so may result in injury or death.
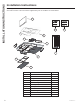
INSTALLATION INSTRUCTIONS
,QGRRU8QLWV
RARMN_ _
Mechanical
Non-Ducted
RAREN_ _
Electronic
Non-Ducted
RARED_ _
Electronic Ducted
Elec. Control
RARMC_ _
RAREC_ _
99
Wall Thermostat
RARWT_ _
99
Table #1 - Model Compatibility List
,QGRRU8QLWV Breaker Size
2XWGRRU8QLWV RARMN_ _
Mechanical Non-
Ducted
RAREN_ _
Electronic Non-Ducted
RARED_ _
Electronic
Ducted
MCA
MIN Circuit
Ampacity
MOP
MAX Circuit Rating
of Overcurrent
ARC13AHC_
999
15A 20A
ARC13AAC_
999
20A 20A
ARC15AAC_
999
20A 20A
ARH13AHC_
99
15A 20A
ARH15AAC_
99
20A 20A