
Installation Instructions


8 49-5000406 Rev. 5
INSTALLATION INSTRUCTIONS
Installation Instructions
A. ROOF REQUIREMENTS AND DETERMINING LOCATION FOR INSTALLATION
Air conditioners covered in this manual are designed
for installation on an RV’s roof.
Installation of this air conditioner must be in accordance
with NFPA 1192 and NFPA 70.
For proper installation, there must be a 14 ñ»” x 14 ñ»”
(+/-ï»”) square opening in the roof and ceiling of the
RV.
There must be 2 to 6 inches between the RV ceiling
and roof.
Air conditioners covered in this manual are designed to
fit over preexisting roof vent openings.
If a roof vent opening isn’t available, use the following
guidelines:
8QLWLVWREHLQVWDOOHGFHQWHUHGVLGHWRVLGHRQWKH59URRI
8QLWLVWREHLQVWDOOHGRQDVHFWLRQRIURRIZKLFKLVOHYHOZLWK
respect to the RV roof if parked on a flat, level surface
.
Roof at the point of installation can have a maximum 15
degree tilt towards the front or rear of the RV.
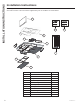
Figure 1: Outdoor Unit
Figure 2: Indoor Non-Ducted Unit
Figure 3: Indoor Ducted Unit
Figure 1: Outdoor unit:
32 - 7/8”
27 - 3/4”
13 - 7/8”
Figure 2: Indoor Non-Ducted Unit:
23”
21”
2 -1/2”
14 - 3/8”
3 - 3/8”
14
-
3/8”
6”
2 - 5/8”
Roof opening
18”
Center Line of unit
Keep at least 18” free of obstructions at rear of unit.
Roof opening
Front
13 - 3/4”
4 - 3/4”
WARNING
ELECTRICAL SHOCK HAZARD
Death or serious injury can result from failure to follow these instructions.
• Disconnect 115VAC and 12VDC power supply before beginning installation and/or servicing
• Ensure product is properly grounded according to the applicable codes
• Replace all parts and panels before operating
Figure 3: Indoor Ducted Unit:
17”
17”
5/8”
Roof Opening
14 - 3/8”
14 - 3/8”
1 - 3/8”
1 - 3/8”