UPRIGHT FREEZERS SAFETY INFORMATION . . . . . . . . .3 USING THE FREEZER OWNER’S MANUAL AND INSTALLATION INSTRUCTIONS CARE AND CLEANING . . . . . . . . . . .9 Upright—No-Frost Models: FUF14, FUF17, FUF21 Temperature Control . . . . . . . . . . . . . . . . . . .5 Features . . . . . . . . . . . . . . . . . . . . . . . . . . . . . .7 INSTALLATION INSTRUCTIONS Installing the Freezer . . . . . . . . . . . . . . . . . . 12 TROUBLESHOOTING TIPS. . . . . . 13 WARRANTY . . . . . . . . . . . . . . . . . . .
THANK YOU FOR MAKING GE APPLIANCES A PART OF YOUR HOME. Whether you grew up with GE Appliances, or this is your first, we’re happy to have you in the family. We take pride in the craftsmanship, innovation and design that goes into every GE Appliances product, and we think you will too. Among other things, registration of your appliance ensures that we can deliver important product information and warranty details when you need them. Register your GE appliance now online.
READ ALL INSTRUCTIONS BEFORE USING THE APPLIANCE WARNING To reduce the risk of fire, explosion, electric shock, or injury when using your upright freezer follow these basic safety precautions: Ŷ 7 KLV IUHH]HU PXVW EH SURSHUO\ LQVWDOOHG DQG ORFDWHG LQ Ŷ 7R SUHYHQW VXIIRFDWLRQ DQG HQWUDSPHQW KD]DUGV WR accordance with the Installation Instructions before it children, remove the door from any freezer before is used. disposing of it or discontinuing its use.
SAFETY INFORMATION IMPORTANT SAFETY INFORMATION READ ALL INSTRUCTIONS BEFORE USING THE APPLIANCE CONNECTING ELECTRICITY WARNING ELECTRICAL SHOCK HAZARD Plug into a grounded 3-prong outlet 'R QRW UHPRYH WKH JURXQG SURQJ 'R QRW XVH DQ DGDSWHU 'R QRW XVH DQ H[WHQVLRQ FRUG )DLOXUH WR IROORZ WKHVH LQVWUXFWLRQV FDQ UHVXOW LQ GHDWK ILUH RU HOHFWULFDO VKRFN Do not, under any circumstances, cut or remove the third (ground) prong from the power cord.
)RU VDIH IRRG VWRUDJH DOORZ KRXUV IRU WKH IUHH]HU WR cool down completely. The freezer will run continuously IRU WKH ILUVW VHYHUDO KRXUV )RRGV WKDW DUH DOUHDG\ IUR]HQ may be placed in the freezer after the first few hours of RSHUDWLRQ 8QIUR]HQ IRRG VKRXOG 127 EH SODFHG LQ WKH freezer until it has operated for 4 hours. Allow several hours after each one-step adjustment for the freezer temperature to stabilize.
USING THE FREEZER: Temperature Control Temperature Control 'HFUHDVH 3DG °F °C Increase Pad Demo 7XUER )UHH]H /LJKW ON Turbo Freeze Lock Controls Light ON Control Lock High Temp Light 'RRU 2SHQ /LJKW Hold 3 Sec Alarm Reset Pad Alarm Reset High Temp Door open This electronic temperature control is located on the front of the freezer door. The temperature is factorypreset to provide satisfactory food storage temperatures.
Key-Ejecting Lock The lock is spring loaded so the key cannot be left in the lock. To lock or unlock, press the key in while turning. ,I WKH NH\ LV ORVW \RX FDQ RUGHU D UHSODFHPHQW E\ FDOOLQJ *( $SSOLDQFHV DW *( &$5(6 GXULQJ normal business hours. Provide the model and serial number of the freezer when requesting a replacement key. WARNING To prevent a child from being entrapped, keep the key out of reach of children and away from the freezer.
USING THE FREEZER: )HDWXUHV Features Door Bins There are 3 full depth door bins and one partial depth door bin on the unit. The partial depth door bin should always be installed at the bottom.
Cleaning the Inside To help prevent odors, leave an open box of baking soda in the freezer. CAUTION 'R QRW FOHDQ JODVV VKHOYHV ZLWK ZDUP water when they are cold. Glass shelves may break if exposed to sudden temperature changes or impact such as 8QSOXJ WKH IUHH]HU EHIRUH FOHDQLQJ ,I WKLV LV QRW SUDFWLFDO bumping or dropping. Tempered glass is designed to shatter wring excess moisture out of sponge or cloth when into many small pieces if it breaks.
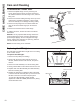
CARE AND CLEANING Care and Cleaning To Remove the Freezer Door Plastic Hinge Cover 1. Remove the plastic hinge cover by removing one screw, disconnect the wiring connector and remove the ambient thermistor from the hinge cover, and then lifting it off. 2. Remove the screws holding the hinge to the top of the FDELQHW XVLQJ D 3KLOOLSV VFUHZGULYHU RU ´ VRFNHW driver. Be carefully not to damage the wiring nearby. 3. Remove the top hinge from the cabinet and lift the door up and off the lower hinge pin.
In Case of Extended Power Failure Ŷ .HHS IUHH]HU GRRU FORVHG
INSTALLATION INSTRUCTIONS Installing the Freezer Freezer Location Your freezer should be conveniently located for day-to-day use in a dry, well-ventilated room. Be sure to install your freezer on a floor strong enough to support it when it is fully loaded. 'R QRW LQVWDOO WKH IUHH]HU ZKHUH WKH WHPSHUDWXUH ZLOO JR EHORZ ) RU DERYH ) EHFDXVH LW ZLOO QRW PDLQWDLQ proper temperatures. 'R QRW LQVWDOO WKH IUHH]HU LQ D ORFDWLRQ H[SRVHG WR UDLQ water or direct sunlight.
Save time and money! Review the charts on the following pages first and you may not need to call for service. Problem Freezer does not operate Freezer starts/stops too frequently Freezer operates too long Noisy operation or cabinet vibrates Freezer temperature too warm Foods defrosting Freezer temperature too cold 49-60763-3 Possible Causes Freezer is unplugged. The fuse is blown/circuit breaker is tripped. "Demo" LED light is on and Freezer is in Demo mode. Door left open.
TROUBLESHOOTING TIPS Troubleshooting Tips...
GEAppliances.com $OO ZDUUDQW\ VHUYLFH LV SURYLGHG E\ RXU )DFWRU\ 6HUYLFH &HQWHUV RU DQ DXWKRUL]HG &XVWRPHU &DUH® technician. To schedule service online, visit us at www.geappliances.com/service RU FDOO *( $SSOLDQFHV DW *( &$5(6 3OHDVH KDYH \RXU VHULDO QXPEHU DQG \RXU PRGHO QXPEHU DYDLODEOH ZKHQ FDOOLQJ IRU VHUYLFH ,Q &DQDGD FDOO For the Period of: GE Appliances Will Replace One Year )URP WKH GDWH RI WKH original purchase Any part of the freezer which fails due to a
CONSUMER SUPPORT Consumer Support GE Appliances Website Have a question or need assistance with your appliance? Try the GE Appliances Website 24 hours a day, any day of the year! You can also shop for more great GE Appliances products and take advantage of all our on-line support VHUYLFHV GHVLJQHG IRU \RXU FRQYHQLHQFH ,Q WKH 86 GEAppliances.com In Canada: GEAppliances.
UTILISATION DU CONGÉLATEUR INFORMATION DE SÉCURITÉ . . .3 UTILISATION DU CONGÉLATEUR MANUEL D’UTILISATION ET D’INSTALLATION ENTRETIEN ET NETTOYAGE . . . .9 Modèles verticaux—Sans givre : FUF14, FUF17, FUF21 Commande de température . . . . . . . . . . . . .5 Caractéristiques . . . . . . . . . . . . . . . . . . . . . . .7 INSTALLATION l’installation du la congélateur . . . . . . . . . . 12 CONSEILS DE DÉPANNAGE . . . . 13 GARANTIE. . . . . . . . . . . . . . . . . . . . . . . .
NOUS VOUS REMERCIONS D’ACCUEILLIR GE APPLIANCES CHEZ VOUS Que vous ayez grandi avec GE Appliances ou qu’il s’agisse de votre première acquisition, nous sommes heureux de vous accueillir dans notre famille. Nous sommes fiers du savoir-faire, de l’innovation et de l’esthétique qui composent chaque appareil GE Appliances, et nous pensons que vous le serez aussi.
LISEZ TOUTES LES DIRECTIVES AVANT D'UTILISER L'APPAREIL AVERTISSEMENT Pour réduire le risque d’incendie, d’explosion, de choc électrique ou de blessures lorsque vous utilisez votre congélateur, veuillez suivre ces consignes de sécurité : Ŷ & H FRQJpODWHXU GRLW rWUH FRUUHFWHPHQW LQVWDOOp conformément aux Consignes d’Installation avant toute utilisation.
INFORMATION DE SÉCURITÉ INFORMATION DE SÉCURITÉ IMPORTANTES LISEZ TOUTES LES DIRECTIVES AVANT D'UTILISER L'APPAREIL BRANCHEMENTS ÉLECTRIQUES AVERTISSEMENT RISQUE DE CHOC ÉLECTRIQUE Branchez l’appareil dans une prise triple avec terre. Ne retirez pas la broche de terre. N’utilisez pas d’adaptateur. Ne pas utiliser un câble de rallonge. Le non-respect de ces instructions peut entraîner des risques d’incendies, des chocs électriques ou la mort.
Pour un stockage sûr des aliments, laissez complètement refroidir votre congélateur pendant 4 heures. Pendant les premières heures, le congélateur fonctionnera en continu. Les aliments déjà congelés peuvent être placés dans le congélateur après les premières heures de fonctionnement. Les aliments non congelés NE doivent PAS être placés dans le congélateur avant que ce dernier n’ait été en fonctionnement pendant 4 heures.
UTILISATION DU CONGÉLATEUR: Commande de température Commande de température Touche de diminution °F °C Touche d’augmentation Demo Témoin de turbo congélation ON Turbo Freeze Témoin de verrouillage des commandes Témoin de température élevée Témoin de porte ouverte ON Control Lock Hold 3 Sec Alarm Reset High Temp Door open Cette commande de température électronique est située à l’avant de la porte du congélateur.
Voyant marche Le voyant marche vous indique que le congélateur est correctement raccordé à l’alimentation électrique. Si la clé est perdue, vous pouvez en commander une nouvelle en appelant GE Appliances au 800.GE.CARES (800.492.2737) pendant les heures d’affaires normales. Donnez toujours le nom du modèle et le numéro de série du congélateur lorsque vous demandez une clé de rechange. AVERTISSEMENT Pour prévenir l’enfermement des enfants, gardez la clé hors de portée des enfants, à distance du congélateur.
UTILISATION DU CONGÉLATEUR: Caractéristiques 8 Caractéristiques Balconnets de porte Placez la balconnet le moins profond dans le bas de l’appareil, les trois autres sont de pleine profondeur.
Nettoyage de l’intérieur Afin de prévenir les odeurs, laissez une boîte de bicarbonate de soude ouverte dans le congélateur. Débranchez le congélateur avant de le nettoyer. Si cela n’est pas pratique, essorez le surplus d’humidité d’une éponge ou d’un linge en nettoyant autour des interrupteurs, des lampes, des témoins lumineux ou des commandes. Utilisez une solution de bicarbonate de soude dans de l’eau tiède – environ une cuillerée à table (15 ml) de bicarbonate dans un litre d’eau.
ENTRETIEN ET NETTOYAGE Entretien et nettoyage Enlèvement de la porte du congélateur 1. Enlevez d’abord le couvercle de charnière en plastique : retirez une vis, débranchez le connecteur de câblage et retirez la thermistance ambiante du couvercle, puis levez le couvercle pour le dégager. 2. Retirez les vis qui fixent la charnière sur le dessus de la carrosserie à l’aide d’un tournevis étoilé ou d’un tournevis à douille 5/16 po. Veillez à ne pas endommager le câblage à proximité. 3.
Lors d’une panne de courant prolongée Ŷ Gardez la porte du congélateur fermé. Votre congélateur peut garder les aliments congelés pendant 24 heures lorsque la porte n’est pas ouvert. Ŷ Si le congélateur ne fonctionne pas pendant plus de 24 heures, ajoutez de la glace sèche. Placez de gros morceaux de glace dans l’appareil. Ajoutez-en davantage au besoin. ATTENTION La manipulation de glace sèche peut causer des gelures aux mains–il est recommandé de porter des gants ou autre équipement de protection.
INSTRUCTIONS D'INSTALLATION Installation du Congélateur Emplacement du congélateur Votre congélateur doit être installé à un endroit pratique, en YXH G¶XQH XWLOLVDWLRQ TXRWLGLHQQH GDQV XQH SLqFH ELHQ DpUpH R l’air est sec. Assurez-vous que le plancher sur lequel sera installé votre congélateur est suffisamment solide pour le supporter lorsqu’il est plein.
Économisez temps et argent! Consultez d’abord les tableaux des pages suivantes et vous pourriez vous éviter un appel de service. Problème Causes possibles Correctifs Le congélateur ne fonctionne pas Le congélateur n’est pas branché. Enfoncez bien la fiche dans la prise murale. Le fusible est grillé/le disjoncteur est déclenché. Le témoin « Demo » est allumé et le congélatgeur est en mode Demo (démonstration).
CONSEILS DE DÉPANNAGE Conseils de dépannage... Avant de faire un appel de service Problème Causes possibles Correctifs De la condensation se forme sur l’extérieur de l’appareil Phénomène normal par temps très humide. Essuyez bien l’extérieur. La porte ne doit pas être complètement étanche et l’air froid du congélateur se mélange à l’air chaud et humide de l’extérieur. Consultez Préparatifs pour l’installation du congélateur. Pas de courant à la prise.
Toutes les réparations en vertu de la garantie sont fournis par nos Centre de Service d’Usine ou par un technicien autorisé Customer Care®. Pour prévoir une réparation, consultez notre site electromenagersge.ca/fr/soutien/demande-de-service ou appelez le 800.661.1616. Veuillez avoir votre numéro de série et votre numéro de modèle à portée de main lorsque vous appelez pour obtenir un service.
SOUTIEN AU CONSOMMATEUR Soutien au consommateur Site Web de GE Appliances Vous avez une question ou vous avez besoin d’aide pour votre appareil électroménager? Visitez le site Web de GE Appliances 24 heures par jour, tous les jours de l’année! Vous pouvez aussi y trouver d’autres formidables produits GE Appliances et tirer avantage de tous nos services d’assistance en ligne. Aux États-Unis : GEAppliances.com Au Canada : Electromenagersge.
FREEZERS VERTICALES INFORMACIÓN DE SEGURIDAD 3 INSTRUCCIONES DE OPERACIÓN Control de Temperatura . . . . . . . . . . . . . . . .5 Características . . . . . . . . . . . . . . . . . . . . . . . .7 CUIDADO Y LIMPIEZA . . . . . . . . . . .9 INSTRUCCIONES DE INSTALACIÓN MANUAL DEL PROPIETARIO E INSTALACIÓN Vertical—Modelos con sistema No-Frost (no producen escarcha): FUF14, FUF17, FUF21 Cómo poner el congelador en funcionamiento . . . . . . . . . . . . . . . . . . 12 SOLUCIONAR PROBLEMAS . . . .
GRACIAS POR HACER QUE GE APPLIANCES SEA PARTE DE SU HOGAR. Ya sea que haya crecido usando GE Appliances, o que ésta es su primera vez, nos complace tenerlo en la familia. Sentimos orgullo por el nivel de arte, innovación y diseño de cada uno de los electrodomésticos de GE Appliances, y creemos que usted también. Entre otras cosas, el registro de su electrodoméstico asegura que podamos entregarle información importante del producto y detalles de la garantía cuando los necesite.
ADVERTENCIA A fin de reducir el riesgo de incendio, explosión, descargas eléctricas o lesiones al usar su congelador vertical, siga estas precauciones básicas de seguridad: Ŷ ( VWH IUHH]HU VH GHEHUi LQVWDODU \ XELFDU DGHFXDGDPHQWH de acuerdo con las Instrucciones de Instalación antes de ser usado. Ŷ 'HVHQFKXIH HO IUHH]HU DQWHV GH KDFHU UHSDUDFLRQHV \D VHD reemplazar una lámpara de luz o hacer una limpieza.
INFORMACIÓN DE SEGURIDAD INFORMACIÓN IMPORTANTE DE SEGURIDAD LEA TODAS LAS INSTRUCCIONES ANTES DE USAR CONEXIÓN DE LA ELECTRICIDAD ADVERTENCIA RIESGO DE DESCARGA ELÉCTRICA Enchufe en un tomacorriente con conexión a tierra de 3 cables. 1R HOLPLQH HO FDEOH GH FRQH[LyQ D WLHUUD 1R XVH XQ DGDSWDGRU 1R XVH XQ SURORQJDGRU Si no se siguen estas instrucciones se podrá producir la muerte, incendios o descargas eléctricas.
Para un almacenamiento de alimentos seguro, deje pasar 4 horas hasta que el congelador se enfríe por completo. El congelador funcionará en forma constante durante las primeras horas. Los alimentos que se encuentren congelados pueden colocarse en el congelador después de las primeras horas de funcionamiento. Los alimentos que no se encuentren FRQJHODGRV 12 GHEHQ FRORFDUVH HQ HO FRQJHODGRU KDVWD TXH pVWH KD\D IXQFLRQDGR GXUDQWH KRUDV 'HMH SDVDU YDULDV KRUDV después de cada ajuste de un paso para que la t
OPERACIÓN DEL CONGELADOR: Control de Temperatura Control de Temperatura Tecla Reducir °F °C Tecla Incrementar Demo Luz de Congelación Turbo ON Turbo Freeze Luz de Bloqueo de los Controles ON Control Lock Luz de Temperatura Alta Luz de Puerta Abierta Hold 3 Sec Alarm Reset High Temp Door open Este control de temperatura electrónico está ubicado en el frente de la puerta del freezer.
Cierre de llave a presión La llave para el cierre accionado por resorte se eyecta automáticamente; la llave no permanecerá en el cierre ni en la posición abierta ni cerrada.Si se pierde la llave, puede ordenar un reemplazo llamando a GE Appliances al 800.GE.CARES (800.492.2737) durante el horario de atención comercial. Mantenga la llave fuera del alcance de los niños y lejos del congelador.
OPERACIÓN DEL CONGELADOR: Caracteristicas 8 Caracteristicas Cestos de la Puerta La puerta cuenta con 3 cestos con profundidad completa y un cesto de la puerta posee profundidad parcial en la unidad. El cesto de la puerta con profundidad parcial deberá ser siempre instalado en la parte inferior.
Limpieza de la Parte Interior Para evitar olores, deje abierta una caja de bicarbonato de sodio en el congelador. 'HVHQFKXIH HO FRQJHODGRU DQWHV GH OLPSLDU 6L HVWR QR UHVXOWD práctico, estruje el exceso de humedad para eliminarlo de la esponja o tela al limpiar alrededor de los interruptores, luces o controles. Use agua caliente y solución de bicarbonato de sodio — aproximadamente una cuchara sopera (15 ml.) de bicarbonato de sodio para un cuarto de galón (1 litro) de agua.
CUIDADO Y LIMPIEZA Cuidado y limpieza Para Retirar la Puerta del Freezer Cubierta de plástico de la bisagra 1. Retire la tapa plástica de la bisagra retirando un tornillo; desconecte el conector del cable y retire el termistor de ambiente de la tapa de la bisagra, y luego levante la misma. 2. Retire los tornillos sosteniendo la bisagra en la parte superior del gabinete, usando un destornillador Phillips o un destornillador hueco de 5/16”. Tenga cuidado de no dañar los cables circundantes. 3.
En caso de interrupción prolongada del suministro eléctrico Ŷ Mantenga la puerta del congelador cerrada. El congelador mantendrá los alimentos congelados durante 24 horas siempre que no permita el ingreso de aire cálido. Ŷ Si el congelador no recibe energía durante 24 horas o más, DJUHJXH KLHOR VHFR 'HMH HO KLHOR HQ WUR]RV JUDQGHV $JUHJXH más hielo según sea necesario.
INSTALLATION INSTRUCTIONS Instalación del Freezer Ubicación del congelador 'HEHUi XELFDU HO FRQJHODGRU GH IRUPD FRQYHQLHQWH SDUD HO XVR diario, en una habitación seca y bien ventilada. 1R LQVWDOH HO FRQJHODGRU GRQGH OD WHPSHUDWXUD EDMH GH ORV ) & R VXSHUH ORV ) & \D TXH QR PDQWHQGUi ODV temperaturas adecuadas. Asegúrese de instalar el congelador en un piso que sea lo suficientemente firme como para sostenerlo cuando esté completamente cargado.
¡Ahorre tiempo y dinero! Revise las tablas en las siguientes páginas y tal vez no necesitará de solicitar un servicio. Problema Causas Posibles Qué hacer El congelador no funciona El congelador está desenchufado. Empuje la clavija completamente en el enchufe. Fusible fundido/interruptor de circuito roto. Reemplace el fusible o reajuste el interruptor. La luz LED “Demo” está encendida y el Freezer está en modo Demo. 3UHVLRQH ³$ODUP 5HVHW´ 5HLQLFLDU OD $ODUPD SULPHUR \ OXHJR SUHVLRQH ³ ´ \ GH
SOLUCIONAR PROBLEMAS Consejos para la Solución de Problemas... Antes de solicitar el servicio técnico Problema Causas Posibles Qué hacer Se forma humedad en la parte externa del gabinete No es extraño durante períodos de alta humedad. Seque la superficie con un paño suave. La puerta puede estar mal colocada, lo que provoca que el aire frío del interior del congelador se mezcle con el aire húmedo del exterior. Vea Preparaciones para instalar el congelador. No hay corriente en el tomacorriente.
GEAppliances.com Todo el servicio de garantía es provisto por nuestros Centros de Servicio de Fabricación, o un técnico autorizado de Servicio al Cliente (Customer Care®). Para programar una visita del servicio técnico, visítenos en GEAppliances.com/service, o comuníquese al 800.GE.CARES (800.432.2737). Cuando llame para solicitar el servicio, tenga los números de serie y modelo disponibles.
SOPORTE PARA EL CONSUMIDOR Soporte para el Consumidor Sitio Web de GE Appliances ¢'HVHD UHDOL]DU XQD FRQVXOWD R QHFHVLWD D\XGD FRQ VX HOHFWURGRPpVWLFR" £,QWHQWH D WUDYpV GHO 6LWLR :HE GH *( $SSOLDQFHV ODV 24 horas del día, cualquier día del año! Usted también puede comprar más electrodomésticos maravillosos de GE Appliances y aprovechar todos nuestros servicios de soporte a través de Internet, diseñados para su conveniencia. En EE.UU.: GEAppliances.