AIR CONDITIONER ROOM SAFETY INFORMATION . . . . . . . . .3 USING THE AIR CONDITIONER Controls . . . . . . . . . . . . . . . . . . . . . . . . . . . . . .5 Remote Control . . . . . . . . . . . . . . . . . . . . . . .6 Cool Mode . . . . . . . . . . . . . . . . . . . . . . . . . . . .6 Energy Saver Mode . . . . . . . . . . . . . . . . . . . .6 Air Direction . . . . . . . . . . . . . . . . . . . . . . . . . .7 CARE AND CLEANING OWNER’S MANUAL AHEE06AC ENGLISH/ESPAÑOL Grille and Case . . . . . . . . . .
THANK YOU FOR MAKING GE APPLIANCES A PART OF YOUR HOME. Whether you grew up with GE Appliances, or this is your first, we’re happy to have you in the family. We take pride in the craftsmanship, innovation and design that goes into every GE Appliances product, and we think you will too. Among other things, registration of your appliance ensures that we can deliver important product information and warranty details when you need them. Register your GE appliance now online.
READ ALL INSTRUCTIONS BEFORE USING THE APPLIANCE WARNING For your safety, the information in this manual must be followed to minimize the risk of fire, electric shock or personal injury. Ŷ 8VH WKLV DSSOLDQFH RQO\ IRU LWV LQWHQGHG SXUSRVH DV described in this Owner’s Manual. Ŷ Turn the unit OFF and unplug your air conditioner before cleaning. Ŷ This air conditioner must be properly installed in accordance with the Installation Instructions before it is used.
SAFETY INFORMATION IMPORTANT SAFETY INFORMATION READ ALL INSTRUCTIONS BEFORE USING THE APPLIANCE WARNING USE OF EXTENSION CORDS RISK OF FIRE. Could cause serious injury or death. Ŷ '2 127 XVH DQ H[WHQVLRQ FRUG ZLWK WKLV :LQGRZ $LU Conditioner. HOW TO CONNECT ELECTRICITY Do not, under any circumstances, cut or remove the third (ground) prong from the power cord. For personal safety, this appliance must be properly grounded. DO NOT use an adapter plug with this appliance.
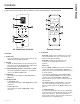
CONTROLS Controls Features and appearance will vary. Lights below the touch pads on the air conditioner control panel indicate the selected settings. 2 1 4 5 Fan Mode Auto Cool High Fan Mid Eco Delay Power 5 Speed 4 Mode 3 6 On Eco Low Delay 3 Temp/Time 3 Filter Reset 7 1 Air Conditioner Controls Controls 1. Power Pad Turns air conditioner on and off. When turned on, the display will show the Set temperature. 2.
USING THE AIR CONDITIONER Using the Air Conditioner Do Not Operate in Freezing Outdoor Conditions This cool-only air conditioner was not designed for freezing outdoor conditions. It must not be used when the outdoor temperature is below freezing (32°F). Remote Control Ŷ To ensure proper operation, aim the remote control at the signal receiver on the air conditioner. Ŷ Make sure nothing is between the air conditioner and the remote control that could block the signal.
Auto Fan Mode Set to Auto for the fan speed to automatically set to the speed needed to provide optimum comfort settings with the set temperature. If the room needs more cooling, the fan speed will automatically increase. If the room needs less cooling, the fan speed will automatically decrease. Air Direction 8VH WKH OHYHU WR DGMXVW WKH DLU GLUHFWLRQ OHIW WR ULJKW 49-5000574 Rev.
CARE AND CLEANING Care and Cleaning Grille and Case Turn the air conditioner off and remove the plug from the wall outlet before cleaning. To clean, use water and a mild detergent. Do not use bleach or abrasives. Air Filter The air filter behind the front grille should be checked and cleaned at least every 30 days or more often if necessary. To remove: CAUTION DO NOT operate the air conditioner without a filter because dirt and lint will clog it and reduce performance.
Questions? Visit our Website at: GEAppliances.com BEFORE YOU BEGIN TOOLS YOU WILL NEED Read these instructions completely and carefully. IMPORTANT – • Save these instructions for local inspector’s use. IMPORTANT – • Observe all governing codes and ordinances. • Note to Installer – Be sure to leave these instructions with the Consumer. • Note to Consumer – Keep these instructions for future reference. • Skill level – Installation of this appliance requires basic mechanical skills.
INSTALLATION INSTRUCTIONS Installation Instructions PARTS INCLUDED (Appearance may vary) Foam top window gasket Left Right Top mounting rail Side Curtain (2) Air conditioner Remote Control Power Speed Mode Eco Temp / Delay Hrs Delay - Type A (3) 10 Side Curtain Frame Type B (9) Side Brackets (2) Window locking bracket (1) 49-5000574 Rev.
1. WINDOW REQUIREMENTS 3. PREPARE THE AIR CONDITIONER • These instructions are for a standard double-hung window. You will need to modify them for other types of windows. • The air conditioner can be installed without the side curtain panels if needed to fit in a narrow window. See the window opening dimensions. • All supporting parts must be secured to firm wood, masonry or metal. • The electrical outlet must be within reach of the power cord.
INSTALLATION INSTRUCTIONS Installation Instructions 4. INSTALL THE AIR CONDITIONER IN THE WINDOW A. Mark the center of the window. Set the air conditioner in the window so that is it centered. Place the air conditioner so that front edge of the bottom mounting rail is against the back edge of the sill. 5. SECURE AIR CONDITIONER A. Loosen the screw on the right hand side of the air conditioner near the bottom. B. Slide a side bracket over the screw so that the bracket is resting on the window sill.
6. INSTALL WINDOW LOCK BRACKET AND FOAM TOP WINDOW GASKET 8VH 7\SH % 6FUHZ WR LQVWDOO WKH ZLQGRZ ORFN bracket on top of the bottom window. A. CAUTION To prevent broken glass or damage to windows, on vinyl or other similarly constructed windows, attach the window locking bracket to the ZLQGRZ VLGH MDPE ZLWK RQH Type B screw. Vinyl Wood INSTALLATION INSTRUCTIONS Installation Instructions B. Cut the foam top window gasket to the window width. C.
TROUBLESHOOTING TIPS Troubleshooting Tips... Before you call for service Save time and money! Review the charts on the following pages first and you may not need to call for service. Problem Possible Cause What To Do Air conditionerdoes not start. The unit is unplugged. Make sure the air conditioner plug is pushed completely into the outlet. The fuse is blown/circuit breaker is tripped. Check the house fuse/circuit breaker box and replace the fuse or reset the breaker. Power Failure.
Ŷ
Notes 16 49-5000574 Rev.
Staple your receipt here. Proof of the original purchase date is needed to make a warranty claim. For The Period Of: Will Replace: One Year From the date of the original purchase Replacement, repair, or refund of the original retail price for any product which fails due to a defect in materials or workmanship. If the unit is exchanged, the replacement unit is warranted for the remainder of your product’s original one-year warranty period.
CONSUMER SUPPORT Consumer Support GE Appliances Website Have a question or need assistance with your appliance? Try the GE Appliances Website 24 hours a day, any day of the year! You can also shop for more great GE Appliances products and take advantage of all our on-line support VHUYLFHV GHVLJQHG IRU \RXU FRQYHQLHQFH ,Q WKH 86 GEAppliances.
PARA SALA ACCONDICIONADORES DE AIRE INFORMACIÓN DE SEGURIDAD . . .3 USO DEL ACONDICIONADOR DE AIRE Controles . . . . . . . . . . . . . . . . . . . . . . . . . . . . .4 Control Remoto . . . . . . . . . . . . . . . . . . . . . . .5 Modo de Frío . . . . . . . . . . . . . . . . . . . . . . . . .5 Modo de Ahorro de Energía . . . . . . . . . . . .5 Dirección del Aire . . . . . . . . . . . . . . . . . . . . .6 MANUAL DEL PROPIETARIO AHEE06AC CUIDADO Y LIMPIEZA Parrilla y Caja . . . . . . . . . . . . . . . .
GRACIAS POR HACER QUE GE APPLIANCES SEA PARTE DE SU HOGAR. Ya sea que haya crecido usando GE Appliances, o que ésta es su primera vez, nos complace tenerlo en la familia. Sentimos orgullo por el nivel de arte, innovación y diseño de cada uno de los electrodomésticos de GE Appliances, y creemos que usted también. Entre otras cosas, el registro de su electrodoméstico asegura que podamos entregarle información importante del producto y detalles de la garantía cuando los necesite.
ADVERTENCIA Para su seguridad, siga las instrucciones de este manual a fin de minimizar riesgos de incendio, descargas eléctricas o heridas personales. Ŷ 8VH HVWH HOHFWURGRPpVWLFR VyOR SDUD VX SURSyVLWR RULJLQDO como se describe en el Manual del Propietario. Ŷ &RORTXH OD XQLGDG HQ 2)) $SDJDGR \ GHVHQFKXIH HO acondicionador de aire antes de usar el mismo. Ŷ (VWH DFRQGLFLRQDGRU GH DLUH VH GHEH LQVWDODU GH IRUPD apropiada de acuerdo con las Instrucciones de Instalación antes de ser usado.
INFORMACIÓN DE SEGURIDAD INFORMACIÓN IMPORTANTE DE SEGURIDAD LEA TODAS LAS INSTRUCCIONES ANTES DE USAR ADVERTENCIA USO DE PROLONGADORES RIESGO DE INCENDIO. Podría ocasionar lesiones graves o la muerte. Ŷ 12 XVH XQ SURORQJDGRU FRQ HVWH $FRQGLFLRQDGRU GH $LUH GH Ventana. Ŷ 12 XVH SURWHFWRUHV FRQWUD SLFRV GH FRUULHQWH QL adaptadores para múltiples tomacorrientes con este Acondicionador de Aire de Ventana.
Las funciones y la apariencia podrán variar. Las luces junto a las teclas táctiles del panel de control del acondicionador de aire indican las configuraciones seleccionadas. 2 1 4 5 Fan Mode Auto Cool High Fan Mid Eco Delay Power 5 Speed 4 Mode 6 On 3 Eco Low Delay Temp/Time 3 3 Filter Reset 7 1 Controles del Acondicionador de Aire Controles 1. Tecla de Power (Encendido) Apaga y prende el acondicionador de aire. Al encenderse, la pantalla mostrará la temperatura Definida. 2.
USO DEL ACONDICIONADOR DE AIRE Uso del Acondicionador de Aire No Utilizar con Condiciones Climáticas Exteriores de Congelación Este acondicionador de aire sólo frío no fue diseñado para uso con condiciones climáticas exteriores de temperatura helada. 1R GHEHUi VHU XVDGR FRQ FRQGLFLRQHV FOLPiWLFDV H[WHULRUHV GH temperatura helada. Control Remoto Ŷ 3DUD DVHJXUDU XQ XVR DSURSLDGR DSXQWH HO FRQWURO UHPRWR DO receptor de señal del acondicionador de aire.
Velocidad Automática del Ventilador Configure en Auto (Automática) para que la velocidad del ventilador se configure de forma automática en la velocidad necesaria para brindar ajustes de confort óptimos con la temperatura configurada. Dirección del Aire 8VH OD SDODQFD SDUD DMXVWDU OD GLUHFFLyQ GHO DLUH KDFLD OD izquierda o la derecha únicamente. 49-5000574 Rev. 0 Si se necesita más frío en la habitación, la velocidad del ventilador se incrementará de forma automática.
CUIDADO Y LIMPIEZA Cuidado y limpieza Parrilla y Caja Apague el acondicionador de aire y retire el enchufe del tomacorriente antes de limpiar. 3DUD OLPSLDU XVH DJXD \ XQ GHWHUJHQWH VXDYH 1R XVH blanqueadores ni abrasivos. Filtro de Aire El filtro de aire que se encuentra detrás de la rejilla frontal se debe revisar y limpiar por lo menos cada 30 días o con una frecuencia mayor, si fuera necesario.
¿Preguntas? Visite nuestra página en la red en: GEAppliances.com ANTES DE INICIAR REQUISITOS ELÉCTRICOS (CONT) Lea estas instrucciones completa y cuidadosamente. El cable de alimentación incluye un dispositivo para interrupción de corriente. Se incluye un botón de prueba y de reinicio en el dispositivo. El dispositivo debe ponerse D SUXHED SHULyGLFDPHQWH SULPHUR VH SUHVLRQD HO ERWyQ de TEST SUXHED \ OXHJR RESET UHLQLFLR PLHQWUDV VH encuentra enchufado al tomacorriente.
INSTRUCCIONES DE INSTALACIÓN Instrucciones de instalación (La apariencia puede variar) Junta de gomaespuma de la parte superior de la ventana dejado derecho Riel de montaje superior Cortinas Laterales Acondicionador de aire Control Remoto Power Speed Mode Eco Delay Temp / Delay Hrs - 7LSR $ 10 Marcos de la Cortina Lateral PARTES INCLUIDAS 7LSR % Soportes Laterales Soporte de Cierre GH OD 9HQWDQD 49-5000574 Rev.
1. REQUISITOS PARA LA VENTANA • Estas instrucciones son para una ventana estándar GH GRV SOLHJXHV 8VWHG QHFHVLWDUi PRGLILFDU HO proceso para otros tipos de ventanas. • El acondicionador de aire puede instalarse sin los paneles de acordeón para ajustarse a una ventana más estrecha. Ver las dimensiones de la abertura de la ventana. • Todas las partes de apoyo deben quedar totalmente aseguradas a algún metal, mampostería o a la madera.
INSTRUCCIONES DE INSTALACIÓN Instrucciones de instalación 4. INSTALE EL ACONDICIONADOR DE AIRE EN LA VENTANA A. Marque el centro de la ventana. Coloque el acondicionador de aire en la ventana de modo que se encuentre centrado. Coloque el acondicionador de aire de modo que el extremo frontal del riel de montaje inferior se encuentre contra el extremo trasero del alféizar. 5. ASEGURE EL ACONDICIONADOR DE AIRE A. Afloje el tornillo del lado derecho del acondicionador de aire, cerca de la parte inferior. B.
6. INSTALE EL SOPORTE DE LA TRABA DE LA VENTANA Y LA JUNTA SUPERIOR DE GOMAESPUMA DE LA VENTANA 8VH XQ WRUQLOOR WLSR % SDUD LQVWDODU HO VRSRUWH GH bloqueo arriba de la parte inferior de la ventana. A. PRECAUCIÓN Para evitar la rotura de vidrios o daños sobre las ventanas, sobre vinilo o ventanas construidas de manera similar, adjunte el soporte de bloqueo de la ventana a la jamba lateral de la ventana con un tornillo 7LSR % Vinilo Madera B.
CONSEJOS PARA LA SOLUCIÓN DE PROBLEMAS 14 Consejos para la Solución de Problemas... Antes de solicitar el servicio técnico ¡Ahorre tiempo y dinero! Primero revise los cuadros que aparecen en las siguientes páginas y es posible que no necesite solicitar reparaciones. Problema Causas posibles Qué hacer El acondicionador de aire no enciende El acondicionador de aire está desconectado. Cerciórese de que el acondicionador de aire está enchufado totalmente en el tomacorriente.
Ŷ 4XL]iV HVFXFKH XQ VRQLGR PHWiOLFR FDXVDGR SRU HO DJXD WRPDGD \ WLUDGD FRQWUD HO FRQGHQVDGRU HQ ORV GtDV lluviosos o cuando la humedad es alta. Esta característica de diseño ayuda a remover la humedad y mejora la eficiencia. Ŷ 4XL]iV HVFXFKH TXH HO WHUPRVWDWR KDFH FOLF FXDQGR HO FRPSUHVRU KDFH FLFOR HQWUH HQFHQGLGR \ DSDJDGR Ŷ (O DJXD VH DFXPXOD HQ OD EDQGHMD GXUDQWH GtDV OOXYLRVRV R FRQ PXFKD KXPHGDG (O DJXD SRGUtD GHUUDPDUVH \ gotear desde el lado externo de la unidad.
NOTAS 16 Notas 49-5000574 Rev.
Grape aquí su recibo. Se requiere facilitar prueba de la fecha de compra original para hacer un reclamo de garantía. Por el Período de: Un Año Desde la fecha de la compra original Reemplazaremos: Reemplazo, reparación o reembolso del costo minorista original de cualquier producto que falle debido a un defecto en los materiales o la fabricación. Si la unidad es cambiada, la unidad de reemplazo posee garantía por el resto del período de la garantía original de un año sobre su producto.
SOPORTE PARA EL CONSUMIDOR Soporte para el Consumidor Sitio Web de GE Appliances ¢'HVHD UHDOL]DU XQD FRQVXOWD R QHFHVLWD D\XGD FRQ VX HOHFWURGRPpVWLFR" £,QWHQWH D WUDYpV GHO 6LWLR :HE GH *( $SSOLDQFHV ODV KRUDV GHO GtD FXDOTXLHU GtD GHO DxR 8VWHG WDPELpQ SXHGH FRPSUDU PiV HOHFWURGRPpVWLFRV PDUDYLOORVRV GH *( $SSOLDQFHV \ aprovechar todos nuestros servicios de soporte a través de Internet, diseñados para su conveniencia. (Q (( 88 GEAppliances.