Dryers GEAppliances.com Safety Instructions . . . . . . . . 2–3 Operating Instructions . . 4-11 Owner’s Manual Control Panels . . . . . . . . . . . . . . . . . 5-7 Dryer Features . . . . . . . . . . . . . . . . . . . 8 Loading and Using the Dryer . . . . . 10 Venting the Dryer . . . . . . . . . . . . . . . 11 Troubleshooting Tips . . . 12, 13 Consumer Support Consumer Support . . . . . . . . . . . . . . 16 Warranty . . . . . . . . . . . . . . . . . . . . . . .
IMPORTANT SAFETY INFORMATION. READ ALL INSTRUCTIONS BEFORE USING. This is the safety alert symbol. This symbol alerts you to potential hazards that can kill you or hurt you and others. All safety messages will follow the safety alert symbol and the word “DANGER”, “WARNING”, or “CAUTION”. These words are defined as: DANGER Indicates a hazardous situation which, if not avoided, will result in death or serious injury.
GEAppliances.com ADDITIONAL GAS DRYER WARNINGS WARNING For your safety, the information in this manual must be followed to minimize the risk of fire or explosion or to prevent damage, personal injury, or death. - DO NOT store or use gasoline or other flammable vapors and liquids in the vicinity of this or any other appliance. - WHAT TO DO IF YOU SMELL GAS: • DO NOT try to light any appliance. • DO NOT touch any electrical switch; DO NOT use any phone in your building.
Operating instructions WARNING! To reduce the risk of fire, electric shock, or injury to persons, read the IMPORTANT SAFETY INSTRUCTIONS before operating this appliance. WARNING WARNING Explosion Hazard Keep flammable materials and vapors, such as gasoline, away from dryer. DO NOT dry anything that has ever had anything flammable on it (even after washing). Failure to do so can result in death, explosion, or fire. Fire Hazard No washer can completely remove oil.
GEAppliances.com Features and appearance will vary. A E B A B A Power B Start and Pause C Display and Status Lights F E I G D H C F I G D H Press to “wake up” the display. If the display is active, press to put the dryer into idle mode. NOTE: Pressing Power does not disconnect the appliance from the power supply. Press Start to begin the cycle. NOTE: The door must be closed for the dryer to start the cycle.
Operating instructions E Drying Cycles - Sensor cycles automatically determine fabric dryness. Timed cycles run for the selected time. Steam Dewrinkle (on some models) Steam Refresh (on some models) Sanitize or Anti-Bacterial (depending on model) Bulky Items Towels/Sheets Cottons Mixed Load Casuals Delicates Speed Dry Jeans Timed Dry For cottons and most linens. For loads consisting of cottons and poly-blends. For wrinkle-free, permanent press, delicate items and knits.
GEAppliances.com G Settings Individual settings for cycle minutes (Time), dryness level (Level) and temperature (Temp) can be set from the minimum (lowest in column) to maximum (highest in column). In general, the higher up the column, the more energy will be used. NOTE: The selected cycle set Time can be further adjusted, in one minute increments, by pressing the Time Adjust + (plus) and - (minus) buttons. Dryness Level-Selection only used for Sensor cycles. Timed cycles run for the selected time.
About the dryer features. Sensor Dry Sensor Dry This feature is active in all cycles except Timed Dry, Warm Up and Air Fluff. The Sensor Dry provides greater drying accuracy than standard machines, resulting in shorter dry times and better clothes care. As the clothes tumble, they touch a moisture sensor. The sensor will stop the heating cycle as soon as the clothes have reached the selected dryness.
Notes. GEAppliances.
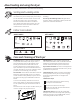
About loading and using the dryer. Always follow the fabric manufacturer’s care label when laundering. Sorting and Loading Hints As a general rule, if clothes are sorted properly for the washer, they are sorted properly for the dryer. Do not overload. This wastes energy and causes wrinkling. Do not add fabric softener sheets once the load has become warm. They may cause fabric softener stains.
About venting the dryer. GEAppliances.com For the best drying performance, the dryer needs to be properly vented. The dryer will use more energy and run longer if it is not vented to the below specifications. Carefully follow the details on Exhausting in the Installation Instructions. Use only rigid metal 4” diameter ductwork inside the dryer cabinet. Use only rigid metal or UL listed flexible metal 4” diameter ductwork for exhausting to the outside. Do not use plastic or other combustible ductwork.
Before you call for service… Troubleshooting Tips Save time and money! Review the charts on the following pages, or visit GEAppliances.com. You may not need to call for service. Problem Possible Causes What To Do Dryer doesn’t start Dryer is unplugged • Make sure the dryer plug is pushed completely into the outlet. Fuse is blown/circuit breaker is tripped • Check the house fuse/circuit breaker box and replace fuse or reset breaker. NOTE: Most electric dryers use two fuses/breakers.
Before you call for service… GEAppliances.com Problem Possible Causes What To Do Clothes take too long to dry Improper sorting • Separate heavy items from lightweight items (generally, a well-sorted washer load is a well-sorted dryer load). Large loads of heavy fabrics (like beach towels) • Large, heavy fabrics contain more moisture and take longer to dry. Separate large, heavy fabrics into smaller loads to speed drying time.
Before you call for service… 14 Problem Possible Causes What To Do Small amount of water on floor in front of dryer Inadequate load size for steam cycle selected, excess steam condenses inside cabinet and leaks out • If using the Steam Dewrinkle cycle, manually reduce time. If using the Steam Refresh cycle, add more garments to the load. Water on floor in back of dryer Loose water hose connection to valve • Tighten connection.
GE Dryer Warranty. All warranty support provided by our Factory Service Centers, or an authorized Customer Care® technician. To schedule service, on-line, 24 hours a day, visit us at GEAppliances.com or call 800.GE.CARES (800.432.2737). Please have serial number and model number available when calling for service. Staple your receipt here. Proof of the original purchase date is needed to obtain support under the warranty.
Consumer Support. GE Appliances Website GEAppliances.com Have a question or need assistance with your appliance? Try the GE Appliances Website 24 hours a day, any day of the year! For greater convenience and faster service, you can now download Owner’s Manuals, order parts or even schedule service on-line. Schedule Service GEAppliances.com Expert GE repair service is only one step away from your door. Get on-line and schedule your service at your convenience 24 hours any day of the year! Or call 800.