WASHERS SAFETY INSTRUCTIONS . . . . . . . . . .4 USING THE WASHER Getting Started . . . . . . . . . . . . . . . . . . . . . . 6 Loading . . . . . . . . . . . . . . . . . . . . . . . . . . . . . 16 CARE AND CLEANING . . . . . . . . . . . .17 INSTALLATION INSTRUCTIONS . . . . . . . . . . . . . . . . . . . . 19 TROUBLESHOOTING TIPS. . . . . 24 OWNER’S MANUAL & INSTALLATION INSTRUCTIONS GTW750 GTW685 GTW680 ENGLISH/ESPAÑOL CONSUMER SUPPORT G014 Warranty . . . . . . . . . . . . . . . . . . . . . . .
THANK YOU FOR MAKING GE APPLIANCES A PART OF YOUR HOME. Whether you grew up with GE Appliances, or this is your first, we’re happy to have you in the family. We take pride in the craftsmanship, innovation and design that goes into every GE Appliances product, and we think you will too. Among other things, registration of your appliance ensures that we can deliver important product information and warranty details when you need them. Register your GE appliance now online.
49-90577 WELCOME Notes 3
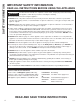
SAFETY INFORMATION IMPORTANT SAFETY INFORMATION READ ALL INSTRUCTIONS BEFORE USING THE APPLIANCE WARNING To reduce the risk of death, fire, explosion, electric shock, or injury to persons when using your appliance, follow basic precautions, including the following: Ŷ Read all instructions before using the appliance.
READ ALL INSTRUCTIONS BEFORE USING THE APPLIANCE PROPER INSTALLATION This washer must be properly installed and located in accordance with the Installation Instructions before it is used. Ŷ Ensure that the hot water hose is connected to the “H” valve and the cold water hose is connected to the “C” valve. Ŷ Install or store where it will not be exposed to temperatures below freezing or exposed to the weather, which could cause permanent damage and invalidate the warranty.
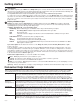
USING THE WASHER Getting started To reduce the risk of fire, electric shock, or injury to persons, read the IMPORTANT SAFETY WARNING INSTRUCTIONS before operating this appliance. Throughout this manual, features and appearance may vary from your model. Step 1 IMPORTANT: See the specific dispenser section in this manual for your model. Step 2 Step 3 Step 4 • Add fabric softener to the fabric softener dispenser. • Add the manufacturer’s recommended amount of detergent.
B C Start/Pause Press Start to begin the cycle. NOTE: Unless Bulky Items cycle is selected, the lid must be closed for the washer to start cycle. If the lid is open, “Lid” will scroll across the display. During the load sensing portion of the cycle, the lid will lock and “SEnSing” will scroll across the display. When load sensing is complete, the lid will unlock. Pressing Pause will unlock the lid (if locked at that time), pause the cycle and the Start indicator light will blink.
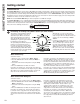
USING THE WASHER Getting started D Wash Cycles-Cycle Selector Knob The wash cycle controls the type of washing process. The cycle selector knob can be turned in either direction. Turning the knob after starting a cycle will stop the washer and change the cycle/options to the new selection. Press Start to begin the new cycle selection. The chart below will help you match the items to be washed with the best wash cycle settings.
Items to Wash Cycle Wash Temp Soil Level Cleaning the basket of residue and odor. No clothes to be washed using this cycle. Basket Clean Hot Ex. Heavy Sanitize with Oxi* Hot Ex. Heavy Max More Jeans with medium to light soil. For heavily soiled work jeans, use the Heavy Duty Cycle. Jeans Hot Warm Colors Cool Cold Tap Cold Ex. Heavy Heavy Normal Light Max More Normal No Spin Sturdy fabrics with heavy to medium soil. Heavy Duty Hot Warm Colors Cool Cold Tap Cold Ex.
USING THE WASHER Getting started *Sanitize with Oxi The Sanitize With Oxi cycle, when using an Oxi additive along with your detergent, is designed to remove 99.9% of bacteria found in home laundry. Measure the detergent and the Oxi products carefully. Using the amounts appropriate for a large heavily soiled load in a top load washer, follow the detergent and the Oxi product label instructions.
F Stain Removal Guide (on some models) The Stain Removal Guide feature allows you to indicate what stains are on the garments in your load. This feature incorporates a patent pending treatment method. An initial water fill is performed at a temperature tailored to the stain type selected and to an amount which enables a concentrated cleaning step. A stain scrubbing period, followed by an active soak, is conducted to effectively treat the stain.
USING THE WASHER Getting started G H Settings Individual settings for agitation (Soil), water temperature (Temp), and spin (Spin) can be set from the minimum (lowest in column) to maximum (highest in column). In general, the higher up the column, the more washer energy will be used. NOTE: Longer Spin times typically reduce dryer time/energy usage (i.e. reduces total energy when using both a washer and a dryer). Cycle Options Deep Fill Select the Deep Fill feature for loads where extra water is needed.
J Smart Dispense (GTW750 model only) When selected, this feature will automatically add detergent to the wash, eliminating the need to add detergent for each load. The detergent amount selection on the control panel will default to AUTO when first powering up the washing machine. When AUTO is selected, the amount of detergent needed for each laundry load will automatically be determined based on the size of the load the machine senses.
USING THE WASHER Getting started Liquid Fabric Softener/Conditioner Dispenser (GTW750 model only) Liquid fabric softener/conditioner should be added to the small drawer in the rear of the washer opening. Follow the liquid fabric softener/conditioner manufacturer’s recommendations for the correct amount of softener/conditioner, based on the load size. Do not overfill or dilute softener/conditioner as this can result in additive being dispensed prematurely in the wash cycle.
Detergent Dispenser (GTW680 and GTW685 models only) HE detergent should be added to the right side of the dispenser drawer. Follow the detergent manufacturer’s recommendations for the correct amount of detergent, based on load size, taking care to add detergent to the right compartment. Do not overfill or dilute detergent as this can result in additive being dispensed prematurely in the wash cycle.
LOADING Loading Always follow fabric manufacturer’s care label when laundering. Automatic Load Sensing This determines the correct agitate profile, agitate duration and amount of water suited to the size and type of load placed in the washer. The washer will not start the wash cycle or fill with water if the lid is open. When the lid is closed the machine is able to begin filling with water in order to sense the load size.
Exterior of the Washer Immediately wipe off any spills with a damp cloth. Interior of the Washer NOTE: For the GTW750 model, the following instructions should be followed using the Bulky Items cycle. 3. Close the lid and select the Basket Clean cycle. Push the Start button. To clean the interior of the washer, select the Basket Clean feature on the control panel. This Basket Clean cycle should be performed, at a minimum, once per month.
CARE AND CLEANING 18 Care and Cleaning Water Supply Hoses Hoses connecting washer to faucet should be replaced every 5 years. Long Vacations Be sure water supply is shut off at faucets. Drain all water from hoses and water filter pump area if weather will be below freezing. Moving and Storage Ask the service technician to remove water from drain pump and hoses. Do not store the washer where it will be exposed to the weather. GTW750 model only: Do not move the washer with a full tank of detergent.
Installation Instructions Washer If you have any questions, call GE Appliances at 800.GE.CARES (800.432.2737) or visit our Website at: GEAppliances.com In Canada, call 800.561.3344 or visit www.GEAppliances.ca BEFORE YOU BEGIN Read these instructions completely and carefully. • IMPORTANT – Save these TOOLS REQUIRED FOR WASHER INSTALLATION Pliers instructions for local inspector’s use. • • • • • • • IMPORTANT – Observe all governing codes and ordinances.
Installation Instructions LOCATION OF YOUR WASHER DO NOT Install the Washer: 1. In an area exposed to dripping water or outside weather conditions. The ambient temperature should never be below 60°F (15.6°C) for proper washer operation. IMPORTANT: Minimum Installation Clearances - Alcove or Closet • If your washer is approved for installation in an alcove or closet, there will be a label on the back of the machine describing requirements. 2.
Installation Instructions 3 CONNECT DRAIN HOSE TO 5 CONNECT WATER HOSES TO OUTLET VALVES WASHER Connect drain hose to drain port on back of washer. Open clamp with pliers and slide onto hose end. Holding clamp open, push hose end onto drain port until fully seated. Release clamp between locating ribs on hose end. Outlet of hose end should be oriented vertically. Drain hose Drain port Drain end Clamp 4 CONNECT WATER HOSES TO Determine which is HOT water line before attaching water hoses to faucets.
Installation Instructions 6 CONNECT TO DRAIN Install drain hose clip on rear panel of washer. Route drain hose through clip and insert free end into drain opening of your home. 6 CONNECT TO DRAIN (Continued) If your drain is a standpipe, fasten drain hose to standpipe with cable tie provided. Drain hose clip Drain hose clip Drain hose Washer back NOTE: If longer drain hose is required, order drain hose extension kit, GE Appliances part Drain number WH49X301.
Installation Instructions ELECTRICAL REQUIREMENTS WARNING - Electrical Shock Hazard Plug into a grounded 3-prong outlet. DO NOT remove ground prong. DO NOT use an adapter. DO NOT use an extension cord. Failure to follow these instructions can result in death, fire or electrical shock. CIRCUIT – Individual, properly polarized and grounded 15 or 20 amp circuit breaker or time-delay fuse. POWER SUPPLY – 2 wire plus ground, 120 Volt, single phase, 60 Hz, alternating current.
TROUBLESHOOTING TIPS Troubleshooting Tips... Before you call for service Problem Possible Causes Normal dispenser operation It is normal for a small amount of water to remain in dispenser after the cycle. Lid was opened and closed between cycle selection and start This is normal This is normal. See START-UP SEQUENCE in the Safety Instructions section.
Problem Washer pauses during wash cycle Residual powder in dispenser or clogging of dispensers Laundry additives dispensing too soon Washer pauses during spin cycle Washer won’t operate Possible Causes What To Do The Soak Option was chosen This is normal. The washer alternates between agitate and soak during these cycles to get your clothes cleaner with less wear. This is normal Many cycles incorporate as series of soaks within the agitation period to get your clothes clean with less wear.
TROUBLESHOOTING TIPS Troubleshooting Tips... Before you call for service Problem Clothes too wet Blinking Spin light or Spin light on at end of cycle Pilling Snags, holes, tears, rips or excessive wear Wrinkling Sounds “Clicking” Possible Causes What To Do No spin selected Incorrect cycle selected Select a spin option. Make sure the cycle selected matches the load you are washing. Some fabrics will feel wetter when rinsed with cold water.
GEAppliances.com All warranty service is provided by our Factory Service Centers, or an authorized Customer Care® technician. To schedule service online, visit us at www.geappliances.com/service_and_support/, or call GE Appliances at 800.GE.CARES (800.432.2737). Please have your serial number and your model number available when calling for service. Servicing your appliance may require the use of the onboard data port for diagnostics.
CONSUMER SUPPORT Consumer Support GE Appliances Website Have a question or need assistance with your appliance? Try the GE Appliances Website 24 hours a day, any day of the year! You can also shop for more great GE Appliances products and take advantage of all our on-line support services designed for your convenience. In the US: GEAppliances.
USAR LA LAVADORA Puesta en Marcha . . . . . . . . . . . . . . . . . . . . . .6 Carga . . . . . . . . . . . . . . . . . . . . . . . . . . . . . . . 16 CUIDADO Y LIMPIEZA . . . . . . . . . . . . .17 INSTRUCCIONES DE INSTALACIÓN . . . . . . . . . . . . . . . . . . . . . MANUAL DEL PROPIETARIO E INSTALACIÓN GTW750 GTW685 GTW680 19 CONSEJOS PARA LA SOLUCIÓN DE PROBLEMAS . . . . . . . . . . . . . . . . . 24 ATENCIÓN AL CLIENTE Garantía (EE.UU.) . . . . . . . . . . . . . . . . . . . .
GRACIAS POR HACER QUE GE APPLIANCES SEA PARTE DE SU HOGAR. Ya sea que haya crecido usando GE Appliances, o que ésta es su primera vez, nos complace tenerlo en la familia. Sentimos orgullo por el nivel de arte, innovación y diseño de cada uno de los electrodomésticos de GE Appliances, y creemos que usted también. Entre otras cosas, el registro de su electrodoméstico asegura que podamos entregarle información importante del producto y detalles de la garantía cuando los necesite.
49-90577 BIENVENIDO Notas 3
INFORMACIÓN DE SEGURIDAD INFORMACIÓN IMPORTANTE DE SEGURIDAD LEA TODAS LAS INSTRUCCIONES ANTES DE USAR Para reducir el riesgo de muerte, incendio, explosión, descargas eléctricas o lesiones sobre ADVERTENCIA las personas al usar su electrodoméstico, siga las precauciones básicas, incluyendo lo siguiente Ŷ Lea todas las instrucciones antes de usar este electrodoméstico.
LEA TODAS LAS INSTRUCCIONES ANTES DE USAR INSTALACIÓN CORRECTA La lavadora se debe instalar y colocar correctamente de acuerdo con las instrucciones de instalación, antes de utilizarla. Ŷ Asegúrese de que la manguera de agua caliente esté conectada a la válvula “H” y que la manguera de agua fría esté conectada a la válvula “C”.
USAR LA LAVADORA Puesta en Marcha Para reducir el riesgo de incendios, descargas eléctricas o heridas, lea las INSTRUCCIONES ADVERTENCIA IMPORTANTES DE SEGURIDAD antes de utilizar este electrodoméstico. Es posible que las funciones y apariencias varíen con relación a su modelo a lo largo del manual. Paso 1 IMPORTANTE: Consulte la sección específica del dispensador de su modelo en este manual.
B Start/Pause (Inicio/Pausa) C Display and Status Lights (Pantalla y las Luces de Status (Estatus)) Presione Start (Inicio) para comenzar el ciclo. NOTA: A menos que se seleccione el ciclo Bulky Items (Articulos Voluminosos), la tapa se deberá cerrar para que la lavadora el ciclo comience. Si la tapa está abierta, se visualizará “Lid” (Tapa) a través de la pantalla. Durante la parte de detección de carga del ciclo, la tapa se bloqueará y “SEnSing” se desplazará a través de la pantalla.
USAR LA LAVADORA Puesta en Marcha D Perilla de Ciclos de Lavado-Selector de Ciclo El ciclo de lavado controla el tipo de proceso de lavado. La perilla Selector de Ciclo se puede girar en cualquier dirección. Girar la perilla luego de iniciar un ciclo detendrá la lavadora y modificará el ciclo/ opciones en la nueva selección. Presione Start (Iniciar) para comenzar la selección del nuevo ciclo.
Temperatura Nivel de Selección del de Lavado Suciedad Giro (Duración) Opciones Disponibles Prendas a Lavar Ciclo Limpieza de la canasta de residuos y olores de la canasta. No se lavará ropa al usar este ciclo. Limpieza de la Canasta Caliente Ext. Sucia Normal Llenado Intenso Enjuague Intenso Prendas muy sucias Desinque no destiñen fecte con Oxi* Caliente Ext. Sucia Máx.
USAR LA LAVADORA Puesta en Marcha *Sanitize with Oxi (Desinfectar con Oxi) El ciclo Sanitize With Oxi (Desinfectar con Oxi), cuando es usado con un aditivo de Oxi junto con su detergente, fue diseñado para eliminar el 99.9% de las bacterias en el lavado hogareño. Mida el detergente y los productos de Oxi cuidadosamente. Al usar las cantidades adecuadas para una carga grande y muy sucia en lavadoras de carga superior, siga las instrucciones de las etiquetas del detergente y del producto de Oxi.
F Stain Removal Guide (Guía de Eliminación de Manchas) (en algunos modelos) La característica Stain Removal Guide (Guía de Eliminación de Manchas) le permite señalar las manchas que se encuentran en las prendas de la carga. Esta función incorpora un método de tratamiento pendiente de patentamiento. Un llenado de agua inicial es realizado a una temperatura ajustada al tipo de manchas seleccionado y a una cantidad que permite un paso de limpieza concentrado.
USAR LA LAVADORA Puesta en Marcha G Settings (Configuraciones) H Opciones de ciclo Configuraciones individuales para agitación Soil (Suciedad), temperatura del agua Temp (Temperatura), y giro Spin (Giro) se pueden configurar de mínimo (inferior en la columna) a máximo (superior en la columna). En general, cuanto más arriba en la columna, más lavadoras energía se usará.
J Dispensador Inteligente (Modelo GTW750 solamente) Si se desea seleccionar manualmente la cantidad de Cuando sea seleccionada, de forma automática esta detergente para una carga dada, esto puede ser realizado función agregará detergente al lavado, eliminando la presionando el botón Detergent Dispense (Dispensar necesidad de agregar detergente a cada carga.
USAR LA LAVADORA Puesta en Marcha Dispensador de Suavizante Líquido/Acondicionador El suavizante/acondicionador para telas líquido deberá ser agregado al cajón pequeño en la parte trasera de la abertura de la lavadora. Siga las recomendaciones del fabricante de suavizante/acondicionador de telas líquido, a fin de utilizar la cantidad correcta de suavizante/ acondicionador en base al tamaño de la carga.
Dispensador de Detergente (Modelos GTW680 y GTW685 solamente) El detergente de alta eficacia deberá ser agregado del lado derecho del cajón dispensador. Siga las recomendaciones del fabricante del detergente en relación a usar la cantidad correcta, en base al tamaño de la carga, cuidando que el detergente sea agregado en el compartimiento derecho. No sobrecargue ni diluya el detergente, ya que esto podrá hacer que los aditivos sean dispensados de forma prematura en el ciclo de lavado.
CARGA Carga Siempre siga las instrucciones del fabricante de la ropa cuando lave. Sensor de Carga Automático Esto determina el perfil de agitación correcto, la duración de la agitación y la cantidad de agua adecuada al tamaño y tipo de carga colocado en la lavadora. La lavadora no iniciará el ciclo de lavado ni se llenará de agua si la tapa se encuentra abierta. Cuando se cierra la tapa la máquina puede comenzar a llenarse de agua para poder detectar el tamaño de la carga.
La parte exterior de la lavadora Limpie inmediatamente cualquier clase de derrame con un paño húmedo. La parte interior de la lavadora NOTA: Para el modelo GTW750, se deberán seguir las siguientes instrucciones utilizando el ciclo Bulky Items (Prendas Voluminosas). Para limpiar la parte interna de la lavadora, seleccione la característica Basket Clean (limpieza de tambor) del panel de control. Este ciclo Basket Clean (Limpieza de la Canasta) debería ser activado, como mínimo, una vez por mes.
CUIDADO Y LIMPIEZA 18 Cuidado y limpieza Mangueras de suministro de aguas Las mangueras que conectan la lavadora al grifo deben cambiarse cada 5 años. Vacaciones prolongadas Asegúrese de que el suministro de agua esté cortado desde todos los grifos. Drene toda el agua de las mangueras y el área de la bomba de filtro de agua si la temperatura puede llegar a bajo cero. Desplazamiento y almacenamiento Solicite al técnico que elimine toda el agua de la bomba de drenaje y de las mangueras.
Instrucciones de instalación Lavadora Si tiene alguna pregunta, llame GE Appliances a 800.GE.CARES (800.432.2737) o visite nuestro sitio Web en: GEAppliances.com ANTES DE COMENZAR Lea detenidamente todas las instrucciones. IMPORTANTE – Guarde estas • instrucciones para uso del inspector local. IMPORTANTE – Cumpla todos • los códigos y ordenanzas regulatorias. Nota al instalador – Asegúrese de dejar estas instrucciones al usuario. Nota al usuario – guarde estas instrucciones para consultas futuras.
Instrucciones de instalación UBICACIÓN DE LA LAVADORA NO instale la lavadora: 1. En un área expuesta a goteras o a las condiciones del exterior. La temperatura ambiente no debe ser QXQFD LQIHULRU D ) & SDUD TXH OD ODYDGRUD funcione correctamente. 2. En una zona en la que pueda entrar en contacto con cortinas u otras telas. 3. Sobre una alfombra. El suelo DEBE ser una superficie dura con una inclinación máxima de 1/2” por pie (1,27 cm por cada 30 cm).
Instrucciones de instalación Conecte la manguera de desagüe al puerto de drenaje en la parte trasera de la lavadora. Abra la abrazadera con las pinzas y deslice las mismas sobre el extremo de la manguera. Manteniendo la abrazadera abierta, presione el extremo de la manguera sobre el puerto de drenaje hasta que quede completamente insertada. Libere la abrazadera entre los resortes de ubicación en el extremo de la manguera.
Instrucciones de instalación 6 CONECTE AL DRENAJE 6 CONECTE AL DRENAJE (Continúa) Instale el sujetador de la Sujetador de manguera de drenaje en el panel la manguera de desagüe trasero de la lavadora. Oriente la manguera de drenaje a través del sujetador e inserte el extremo libre en la abertura del drenaje de su hogar. Si el drenaje es un tubo de subida, ajuste la manguera de drenaje al tubo de subida con el enlace de cable provisto. Manguera de desagüe Inserción máx.
Instrucciones de instalación REQUISITOS ELÉCTRICOS ADVERTENCIA - Riesgo de Descarga Eléctrica Enchufe a un tomacorriente de 3 clavijas con conexión a tierra. NO retire la terminal de tierra. NO UTILICE un cable de extensión. NO UTILICE un enchufe adaptador con este artefacto. Si no se siguen estas instrucciones, se podrá producir la muerte, incendio o descargas eléctricas. CIRCUITO – individual, correctamente polarizado y conectado a un disyuntor de 15 o 20 amperes o a un fusible con retardo.
CONSEJOS PARA LA SOLUCIÓN DE PROBLEMAS Antes de Solicitar el Servicio Técnico Problema Causas posibles Quedó una cantidad pequeña de agua en el dispensador (en algunos modelos) al final del ciclo Espray corto y retraso luego de presionar el botón Start (Iniciar) El nivel de agua parece bajo Flujo bajo de agua Funcionamiento normal del dispensador Es normal que una cantidad pequeña de agua permanezca en el dispensador luego del ciclo.
Problema Causas posibles Qué hacer La lavadora se interrumpe durante el ciclo de lavado Se seleccionó la opción Soak (Remojo) Esto es normal Polvo residual en el dispensador o atascamiento de los dispensadores (en algunos modelos) El agua usada para el lavado es demasiado fría o la presión de agua es baja en el hogar Los aditivos de lavado se dispensan demasiado rápido (Dispensadores en algunos modelos) La lavadora se interrumpe durante el ciclo de centrifugado La lavadora no funciona Desborde de lo
CONSEJOS PARA LA SOLUCIÓN DE PROBLEMAS Antes de Solicitar el Servicio Técnico Problema La ropa está demasiado mojada Luz intermitente de giro o la luz giro en al final del ciclo Formación de bolitas Enganches, agujeros, desgarros, rasgones o desgaste excesivo Arrugas Sonidos “Clic” “Silbidos” oscilantes Sonido de “clic” detrás el panel de control mientras llena El flujo de agua cambia durante el llenado Sonidos del motor durante los giros “Zumbido” “Gorgoteo” El agua “borbotea” La lavadora se balance
GEAppliances.com Por el Período de: GE Appliances reemplazará: Un Año Desde la fecha de compra original Cualquier pieza especificada de fábrica de la lavadora que falle debido a un defecto de los materiales o la mano de obra. Durante esta garantía limitada de un año, también ofrecemos, en forma gratuita, toda la mano de obra y los costos de servicio para reemplazar la pieza defectuosa. Diez años Desde la fecha de compra original El motor, si falla debido a un defecto de fabricación o de mano de obra.
SOPORTE PARA EL CONSUMIDOR Soporte para el Consumidor Sitio Web de GE Appliances ¿Desea realizar una consulta o necesita ayuda con su electrodoméstico? ¡Intente a través del Sitio Web de GE Appliances las 24 horas del día, cualquier día del año! Usted también puede comprar más electrodomésticos maravillosos de GE Appliances y aprovechar todos nuestros servicios de soporte a través de Internet, diseñados para su conveniencia. En EE.UU.: GEAppliances.