MICROWAVE OVEN OWNER’S MANUAL SAFETY INFORMATION . . . . . . . 3-5 USING YOUR OVEN PEM31 Features . . . . . . . . . . . . . . . . . . . . . . . . . . . . . .6 Controls . . . . . . . . . . . . . . . . . . . . . . . . . . . . . .7 Power Levels . . . . . . . . . . . . . . . . . . . . . . . . . .8 Time and Auto Features . . . . . . . . . . . . . 8-12 Sensor Features . . . . . . . . . . . . . . . . . . . 13-15 Other Features . . . . . . . . . . . . . . . . . . . . 16-17 Microwave Terms . . . . . . . . . . .
THANK YOU FOR MAKING GE APPLIANCES A PART OF YOUR HOME. Whether you grew up with GE Appliances, or this is your first, we’re happy to have you in the family. We take pride in the craftsmanship, innovation and design that goes into every GE Appliances product, and we think you will too. Among other things, registration of your appliance ensures that we can deliver important product information and warranty details when you need them. Register your GE appliance now online.
READ ALL INSTRUCTIONS BEFORE USING THE APPLIANCE WARNING To reduce the risk of burns, electric shock, fire, injury to persons, or exposure to excessive microwave energy: When using electrical appliances, basic safety precautions should be followed, including the following: Read all instructions before using this appliance. Read and follow the specific precautions in the PRECAUTIONS TO AVOID POSSIBLE EXPOSURE TO EXCESSIVE MICROWAVE ENERGY section on page 5.
SAFETY INFORMATION IMPORTANT SAFETY INSTRUCTIONS READ ALL INSTRUCTIONS BEFORE USING THE APPLIANCE WARNING OPERATING As with any appliance, close supervision is necessary when used by children. Do not operator the oven without the turntable in place. The turntable must be unrestricted so it can turn. Make sure all cookware used in your microwave oven is suitable for microwaving.
READ ALL INSTRUCTIONS BEFORE USING THE APPLIANCE PRECAUTIONS TO AVOID POSSIBLE EXPOSURE TO EXCESSIVE MICROWAVE ENERGY (a) Do Not Attempt to operate this oven with the door open since open-door operation can result in harmful exposure to microwave energy. It is important not to defeat or tamper with the safety interlocks. (b) Do Not Place any object between the oven front face and the door or allow soil or cleaner residue to accumulate on sealing surfaces. (c) Do Not Operate the oven if it is damaged.
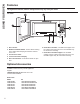
USING YOUR OVEN Features Throughout this manual, features and appearance may vary from your model. 800 Watts Sensor Cooking Popcorn Beverage Potato Vegetable Reheat Weight/Time 1 3 Add 30 Sec 4 5 6 Timer On/Off 7 8 9 Cook Time Power Level 0 Set Clock Turntable Cancel Off 1 Door Latches 2 Window with Metal Shield. Screen allows cooking to be viewed while keeping microwaves confined in the oven. 3 Convenience Guide 4 Touch Control Panel Display 5 Door Latch Release.
You can microwave by time or with the convenience features. Not all features on all models. Express Cook Sensor Cooking 1 2 3 Add 30 Sec Popcorn Beverage Potato 4 5 6 Timer On/Off Vegetable Reheat Weight/Time 7 8 9 Cook Time Power Level 0 Set Clock Turntable Defrost USING YOUR OVEN Controls Clock Display Cooking Controls Check the Convenience Guide before you begin.
USING YOUR OVEN About the features Power Level The power level may be entered or changed immediately after entering the feature time for Cook Time, Time Defrost, Add 30 Sec or Express Cook. the power level may also be changed during the time countdown. 1. Press Cook Time. 2. Enter cooking or defrosting time 3. Press Power Level. 4. Select desired power level 1-10. 3. Press Start/Pause. Variable power levels add flexibility to microwave cooking.
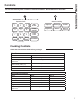
Cooking Guide for Cook Time NOTE: Use power level 10 (High) unless otherwise noted. Vegetable Amount Time Comments 1 lb. 5 to 8 min., In 11¼2-qt. oblong glass baking dish, place 1/4 cup (frozen spears) 10-oz. package Med-High (7) 4 to 7 min. Rotate dish after half of time. In 1-qt. casserole. Beans (fresh green) (frozen green) (frozen lima) 1 lb. cut in half 10-oz. package 10-oz. package 10 to 14 min. 4 to 8 min. 4 to 8 min. In 11¼2-qt. casserole, place 1/2 cup water. In 1-qt.
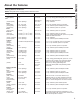
USING YOUR OVEN About the features Time Defrost Time Defrost allows you to defrost for a selected length of time. See the Defrosting Guide for suggested times. (Weight Defrost is explained in the Auto Feature section.) 1. Press Defrost Weight/Time twice. 2. Enter defrosting time. 3. Press Start/Pause. 4. Turn food over when the oven signal. 5. Press Start/Pause. When the oven signals, turn food over and break apart or rearrange pieces for more even defrosting.
USING YOUR OVEN About the features Defrosting Guide Food Time Comments 1/4 min. 2 to 4 min. Rearrange after half of time. Breads, Cakes Bread, buns or rolls (1 piece) Sweet rolls (approx. 12 oz.) Fish and Seafood Fillets, frozen (1 lb.) Shellfish, small pieces (1 lb.) 6 to 9 min. 3 to 7 min. Place block in casserole. Turn over and break up after first half of time. Fruit Plastic pouch—1 or 2 (10-oz. package) 1 to 5 min. Meat Bacon (1 lb.) Franks (1 lb.) 2 to 5 min. 2 to 5 min.
USING YOUR OVEN About the features Express Cook This is a quick way to set cooking time for 1–6 minutes. Press one of the Express Cook pads (from 1 to 6) for 1 to 6 minutes of cooking at power level 10. For example, press the 2 pad for 2 minutes of cooking time. The power level can be changed as time is counting down. Press POWER LEVEL and enter 1–10. Add 30 Sec You can use this feature two ways: It will add 30 seconds to the time counting down each time the pad is pressed.
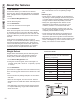
Humidity Sensor The Sensor Features detect the increasing humidity released during cooking. The oven automatically adjusts the cooking time to various types and amounts of food. Do not use the Sensor Features twice in succession on the same food portion—it may result in severely overcooked or burnt food. Be sure to let the oven cool down for 5-10 minutes before starting the next sensor cook. If food is undercooked after the countdown, use Cook Time for additional cooking time.
USING YOUR OVEN About the sensor features Reheat The Reheat feature reheats single servings of previously cooked foods or a plate of leftovers. 1. Place covered food in the oven. Press Reheat. 2. Using the conversion guide below, enter food code. For example, press pad 1 for Pizza. Food Code Entry Food Available Servings Ounces per serving 1 Pizza 1-4 Slices 2 ounces 2 Plate 1 3 Soup 1-4 4 ounces After removing food from the oven, stir, if possible, to even out the temperature.
Vegetable and Potato How to Change the Automatic Settings To use the Vegetable or Potato features: 1. Place covered food in the oven. Press Vegetable. To reduce time by 10%: Press 1 after the feature pad. 2. Using the Conversion Guide below, enter food code. For example , press pad 1 for Fresh. To add 10% to cooking time: Press 9 after the feature pad. 3. Press Start/Pause . The oven signals when the steam is sensed and the time remaining begins counting down. Turn or stir the food if necessary.
USING YOUR OVEN Other Features Cooking Complete Reminder To remind you that you have food in the oven, the oven will display “END” and beep once a minute until you either open the oven door or press the Cancel/Off button. Set Clock Press to enter the time of day or to check the time of day while microwaving. 1. Press Set Clock. 2. Enter time of day. 3. Press Start or Set Clock.
Child Lock-Out You may lock the control panel to prevent the microwave from being accidentally started or used by children. Turntable For best cooking results, leave the turntable on. It can be turned off for large dishes. Press TURNTABLE to turn the turntable on or off. Timer On/Off Timer On/Off operates as a minute timer and can be used at any time, even when the oven is operating. 1. Press TIMER ON/OFF. To lock or unlock the controls, press and hold Cancel/ Off for about three seconds.
USING YOUR OVEN 18 Microwave Terms Term Definition Arcing Arcing is the microwave term for sparks in the oven. Arcing is caused by: Ŷ metal or foil touching the side of the oven. Ŷ foil that is not molded to food (upturned edges act like antennas). Ŷ metal such as twist-ties, poultry pins, gold-rimmed dishes. Ŷ recycled paper towels containing small metal pieces. Ŷ plates or dishes with a metallic trim or glaze with a metallic sheen.
Helpful Hints An occasional thorough wiping with a solution of baking soda and water keeps the inside fresh. Be certain the oven control is turned off before cleaning any part of this oven. How to Clean the Inside Walls, Floor, Inside Window, Metal and Plastic Parts on the Door Some spatters can be removed with a paper towel; others may require a damp cloth. Remove greasy spatters with a sudsy cloth, then rinse with a damp cloth. Do not use abrasive cleaners or sharp utensils on oven walls.
TROUBLESHOOTING TIPS Troubleshooting Tips PROBLEM POSSIBLE CAUSE OVEN WILL NOT COME ON A fuse in your home may be blown or the circuit breaker tripped. Replace fuse or reset circuit breaker. Unplug your microwave oven, then plug it back in. Make sure 3-prong plug on oven is fully inserted into wall receptacle. CONTROL PANEL LIGHTED, YET OVEN WILL NOT START Door not securely closed. Start/Pause must be pressed after entering cooking selection.
NOTES Notes 21
NOTES 22 Notes
For the period of GE Appliances Will Choose to Repair or Replace: One year From the date of the original purchase Any product which fails due to a defect in materials or workmanship. The exchange unit is warranted for the remainder of your product’s original one-year warranty period. WARRANTY GE Appliances Microwave Oven Warranty In Order to Make a Warranty Claim: Call GE Appliances at 800 GE CARES (800 432-2737). Have the model number and serial number available.
CONSUMER SUPPORT Consumer Support GE Appliances Website Have a question or need assistance with your appliance? Try the GE Appliances Website 24 hours a day, any day of the year! You can also shop for more great GE Appliances products and take advantage of all our on-line support services designed for your convenience. In the US: GEAppliances.
HORNO MICROONDAS INFORMACIÓN DE SEGURIDAD . . . .3-5 USO DE LA HORNO Funciones . . . . . . . . . . . . . . . . . . . . . . . . . . . . . . . . . 6 Controles . . . . . . . . . . . . . . . . . . . . . . . . . . . . . . . . . . .7 Nivel de potencia . . . . . . . . . . . . . . . . . . . . . . . . . . . 8 Funciones de tiempo y automático . . . . . . . . . . . . . . . . . . . . 8-12 Características de microondas por sensor . . . . . . . . . . . . . . . . . . . . . . . . . . . . 13-15 Otras funciones . . . . .
GRACIAS POR HACER QUE GE APPLIANCES SEA PARTE DE SU HOGAR. Ya sea que haya crecido usando GE Appliances, o que ésta es su primera vez, nos complace tenerlo en la familia. Sentimos orgullo por el nivel de arte, innovación y diseño de cada uno de los electrodomésticos de GE Appliances, y creemos que usted también. Entre otras cosas, el registro de su electrodoméstico asegura que podamos entregarle información importante del producto y detalles de la garantía cuando los necesite.
ADVERTENCIA Para reducir el riesgo de quemaduras, descargas eléctricas, incendio, lesiones o exposición a energía de microondas excesiva: Cuando utilice aparatos eléctricos, se deben seguir las precauciones de seguridad básicas, entre las que se incluyen las siguientes: Ŷ /HD WRGDV ODV LQVWUXFFLRQHV DQWHV GH XWLOL]DU HVWH DSDUDWR PARA REDUCIR EL RIESGO DE INCENDIO DENTRO DEL HORNO: Ŷ /HD \ VLJD ODV SUHFDXFLRQHV HVSHFtILFDV GHVFULWDV HQ OD Ŷ 1R FRFLQH H[FHVLYDPHQWH ORV DOLPHQWRV 9LJLOH VHFFLyQ 35(
INFORMACIÓN DE SEGURIDAD INFORMACIÓN IMPORTANTE DE SEGURIDAD LEA TODAS LAS INSTRUCCIONES ANTES DE USAR ADVERTENCIA Continuado USO Ŷ &RPR FRQ FXDOTXLHU DSDUDWR FXDQGR VHD XWLOL]DGR SRU niños es necesaria una estrecha vigilancia. No use el horno sin el plato giratorio en su posición. El plato giratorio no deberá tener restricciones, de modo que pueda girar. Ŷ $ VHJ~UHVH GH TXH WRGRV ORV XWHQVLOLRV XVDGRV HQ HO KRUQR microondas sean para uso en el mismo.
PRECAUCIONES PARA EVITAR LA POSIBLE EXPOSICIÓN A ENERGÍA DE MICROONDAS EXCESIVA (a) No intente hacer funcionar el horno con la compuerta abierta ya que ésto puede provocar exposición peligrosa a la energía de microondas. Es importante no forzar ni dañar los seguros. (b) No coloque ningún objeto entre la parte frontal del horno y la compuerta, ni permita que se acumulen residuos de producto limpiador o detergente, suciedad o polvo en las superficies de sellado.
USO DE LA HORNO Funciones Es posible que las funciones y apariencias varíen con relación a su modelo a lo largo del manual. 800 Watts Sensor Cooking Popcorn Beverage Potato Vegetable Reheat Weight/Time Defrost Express Cook 1 2 3 Add 30 Sec 4 5 6 Timer On/Off 7 8 9 Cook Time Power Level 0 Set Clock Turntable Cancel Off Start Pause 1 Pestillos de la Puerta. 6 Plato Giratorio Extraíble.
Puede usar el horno microondas por tiempo o con funciones convenientes. No todos los modelos cuentan con todas las funciones. Express Cook Sensor Cooking 1 2 3 Add 30 Sec Popcorn Beverage Potato 4 5 6 Timer On/Off Vegetable Reheat Weight/Time 7 8 9 Cook Time Power Level 0 Set Clock Turntable Defrost USO DE LA HORNO Controles Clock Display Controles de Cocción Consulte la Guía de Acciones Convenientes antes de comenzar.
USO DE LA HORNO Acerca de las funciones Nivel de potencia El nivel de potencia se podrá ingresar o modificar de forma inmediata luego de ingresar el tiempo para Cook Time (Tiempo de Cocción), Time Defrost (Descongelar por Tiempo), Add 30 Sec (Agregar 30 Segundos) o Express Cook (Cocción Express). El nivel de potencia también se puede modificar durante la cocción. 1. Presione Cook Time (Tiempo de Cocción) e ingrese el tiempo de cocción. 2. Ingrese el tiempo de cocción o descongelación. 3.
Guía de Cocción para la Cocción por Tiempo NOTA: Use el nivel de potencia 10 (Alto) a menos que se indique lo contrario. Verdura Cantidad Tiempo Comentarios Espárragos WDOORV IUHVFRV OLEUD D PLQ 0HG +LJK WDOORV IUHVFRV SDTXHWH GH RQ]DV D PLQ (Q XQ SODWR GH KRUQHDGR GH YLGULR UHFWDQJXODU GH ó FRORTXH ó GH WD]D GH DJXD Gire el plato luego de la mitad del tiempo.
USO DE LA HORNO Acerca de las funciones Descongelación por Tiempo 7LPH 'HIURVW 'HVFRQJHODFLyQ SRU 7LHPSR OH permite descongelar durante un período de tiempo seleccionado. Consulte los tiempos sugeridos HQ OD *XtD GH 'HVFRQJHODFLyQ :HLJKW 'HIURVW 'HVFRQJHODFLyQ SRU 3HVR VH H[SOLFD HQ OD VHFFLyQ $XWR )HDWXUH )XQFLyQ $XWRPiWLFD 1. Presione Defrost Weight/Time (Peso/ Tiempo de Descongelación) dos veces. 2. Ingrese el tiempo de descongelación. 3. Presione Start/ Pause (Iniciar/ Pausar). 4.
Guía de Descongelación Comida Tiempo Comentarios Panes, Tortas Panes, buñuelos o SDQHFLOORV WUR]R 1/4 de min. 3DVWHOLWRV R] DSUR[ 2 a 4 min. Reordene luego de la mitad del tiempo. Pescado y Mariscos /RPRV FRQJHODGRV OE 6 a 9 min. Mariscos, trozos pequeños OE 3 a 7 min. Coloque el bloque en la cacerola. Dé vuelta y separe luego de la primera mitad de tiempo. Fruta %ROVD GH SOiVWLFR² R SDTXHWH GH R] USO DE LA HORNO Acerca de las funciones 1 a 5 min.
USO DE LA HORNO Acerca de las funciones Cocción Express Ésta es una forma rápida de configurar el tiempo de cocción entre 1 y 6 minutos. Presione una de las teclas de Express Cook (Cocción Express) GH D SDUD XQD FRFFLyQ HQWUH \ PLQXWRV HQ power level 10 (nivel de potencia 10). Por ejemplo: presione la tecla 2 para un tiempo de cocción de 2 minutos. El nivel de potencia se puede modificar mientras se está realizando la cuenta regresiva.
Sensor de Humedad 6HQVRU )HDWXUHV )XQFLRQHV GHO 6HQVRU GHWHFWDQ OD humedad creciente liberada durante la cocción. El horno ajusta de forma automática el tiempo de cocción a diferentes tipos y cantidades de comida. 1R XVH 6HQVRU )HDWXUHV )XQFLRQHV GHO 6HQVRU GRV veces seguidas en la misma porción de comida; esto podrá hacer que la comida se sobrecaliente de forma excesiva o que se queme. Asegúrese de dejar que el horno se enfríe entre 5 y 10 minutos, antes de iniciar la siguiente cocción con sensor.
USO DE LA HORNO Acerca de las funciones Reheat (Recalentar): /D IXQFLyQ 5HKHDW 5HFDOHQWDU YXHOYH D FDOHQGDU porciones individuales de comidas cocinadas previamente o un plato con restos de comida. 1. Coloque la comida cubierta en el horno. Presione Reheat (Recalentar). El horno se inicia de inmediato. 2. Usando la guía de conversión que aparece a continuación, ingrese el código de la comida. Por ejemplo: presione la tecla 1 para Pizza.
Vegetable(Verduras) and Potato(Papa) Para usar las funciones Vegetable (Verdura) o Potato (Papa): 1. Coloque la comida cubierta en el horno. Presione Vegetable (Verdura). 2. Usando la Guía de Conversión que aparece a continuación, ingrese el código de la comida. Por ejemplo: presione la tecla 1 para fresca. 3. Presione Start/Pause (Iniciar/ Pausar). El horno emite una señal cuando el sensor detecta vapor y el tiempo restante comienza la cuenta regresiva. Si es necesario, gire o revuelva la comida.
USO DE LA HORNO Otras Funciones Recordatorio de Cocción Completa Para recordarle que colocó comida en el horno, este ~OWLPR PRVWUDUi ³(QG´ )LQ \ HPLWLUi XQ SLWLGR XQD YH] por minuto hasta que abra la puerta del horno o presione HO ERWyQ &DQFHO 2II &DQFHODU $SDJDU Set Clock (Configuración del Reloj). Presione para ingresar la hora del día o para ver la hora del día mientras cocina con el horno microondas. 1. Presione Set Clock (Configuración del Reloj). 2. Ingrese la hora del día. 3.
Bloqueo para Niños Puede bloquear el panel de control para evitar que el microondas se inicie de forma accidental o sea usado por niños. Turntable (Plato Giratorio) Para obtener mejores resultados en su cocción, deje el plato JLUDWRULR HQFHQGLGR /R SRGUi DSDJDU DO XVDU SODWRV JUDQGHV Presione TURNTABLE (Plato Giratorio) para encender o apagar el plato giratorio.
USO DE LA HORNO 18 Términos del Microondas Término Definición Arco eléctrico El arco eléctrico es lo que, en la terminología de los microondas, describe las chispas en el horno. El arco eléctrico se produce cuando: Ŷ HO HVWDQWH GH PHWDO VH KD LQVWDODGR GH IRUPD LQFRUUHFWD \ HVWi WRFDQGR ODV SDUHGHV GHO PLFURRQGDV Ŷ hay un metal o papel de aluminio tocando el lateral del horno. Ŷ KD\ SDSHO GH DOXPLQLR QR HVWi HQYROYLHQGR ELHQ OD FRPLGD KD\ ERUGHV GREODGRV KDFLD DUULED TXH DFW~DQ FRPR DQWHQDV Ŷ hay
Consejos Útiles Una limpieza completa de forma ocasional con una solución de bicarbonato y agua mantiene el interior fresco. Desenchufe el cable antes de limpiar cualquier parte del horno. Cómo Limpiar el Interior Paredes, Piso, Ventana Interior, Partes Metálicas y Plásticas de la Puerta Algunas salpicaduras se pueden eliminar con una toalla de papel; otras pueden requerir una tela húmeda. Elimine salpicaduras de grasa con una tela con jabón, y luego enjuague con una tela húmeda.
CONSEJOS PARA LA SOLUCIÓN DE PROBLEMAS Troubleshooting Tips PROBLEMA CAUSA POSIBLE EL HORNO NO SE ENCIENDE Es posible que un fusible de su hogar se haya quemado o que el disyuntor se haya desconectado. Reemplace el fusible o reinicie el disyuntor. Desenchufe el horno microondas; luego vuelva a enchufarlo. Asegúrese de que el cable de 3 patas del horno esté completamente insertado en el tomacorriente.
NOTAS Notas 21
NOTAS 22 Notas
For the period of GE Appliances Decidirá Reparar o Reemplazar: One year From the date of the original purchase &XDOTXLHU SURGXFWR TXH IDOOH GHELGR D XQ GHIHFWR HQ ORV PDWHULDOHV R OD IDEULFDFLyQ /D unidad de reemplazo posee garantía por el resto del período de garantía original de un año sobre el producto. GARANTÍA Garantía de Horno Microondas GE Appliances A Fin de Realizar un Reclamo sobre la Garantía: /ODPH D *( $SSOLDQFHV DO *( &$5(6 7HQJD HO Q~PHUR GH PRGHOR \ HO Q~PHUR GH V
SOPORTE PARA EL CONSUMIDOR Soporte para el Consumidor Sitio Web de GE Appliances ¿Desea realizar una consulta o necesita ayuda con su electrodoméstico? ¡Intente a través del Sitio Web de GE Appliances las 24 horas del día, cualquier día del año! Usted también puede comprar más electrodomésticos maravillosos de GE Appliances y aprovechar todos nuestros servicios de soporte a través de Internet, diseñados para su conveniencia. En EE.UU.: GEAppliances.