
Use and Care Manual


14 49-2000708 Rev. 3
Installation Preparation
INSTALLATION PREPARATION
ADVANCE PLANNING
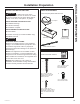
Duct Install Planning
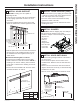
Ŷ This hood is designed to be vented vertically through
the ceiling with a 8” round duct or backwall using an
90º elbow and 8” round duct.
Ŷ Use metal ductwork only.
Ŷ Plan the route for venting exhaust to the outdoors.
To maximize the ventilation performance of the vent
system:
1. Minimize the duct run length and number of
transitions and elbows.
2. Maintain a constant duct size.
3. Seal all joints with duct tape to prevent any leaks.
NOTE: Flexible vent is not recommended. Flexible
vent creates back pressure and air turbulence that
greatly reduces performance.
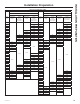
Ŷ Maximum equivalent duct length for 100 CFM: 150
foot for vent hoods.
Ŷ Install a wall cap or roof cap with damper at the
exterior opening. Purchase the wall or roof cap and
any transition and length of duct needed in advance.
Ŷ When applicable, install any makeup (replacement)
air system in accordance with local building code
requirements. Use makeup air kit JXMUA8.
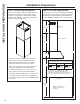
Vent system can terminate either through the roof
RUWKHZDOO7RYHQWWKURXJKDZDOODHOERZLV
needed and installed immediately above the hood.
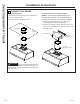
Recirculation Install Planning
A recirculation duct and charcoal filter are necessary
for recirculation installation and must be purchased
separately.
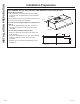
Power Supply Planning
The location of the power supply connection is called
out in the section, House Wiring Location
Roof Cap
Round Duct
Wall Cap
Add Insulation
and/or Caulk
Add Insulation
and/or Caulk
Add tape to joint
Hood
POWER SUPPLY
IMPORTANT – (Please read carefully)
WARNING
FOR PERSONAL SAFETY, THIS APPLIANCE MUST
BE PROPERLY GROUNDED.
Remove house fuse or open circuit breaker before
beginning installation.
Do not use an extension cord or adapter plug with
this appliance. Follow National Electrical Codes or
prevailing local codes and ordinances.
Electrical supply
These vent hoods must be supplied with 120V, 60Hz,
and connected to a properly grounded branch circuit,
and protected by a 15 or 20 amp circuit breaker or
time delay fuse.
Ŷ Wiring must be 2 wire with ground.
Ŷ If the electrical supply does not meet the above
requirements, call a licensed electrician before
proceeding.
Ŷ Route house wiring as close to the installation
location as possible in the ceiling or wall.
Ŷ Connect the wiring to the house wiring in
accordance with local codes.
Grounding instructions
The grounding conductor must be connected to
a ground metal, permanent wiring system, or an
equipment-grounding terminal or lead on the hood.
WARNING
The improper connection of the
equipment-grounding conductor can result in a risk
of electric shock. Check with a qualified electrician or
service representative if you are in doubt whether the
appliance is properly grounded.