
Owners manual


49-60820 43
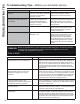
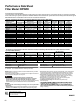
TROUBLESHOOTING TIPS
Truth or Myth? Answer Explanation
When the refrigerator is installed, or after
replacing the water filter, I must dispense
water for five minutes.
758(
A newly installed refrigerator or water filter contains air in the water
lines. Press the dispenser paddle and dispense cold water for at least
5 minutes to remove air from the water line, and flush the filter.
To fill the ice bucket to the maximum
capacity, I should dispense 12 and 18 hours
after installation.
758( Dispensing 3-4 cubes 12 hours and 18 hours after installation, allows
ice to disperse within the ice bucket, which in turns calls on the ice
maker to produce additional ice. Normal ice production = 100 cubes
in 24 hours.
I can use the water filter bypass plug to
determine if the filter requires replacement.
758( Decrease in flow from the water dispenser, or decreased ice
production, may indicate the need to replace the water filter. Install
the water filter bypass plug (provided with the refrigerator on some
models*), and check flow from the dispenser. If water flow returns to
normal with the bypass plug in place, replace the water filter.
The top of the refrigerator doors will always
be aligned.
MYTH Several things can affect the fresh food door alignment, including the
floor the refrigerator is installed on and loading of doors. If the top
RIWKHIUHVKIRRGGRRUVDUHQRWDOLJQHGXVHD´DOOHQZUHQFKWR
adjust the right/left hand door. The adjustment screw is located on
WKHERWWRPULJKWRUOHIWKDQGVLGHRIWKHGRRURSHQWKHIUHH]HUGRRUWR
access the screw.
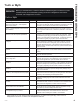
Refrigerator door handles can be easily
tightened.
758( If door handles are loose or have a gap, the handle can be adjusted
XVLQJD´DOOHQZUHQFKRQVHWVFUHZVORFDWHGRQWKHHQGVRIWKH
handles.
There may be odor and taste problems with
your ice.
758( After starting the ice maker throw away 24 hours of ice production to
avoid odor and taste problems.
I can make fine adjustments to the fresh food
doors to align them.
758( ,IWKHIUHVKIRRGGRRUVDUHQRWDOLJQHGXVHD´$OOHQZUHQFKWR
adjust the right hand door. The adjustment screw is located on the
bottom of the right/left door. Open the freezer door to access.
Door handles should always be removed for
installation.
MYTH Check chart on reverse side of this instruction. If the doors must be
removed do not remove the handles, or if the refrigerator will fit easily
through the passage way opening. Adjust handles that are loose or
KDYHDJDSE\DGMXVWLQJ´VHWVFUHZVRQHLWKHUHQGRIKDQGOHV
Door removal is always required for
installation.
MYTH Check chart on reverse side of this instruction. Doors should only be
removed when necessary to prevent damage from passage way or
access to final location.
Refrigerator doors that won’t close after
installation, can be adjusted to close properly.
758( Door mechanism works best if installed at 90°+. If installed at 180°,
remove the door from the mid hinge, and swing the door 180° before
reinstalling. See Reinstalling the Refrigerator Doors.
There is an adjustment to rear wheels. MYTH Front leveling legs are adjustable and should be used to balance the
refrigerator. Leveling legs are used to make initial fresh food door
adjustment.
Check for leaks after all water connections
are made.
758( While purging the air from the water system, check all water line
connections for leaks. Check the connection to the household water
supply at back of refrigerator, and door water line connect.
My LCD display will always be on when I
plug the power cord in at installation.
MYTH If the refrigerator has been stored in a cold environment, the LCD
may be slow to give a proper display. Give the refrigerator enough
time to warm up, and the display should be okay.
Any packaging residue can be cleaned off
the refrigerator using any cleaner.
MYTH Do not use wax, polish, bleach, or other products containing chlorine
on Stainless Steel panels, door handles and trim. Check this
LQVWUXFWLRQXQGHU³&OHDQLQJWKH2XWVLGH´IRUIXOOGHWDLOV
*Some models do not come equipped with the filter bypass plug. To obtain a free bypass plug, visit us on-line at
cafeappliances.com/service. In Canads, visit cafeappliances.ca/service.
Truth or Myth
Truth or Myth
SERVICE
Before you schedule service, review the detailed troubleshooting tips in the Owner’s manual.
If needed, service can be scheduled by visiting us online at cafeappliances.com/service.
In Canada, visit cafeappliances.ca/service