Air Conditioners Room ge.com Safety Instructions . . . . . . . . . .2, 3 Operating Instructions Controls—Control Knobs . . . . .6, 7 Controls—Touch Pads . . . . . . .4, 5 Care and Cleaning Air Filter . . . . . . . . . . . . . . . . . . . . .8 Batteries . . . . . . . . . . . . . . . . . . . . .8 Grille and Case . . . . . . . . . . . . . . .8 Outdoor Coils . . . . . . . . . . . . . . . .8 Installation Instructions . . . .
WARNING! For your safety, the information in this manual must be followed to minimize the risk of fire, electric shock or personal injury. SAFETY PRECAUTIONS Operating Instructions Safety Instructions IMPORTANT SAFETY INFORMATION. READ ALL INSTRUCTIONS BEFORE USING. ■ Use this appliance only for its intended purpose as described in this Owner’s Manual. ■ If the receptacle does not match the plug, the receptacle must be changed out by a qualified electrician.
WARNING! USE OF EXTENSION CORDS—115-Volt models only Because of potential safety hazards under certain CAUTION: conditions, we strongly recommend against the use of an extension cord. Operating Instructions However, if you must use an extension cord, it is absolutely necessary that it be a UL-listed, 14 gauge, 3-wire grounding type appliance extension cord having a grounding type plug and outlet and that the electrical rating of the cord be 15 amperes (minimum) and 125 volts.
Safety Instructions About the controls on the air conditioner—models with touch pads. Features and appearance will vary. FAN On COOL On ENERGY SAVER On TIMER On Operating Instructions SLEEP On Remote Control Air Conditioner Controls On/Off Timer Turns air conditioner on and off. On—When the air conditioner is off, it can be set to automatically turn on in 1 to 24 hours at its previous setting. Each touch will set the time in hours.
Additional controls and important information. Do Not Operate in Freezing Outdoor Conditions This cool-only air conditioner was not designed for freezing outdoor conditions. It must not be used in freezing outdoor conditions. When the air conditioner is turned on, it will automatically start in the setting last used.
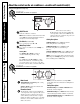
Features and appearance may vary. Controls (on models so equipped) Operating Instructions Safety Instructions About the controls on the air conditioner—models with control knob(s). ON/OFF Switch Turns air conditioner on and off. NOTE: If the air conditioner is off and is then turned on while set in a Cool mode, it will take approximately 3 minutes for the compressor to start and cooling to begin. Installation Instructions Fan Switch (on some models) Use to set the fan speed to LO or HI.
Additional controls and important information. Do Not Operate in Freezing Outdoor Conditions This cool-only air conditioner was not designed for freezing outdoor conditions. It must not be used in freezing outdoor conditions. Safety Instructions ge.com Vent Control (on some models) Operating Instructions The vent control is located on the inside of the air louvers in the lower right corner. When set at CLOSE, only the air inside the room will be circulated and conditioned.
How to Insert the Batteries on the Remote Control (on some models) Operating Instructions Safety Instructions Care and cleaning of the air conditioner. 1 Remove the battery cover by sliding it according to the arrow direction. 2 Insert new batteries, making sure that the (+) and (–) of battery are installed correctly. 3 Reattach the cover by sliding it back into position. NOTES: ■ Use 2 AAA (1.5 volt) batteries. Do not use rechargeable batteries.
Installation Instructions Air Conditioner Questions? Call 800.GE.CARES (800.432.2737) or Visit our Website at: ge.com BEFORE YOU BEGIN CAUTION: Read these instructions completely and carefully. IMPORTANT • — Save these instructions for local inspector’s use. • — Observe all governing codes and ordinances. Note to Installer – Be sure to leave these instructions with the Consumer. Note to Consumer – Keep these instructions for future reference.
Installation Instructions PARTS INCLUDED Window sash seal (Appearance may vary) Top mounting rail Foam top window gasket Top mounting rail seal strip Left accordion panel Right accordion panel Air conditioner Type A (9 or 10) 1/2” Screws Type B (7) 3/4” Screws 10 Security bracket (3)
Installation Instructions 1 WINDOW REQUIREMENTS 2 STORM WINDOW REQUIREMENTS A storm window frame will not allow the air conditioner to tilt toward the outside, and will keep it from draining properly. To adjust for this, attach a piece of wood to the stool. WOOD PIECES– WIDTH: 2″ LENGTH: Long enough to fit inside the window frame. THICKNESS: To determine the thickness, place a piece of wood on the stool to make it 1/2″ higher than the top of the storm window frame or the vinyl frame.
Installation Instructions 3 PREPARE AIR CONDITIONER (CONT.) 4 INSTALL AIR CONDITIONER IN WINDOW (CONT.) C Loosen the lower screw on each side of the case and hook a security bracket on each side. To allow for later adjustment, do not tighten screws until installing the unit in the window. C Extend the left and right accordion panels to the vertical window sashes and attach with 4 type B screws.
ge.com What To Do Air conditioner does not start The air conditioner is unplugged. • Make sure the air conditioner plug is pushed completely into the outlet. The fuse is blown/circuit breaker is tripped. • Check the house fuse/circuit breaker box and replace the fuse or reset the breaker. Power failure. • If power failure occurs, turn the air conditioner Off. When power is restored, wait 3 minutes to restart the air conditioner to prevent tripping of the compressor overload.
Consumer Support Troubleshooting Tips Installation Instructions Operating Instructions Safety Instructions Notes.
GE Service Protection Plus™ GE, a name recognized worldwide for quality and dependability, offers you Service Protection Plus ™—comprehensive protection on all your appliances— No Matter What Brand! Benefits Include: • Backed by GE • All brands covered • Unlimited service calls • All parts and labor costs included • No out-of-pocket expenses • No hidden deductibles • One 800 number to call We’ll Cover Any Appliance. Anywhere. Anytime.
Consumer Product Ownership Registration Dear Customer: Thank you for purchasing our product and thank you for placing your confidence in us. We are proud to have you as a customer! Follow these three steps to protect your new appliance investment: 1 2 3 Complete and mail your Consumer Product Ownership Registration today. Have the peace of mind of knowing we can contact you in the unlikely event of a safety modification. After mailing the registration below, store this document in a safe place.
All warranty service provided by our Factory Service Centers, or an authorized Customer Care® technician. To schedule service, on-line, 24 hours a day, visit us at ge.com, or call 800.GE.CARES (800.432.2737). Please have serial number and model number available when calling for service. Staple your receipt here. Proof of the original purchase date is needed to obtain service under the warranty.
Consumer Support. GE Appliances Website ge.com Have a question or need assistance with your appliance? Try the GE Appliances Website 24 hours a day, any day of the year! For greater convenience and faster service, you can now download Owner’s Manuals, order parts or even schedule service on-line. Schedule Service ge.com Expert GE repair service is only one step away from your door. Get on-line and schedule your service at your convenience 24 hours any day of the year! Or call 800.GE.CARES (800.432.
Acondicionadores de Aire ge.com Instrucciones de seguridad . . . . .2, 3 Instrucciones de operación Controles—botones de control . . .6, 7 Controles—teclas de toque . . . . . .4, 5 Cuidado y limpieza Baterías . . . . . . . . . . . . . . . . . . . . . . .8 Bobinas para exteriores . . . . . . . . . .8 Filtro de aire . . . . . . . . . . . . . . . . . . .8 Parrilla y caja . . . . . . . . . . . . . . . . . .8 Instrucciones de instalación . .
Instrucciones de seguridad INFORMACIÓN IMPORTANTE DE SEGURIDAD. LEA TODAS LAS INSTRUCCIONES ANTES DE USAR. ¡ADVERTENCIA! Por su seguridad, se debe seguir la información en este manual para minimizar el riesgo de incendios, descargas eléctricas o lesiones personales. PRECAUCIONES DE SEGURIDAD Instrucciones de operación ■ Use este electrodoméstico solamente para el propósito determinado según se describe en el Manual del propietario.
¡ADVERTENCIA! USO DE CABLES DE EXTENSIÓN—Modelos de 115 voltios solamente Debido al potencial de riesgos de seguridad PRECAUCIÓN: bajo ciertas condiciones, enérgicamente recomendamos contra el uso de cables de extensión. Instrucciones de seguridad ge.com NO USE un cable de extensión con ninguno de los modelos de 230/208 voltios.
Instrucciones de seguridad Acerca de los controles en el acondicionador de aire— modelos con teclas de toque. Las funciones y el aspecto pueden variar. FRÍO Encendido VENTILADOR Encendido AHORRADOR DE ENERGÍA Encendido SINCRONIZADOR Encendido Instrucciones de operación DORMIR Encendido Controles del acondicionador de aire On/Off (Encendido/apagado) Apaga y prende el acondicionador de aire.
Controles adicionales e información importante. No use en las condiciones externas debajo el punto de congelación Este acondicionador de aire no es diseñado para usar en temperaturas externas debajo el punto de congelación. No use en las condiciones externas debajo el punto de congelación. Instrucciones de seguridad ge.com Cuando el acondicionador de aire se encienda, se encenderá automáticamente en el nivel que se encontraba la última vez.
Las funciones y el aspecto pueden variar. Controles (en algunos modelos) Instrucciones de operación Instrucciones de seguridad Acerca de los controles en el acondicionador de aire— modelos con botón(es) de control. Interruptor ON/OFF Enciende y apaga el acondicionador de aire. NOTA: Si el acondicionador de aire está apagado y entonces es encendido mientras está en un modo Cool (Enfriado), el compresor necesitará aproximadamente 3 minutos para iniciar y para que el enfriamiento comience.
Controles adicionales e información importante. No use en las condiciones externas debajo el punto de congelación Este acondicionador de aire no es diseñado para usar en temperaturas externas debajo el punto de congelación. No use en las condiciones externas debajo el punto de congelación. El control de ventilación está localizado al interior de las persianas en la esquina derecha inferior.
Cómo insertar las baterías del control remoto (en algunos modelos) 1 Retire la cubierta de la batería deslizándola de acuerdo con la dirección de la flecha. 2 Inserte baterías nuevas, cerciorándose de que los polos positivos (+) y negativos (–) están orientados correctamente. 3 Coloque la cubierta otra vez deslizándola en su lugar. Apague el acondicionador de aire y retire el enchufe del tomacorriente de la pared antes de limpiar. ■ Use 2 baterías “AAA” de 1,5 voltios. No use baterías recargables.
Instrucciones para la instalación Acondicionador de aire ¿Preguntas? Llame al 800.GE.CARES (800.432.2737) o bien Visite nuestra página Web: ge.com REQUISITOS ELECTRICOS (cont.) ANTES DE INICIAR Lea estas instrucciones completa y cuidadosamente — Guarde estas instrucciones para uso del inspector local. • — Observe todos los códigos y órdenes de ley. Nota al instalador – Asegúrese de dejar estas instrucciones con el consumidor. Nota al consumidor – Conserve estas instrucciones para referencia futura.
Instrucciones para la instalación HERRAMIENTAS QUE USTED NECESITARÁ Nivel Destornillador Phillips Lápiz Tijeras o cuchilla Regla o cinta métrica PARTES INCLUIDAS Sello del marco de la ventana (el aspecto puede variar) Riel de montaje superior Empaque superior de espuma de la ventana Cinta de sellado del riel de montaje superior Panel de acordeón derecho Panel de acordeón izquierdo Acondicionador de aire Tornillos 1/2″ tipo A (9 o 10) Tornillos 3/4″ tipo B (7) 10 Soporte de seguridad (3)
Instrucciones para la instalación 1 REQUISITOS PARA LA VENTANA 2 REQUISITOS DE UNA VENTANA DE TORMENTAS • Estas instrucciones son para una ventana estándar de dos pliegues. Usted necesitará modificar el proceso para otros tipos de ventanas. • Todas las partes de apoyo deben quedar totalmente aseguradas a algún metal, mampostería o a la madera. • El tomacorriente eléctrico debe estar al alcance del cable eléctrico del acondicionador de aire.
Instrucciones para la instalación 3 PREPARE EL ACONDICIONADOR 3 PREPARE EL ACONDICIONADOR DE AIRE DE AIRE (CONT.) A Retire la parte posterior la cinta de sellado del riel de montaje y adhiéralo al fondo del riel de montaje superior. Corte al tamaño apropiado. D Inserte los marcos de los paneles de acordeón en la parte superior e inferior de los rieles de montaje. Adhiera los paneles de acordeón al lado de la caja usando los 6 tornillos tipo A.
Instrucciones para la instalación 4 INSTALE EL ACONDICIONADOR DE AIRE EN LA VENTANA (CONT.) C Extienda los paneles de acordeón izquierdo y derecho hacia las bandas de la ventana vertical con 4 tornillos tipo B. Tornillos tipos B Tornillos tipos B Tornillo tipo B D Pegue los corchetes a la repisa en ambos lados usando dos tornillos tipo B. E Apriete los tornillos para sujetar los soportes en su lugar en cada lado del acondicionador de aire.
Instrucciones de seguridad Ideas para la identificación y solución de problemas: ¡Ahorre dinero y tiempo! Problema Causas posibles Qué hacer El acondicionador de aire no enciende El acondicionador de aire está desconectado. •Cerciórese de que el acondicionador de aire está enchufado totalmente en el tomacorriente. El fusible se disparó / el cortacircuitos se disparó. •Inspeccione los fusibles / caja de interruptores de la casa y reemplace cualquier fusible o reajuste el interruptor.
Sonidos de operación normales ■ Quizás escuche un sonido metálico causado por el agua tomada y tirada contra el condensador en los días lluviosos o cuando la humedad es alta. Esta característica de diseño ayuda a remover la humedad y mejora la eficiencia. ■ Quizás escuche que el termostato hace clic cuando el compresor hace ciclo entre encendido y apagado. ■ El agua se acumula en la bandeja durante días lluviosos o con mucha humedad. El agua podría derramarse y gotear desde el lado externo de la unidad.
Apoyo al consumidor Solución de problemas Instrucciones de instalación Instrucciones de operación Instrucciones de seguridad Notas.
Todos los servicios de garantía los proporcionan nuestros Centros de Reparación de Fábrica o nuestros técnicos Customer Care® autorizados. Para concertar una cita de reparación, en línea, 24 horas al día, visítenos al ge.com, o llame al 800.GE.CARES (800.432.2737). Cuando llame para solicitar servicio, por favor tenga a mano el número de serie y el número de modelo. Grape aquí su recibo. Se requiere facilitar prueba de la fecha de compra original para obtener un servicio bajo la garantía.
Apoyo al Consumidor. Página Web de GE Appliances ge.com ¿Tiene alguna pregunta sobre su electrodoméstico? ¡Pruebe la página Web de GE Appliances 24 horas al día, cualquier día del año! Para mayor conveniencia y servicio más rápido, ya puede descargar los Manuales de los Propietarios, pedir piezas o incluso hacer una cita en línea para que vengan a realizar una reparación. Solicite una reparación ge.com El servicio de expertos GE está a tan sólo un paso de su puerta.