Owner’s Manual Side-by-Side 36″, 42″, 48″ Built-In Refrigerators
Consumer Information Built-In Refrigerators Introduction Your new Monogram refrigerator makes an eloquent statement of style, convenience and kitchen planning flexibility. Whether you chose it for its purity of design, practical storage arrangements or assiduous attention to detail—or for all of these reasons—you’ll find that your Monogram refrigerator’s superior blend of form and function will delight you for years to come.
Consumer Information Built-In Refrigerators Before using your refrigerator Read this manual carefully. It is intended to help you operate and maintain your new refrigerator properly. Keep it handy for answers to your questions. If you don’t understand something or need more help, there is a list of toll-free consumer service numbers included in the back section of this manual. OR Visit our Website at: ge.
IMPORTANT SAFETY INSTRUCTIONS READ AND SAVE THESE INSTRUCTIONS w WARNING – When using this appliance, always exercise basic safety precautions, including the following: • Use this appliance only for its intended purpose as described in this Owner’s Manual. • This refrigerator must be properly installed in accordance with the Installation Instructions before it is used. • Do not allow children to climb, stand or hang on the shelves in the refrigerator.
IMPORTANTES INSTRUCTIONS DE SÉCURITÉ LIRE ET CONSERVER CES INSTRUCTIONS w AVERTISSEMENT : Lorsque vous utilisez le réfrigérateur, observez toujours certaines précautions de base, notamment : • N’utilisez le réfrigérateur que pour son usage prévu, comme décrit dans le présent manuel. • Installez le réfrigérateur conformément aux directives d’installation avant de l’utiliser. • Ne laissez pas les enfants grimper, s’asseoir, se tenir debout ni se pendre aux clayettes du réfrigérateur.
IMPORTANT SAFETY INSTRUCTIONS HOW TO CONNECT ELECTRICITY Do not, under any circumstances, cut or remove the third (ground) prong from the power cord. For personal safety, this appliance must be properly grounded. The power cord of this appliance is equipped with a 3-prong (grounding) plug which mates with a standard 3-prong (grounding) wall outlet to minimize the possibility of electric shock hazard from this appliance.
IMPORTANTES INSTRUCTIONS DE SÉCURITÉ RACCORDEMENT ÉLECTRIQUE Ne coupez ni retirez en aucun cas la troisième broche (mise à la terre) de la fiche du cordon d’alimentation. Pour votre sécurité, cet appareil doit être correctement mis à la terre. Le cordon d’alimentation de cet appareil est muni d’une fiche à 3 broches (mise à la terre) qui se branche dans une prise mural ordinaire à 3 alvéoles (mise à la terre) pour réduire au minimum les risques du chocs électriques.
Temperature Controls Built-In Refrigerators Preset Settings: Allow 24 hours to reach these preset temperatures. Temperature controls The temperature display shows the actual temperature of the freezer and fresh food compartments. The actual temperature will vary from the set temperature based on factors such as door opening, amount of food, defrost cycling and room temperature.
Water Filter Cartridge Built-In Refrigerators Water filter cartridge The water filter cartridge is located in the back upper right corner of the refrigerator compartment. To Replace the Filter: The filter cartridge is designed to filter 300 gallons of water (lasting approximately 12 months). It should be replaced when the status light turns red or if you notice the ice cubes getting hollow or small. Installing the Filter Cartridge: 1. Remove the old cartridge by slowly turning it to the left.
Ice & Water Dispenser (on some models) Built-In Refrigerators Dispenser with glass-touch controls How it Works The electronic controls on the dispenser are truly interactive. The control panel is equipped with a proximity sensor that causes the panel to light up as you approach the dispenser (approx. 2 inches). To make a selection, simply touch the graphic for the feature you want, and the halo for that feature will light up.
Ice & Water Dispenser (on some models) Built-In Refrigerators Ice storage bin To remove: Lift up the access door to reach the icemaker. Set the icemaker power switch to the O (off) position. With the access door closed, support the storage bin at the bottom while slightly lifting. Pull bin straight out. To replace: Slide the bin back until the tab on the bin locks into the slot on the shelf. If the bin does not go all the way back, remove it and rotate the drive mechanism 1/4 turn.
Automatic Icemaker Built-In Refrigerators Automatic icemaker A newly-installed refrigerator may take 12–24 hours to begin making ice. Power Switch Icemaker The icemaker will produce seven cubes per cycle—approximately 15 cycles in a 24-hour period, depending on freezer compartment temperature, room temperature, number of door openings and other use conditions. If the refrigerator is operated before the water connection is made to the icemaker, set the power switch to O (off).
Climate Control Drawer Built-In Refrigerators Climate Control drawer How it Works The Climate Control feature is a system of dampers, a fan, a temperature thermistor, a heater and a specially designed tray. The Climate Control drawer can be used to chill items quickly, thaw foods quickly or store items at their optimum temperatures. The drawer is tightly sealed to prevent the drawer’s temperature from causing temperature fluctuations in the rest of the refrigerator.
Climate Control Drawer Built-In Refrigerators Climate Control chart NOTE: Results may vary depending on packaging, starting temperature and other food traits.
Storage Pans Built-In Refrigerators Sealed deli pan Use the Sealed Deli Pan for the convenient storage of lunch meats and cheese, hors d’oeuvres, spreads and snacks. The pan and shelf to which it is attached can be adjusted to any height. Sealed produce pans The top pan has adjustable humidity levels for the higher humidity levels required by most vegetables and lower humidity levels required for most fruits. The second pan is designed to provide constant high humidity levels.
Climate Control Drawer and Storage Pans Built-In Refrigerators Drawer and pan removal To remove a drawer or pan: 1. Pull the pan out to the stop position. 2. Lift the front of the pan up and out of the wire holder. 3. Lift the back of the pan up and out. To replace a pan: 1. Place the back of the pan in the wire holder, making sure the wire holder fits into the grooves on the back of the pan. 2. Lower the front of the pan into the wire holder. 3.
Shelves and Bins Built-In Refrigerators How to rearrange your shelves Tempered glass shelves in the fresh food compartment and wire shelves in the freezer compartment are adjustable, enabling you to make efficient shelf arrangements to fit your family’s food storage needs. To replace shelves: Select desired shelf height. With shelf front raised slightly, engage top lugs in tracks at rear of cabinet. Then lower front of shelf until it locks into position.
Shelves and Bins Built-In Refrigerators Freezer baskets Wire slide-out freezer baskets can be pulled out for easy access to frozen foods. To remove: Pull basket out. Lift the front of the basket up and then take it out. Freezer juice rack This slide-out rack can be used to easily access frozen juices or foods. Sabbath Mode Product Kit The Sabbath Mode Product Kit was designed for use on the Jewish Sabbath and Holidays.
Care and Cleaning Built-In Refrigerators Cleaning outside The dispenser spill shelf and the area beneath it should be cleaned periodically with a mild liquid dish detergent. Dispenser cradle—Before cleaning, lock the dispenser by touching CONTROL LOCK for 3 seconds to prevent activating the dispenser. Clean with warm water and a mild liquid dish detergent. Rinse thoroughly and wipe dry. Unlock the dispenser by touching CONTROL LOCK for 3 seconds.
Care and Cleaning Built-In Refrigerators Light bulb replacement WARNING – Halogen lights generate intense heat. Be certain power is off and lamps have sufficient time to cool before attempting to replace. Type 2 Power to the lamps can be turned off at the Master Light switch located behind the grille panel at the top of the refrigerator. Turning the temperature control to OFF does NOT remove power to the light circuits. AVERTISSEMENT : Les ampoules halogènes produisent une chaleur intense.
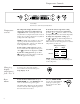
Care and Cleaning Built-In Refrigerators Using the Master Light switch This feature turns off the lights in the fresh food and freezer compartments. The switch is located behind the grille panel at the top of the refrigerator. Lift up the panel to access the switch. The switch is located behind the grille panel. Type 1 bulb replacement NOTE: Before replacing the bulbs, review the light bulb information and WARNING.
Care and Cleaning Built-In Refrigerators Type 2 bulb replacement NOTE: Before replacing the bulbs, review the light bulb information and WARNING. Replacing Type 2 bulbs in lamps located inside the light shield at the top of the fresh food compartment: 1. Set the Master Light switch to the OFF position (see Using the Master Light switch) and allow the lamps to cool. Support tabs Upper light shield 2. If the Water Filter Cartridge is installed, remove it and replace with the filter bypass plug. 3.
Care and Cleaning Built-In Refrigerators Type 2 bulb replacement NOTE: Before replacing the bulbs, review the light bulb information and WARNING. Replacing Type 2 bulbs in lamps located in the top of the Climate Control drawer: Lower lamp assemblies 1. Set the Master Light switch to the OFF position (see Using the Master Light switch) and allow the lamps to cool. 2. To access the lamps, remove the second produce pan. See Drawer and Pan Removal section. 3.
Care and Cleaning Built-In Refrigerators Preparing for vacation For long vacations or absences, remove food and shut off power to the refrigerator at the fuse box or circuit breaker. Clean the interior (see Cleaning Inside). Leave doors open. For shorter vacations, remove perishable foods and leave controls at regular settings. However, if the room temperature is expected to drop below 60°F (16°C), follow the same instructions as for long vacations.
The Problem Solver Built-In Refrigerators Questions? Use this problem solver! PROBLEM REFRIGERATOR DOES NOT OPERATE MOTOR OPERATES FOR LONG PERIODS OR CYCLES ON AND OFF FREQUENTLY (Modern refrigerators with more storage space and a larger freezer require more operating time. They start and stop often to maintain even temperatures.) OPERATING SOUNDS POSSIBLE CAUSE • May be in defrost cycle when compressor does not operate for about 30 minutes. • Temperature control set at OFF.
The Problem Solver Built-In Refrigerators Questions? Use this problem solver! PROBLEM POSSIBLE CAUSE DOOR NOT CLOSING • Package may be holding door open. PROPERLY • Check the door gasket; it may out of position. • Refrigerator is not level. See Installation Instructions. ACTUAL TEMPERATURE NOT EQUAL TO SET TEMPERATURE • Refrigerator just plugged in. Allow 24 hours for system to stabilize. • Door open for too long. Allow 24 hours for system to stabilize. • Warm food added to refrigerator.
The Problem Solver Built-In Refrigerators PROBLEM POSSIBLE CAUSE MOISTURE COLLECTS INSIDE • Too frequent or long door openings. • In humid weather, air carries moisture into refrigerator when doors are opened. • Controlling humidity and temperature in the kitchen with air conditioning will eliminate this condition. REFRIGERATOR HAS ODOR • Foods with strong odors should be tightly covered. • Check for spoiled food. • Interior needs cleaning. See Care and Cleaning.
The Problem Solver Built-In Refrigerators Questions? Use this problem solver! PROBLEM POSSIBLE CAUSE WATER DISPENSER DOES NOT WORK • Water supply line turned off, restricted or not connected. Call your installer for proper water supply line connection. • Water filter clogged. Replace the filter or use the filter bypass plug. • The CONTROL LOCK on the dispenser has been activated. To unlock the dispenser, touch CONTROL LOCK for 3 seconds. • Air may be trapped in system.
Performance Data Sheet SmartWater Filtration System MWF Cartridge This system has been tested according to NSF/ANSI 42/53 for reduction of the substances listed below. The concentration of the indicated substances in water entering the system was reduced to a concentration less than or equal to the permissible limit for water leaving the system, as specified in NSF/ANSI 42/53.* (100% safety factors built in for unmetered usage) Standard No. 42: Aesthetic Effects Influent Effluent Average Average Maximum 1.
State of California Department of Health Services Water Treatment Device Certificate Number 05 - 1698 Date Issued: February 2, 2005 Trademark/Model Designation MWF Replacement Elements MWF Manufacturer: General Electric Company The water treatment device(s) listed on this certificate have met the testing requirements pursuant to Section 116830 of the Health and Safety Code for the following health related contaminants: Microbiological Contaminants and Turbidity Cysts Turbidity Organic Contaminants Alach
Consumer Services Built-In Refrigerators With the purchase of your new Monogram appliance, receive the assurance that if you ever need information or assistance from GE, we will be there. All you have to do is call—toll- free! GE Answer Center ® In the USA: 800.626.2000 In-Home Repair Service In the USA: 800.444.1845 Whatever your question about any Monogram major appliance, GE Answer Center® information service is available to help. Your call—and your question—will be answered promptly and courteously.
Warranty Built-In Refrigerators YOUR MONOGRAM REFRIGERATOR WARRANTY Staple sales slip or cancelled check here. Proof of original purchase date is needed to obtain service under warranty. WHAT IS COVERED From the Date of the Original Purchase LIMITED TWO-YEAR WARRANTY For two years from date of original purchase, we will provide, free of charge, parts and service labor in your home to repair or replace any part of the refrigerator that fails because of a manufacturing defect.