Monogam. b--2z Use md Cme Guide for ZEK~36GP ZEK73W Built-In Convection Wall men 1992 Monogam.TM 27” Se~Chaning Convection &en m100 Rev.
Introduction Your new Monogram built-in convection oven makes an eloquent statement of style, convenience and kitchen planning flexibility. Whether you chose it for its purity of design, time-saving convection cooking capability, assiduous attention to detail—or for all of these reasons—you’ll find that your Monogram built-in oven’s superior blend of form and function will delight you for years to come.
Before using your oven, read this book carefully. It is intended to help you operate and maintain your new oven properly. Keep it handy for answers to your questions. If you don’t understand something or need more help, write (include your phone number): Consumer Affairs GE Appliances Appliance Park Louisville, KY 40225 Write down the model and serial numbers. You’ll find them on a label on the front of the oven behind the oven door.
WORTANT SAFETY ~STRUCTIONS Read W instructions before using this appliance. IMPORTANT SAFETY NOTICE The California Safe Drinking Water and Toxic Enforcement Act requires the Governor of California to publish a list of substances known to the state to cause birth defects or other reproductive harm, and requires businesses to warn customers of potential exposure to such substances. The fiberglass insulation in self-clean ovens gives off a very small amount of carbon monoxide during the cleaning cycle.
Oven c Stand away from oven when opening the door. ● ● ● ● ● ● ● ● ● Hot air or steam which escapes can cause burns to hands, face andor eyes. Don’t heat unopened food containers in the oven. Pressure could build up and the container could burs~ causing an injury. Keep oven vent ducts unobstructed. ~ Keep oven free from grease buildup. Place oven shelf in desired position while oven is cool. If shelves must be handled when hot, do not let pot holder contact heating units in the oven.
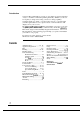
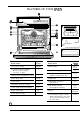
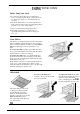
FEATURES OF YOUR O~N — \ Feature Index 1 Oven Door Gasket Explained on page Feature Index 5,30,35 10 Probe Outlet 2 Convection Fan and Heating Element (operates during convection cooking) 12 3 Model and Serial Number Location 3 4 Oven Broil Unit 5 Oven Vent 6 Automatic Oven Door Latch 11 Oven Shelf Supports 27,36 5 12 11, 12 13 Bake Unit 10,36 14 Removable Oven Door with Window 35 31,32 7 Oven Control, Clock and Timer 15 Broiler Pan and Grid, Roasting Rack and Stand 8 Oven Vent Grille
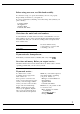
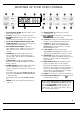
FEATURES OF YOUR OVEN CONTROL 1. CONVECTION BAKE. Press this pad to select baking with convection. 2. BAKE. Press this pad to select bake function. 3. TfME DISPLAY. Shows the time of day, the times set for the timer or automatic oven operation. 4. OVEN OR PROBE TEMPERATURE AND BROIL DISPLAY. Shows the oven temperature, probe temperature or broil setting. 5. FUNCTION INDICATORS. Lights up to show whether oven is in bake, broil, convection bake, self-clean mode, set mode, or probe is selected. 6. INCREASE.
OVEN CONTROL, CLOCK AND TMER Clock The clock must be set for the automatic oven timing functions to work properly. The time of day cannot be changed during a Timed Bake or CLEAN cycle. Timer The timer is a minute timer; it does not control oven operations. The maximum setting on the timer is 9 hours and 55 minutes. To Set the Clock CLOCK 1. Press the CLOCK pad. m A ❑ 2. Press the INCREASE or DECREASE pad to set the time of day. 3. Press the CLOCK pad to start. To Set the Timer TIMER 1.
Display Messages Programmed information can be displayed at any time by pressing the pad of the operation you want to see. For example, you can display the current time of day while the timer is counting down by pressing the CLOCK pad. Press the TIMER ON/OFF pad to return to the timer display. To check the start time for delayed Bake or Self-Clean, press and hold BAKE or CLEAN pad for 3 seconds. The display will show the bake or clean start time for as long as you press the pad.
US~G YOUR OVEN Before Using Your Oven 1. Look at the controls. Be sure you understand how to set them properly. Read over the directions for the Oven Controls so you understand how to use them. 2. Check the inside of the oven. Look at the shelves. Take a practice run at removing and replacing them properly, to give sure, sturdy support. 3. Read over information and tips that follow. 4. Keep this book handy so you can refer to it, especially during the first weeks of using your new oven.
Shelf Positions The oven has four shelf supports identified in this illustration as A (bottom), B, C and D (top). See the Multi-Shelf baking section for shelf placement suggestions. Oven Light The light comes on automatically when the door is opened. Use the pad on the control panel to turn the light on and off when the door is closed. OVEN LIGHT m Adjusting Oven Thermostat When cooking food for the first time in your new oven, use time given on recipes as a guide.
COWECTION COO~NG What is Convection? In a convection oven, a fan circulates hot air over, under and around the food. This circulating hot air is evenly distributed throughout the oven cavity. As a result, foods are evenly cooke and browned— often in less time with convection heat. Because food is heated faster in a convection oven when using the convection modes, many types of food can be cooked at lower temperatures than those suggested for regular ovens.
CO~CTION BA~G Adapting Recipes For Convection Baking Use the temperature called for in your recipe. You may find that you need to reduce it by 25°F., depending on the type of food you are cooking. Preheating is not necessary with foods having a bake time of over 15 minutes. Check foods for doneness at the minimum suggested cooking time. Use pan size recommended in the recipe. For more information on adapting recipes, see the Convection Cookbook.
TMED CONVECTION BAmNG How to Convection Time Bake Your oven can be set to turn on and off automatically. NOTE: Before beginning, make sure the oven clock shows the correct time of day. To set the clock, first press the CLOCK pad. Press the INCREASE or CLOCK DECREASE pad until correct time of m day is displayed. Press the CLOCK pad to start.
How to Set Delay Start and Automatic Stop Convection Bake Quick Reminder 1. Press the CONVECTION BAKE pad. 2. Press the INCREASE or DECREASE pad to select oven temperature. 3. Press the COOK TIME pad. 4. Press the INCREASE or DECREASE pad to set the length of cooking time. 5. Press the STOP TIME pad. 6. Press the INCREASE or DECREASE pad until desired stop time appears in display. Delay Start and Automatic Stop is setting the oven control to turn the oven on and bake until a specific time.
CO~CTION ROASTmG Meats cooked in a convection oven are dark brown on the outside and tender and juicy on the inside. In most cases, cooking time will be less when using the Convection Roast feature. Sometimes cooking time is reduced by 10 minutes per hour. To make sure the meat is cooked the way you want it, we recommend using the temperature probe provided with the oven. The special roasting rack and pan allow heated air to circulate over and under the meat. This allows the meat to brown on all sides.
How to Set Your Oven for Convection Roasting When Using the Temperature Probe The display will flash “Probe” and beep if the probe is inserted into the outlet but the oven is not programmed for the probe. 1. Place the offset shelf in the lowest position (A). Insert the probe into meat. 2. Plug the probe into the outlet on the oven wall. M&e sure it is pushed all the way in. Close the oven door. 3. Press the PROBE pad. m A PROBE ❑ 4.
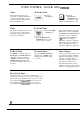
ROAST~G GU~E ~pe Oven Temperature Doneness Approximate Roasting Time in Minutes per Pound Internal Temperature ‘F. 6 to 8 Ibs. 3 to 5 lbs.
TMED BA~NG How to Time Bake Your oven can be set to turn on and off automatically. NOTE: Before beginning, make sure the oven clock shows the correct time of day. To set the clock, first press the CLOCK pad. Press the INCREASE CLOCK or DECREASE pad until correct time of day is displayed. Press the CLOCK pad to start. m How to Set Immediate Start and Automatic Stop The oven will turn on immediately and cook for a selected length of time. At the end of Cook Time the oven will turn off automatically.
T-D BAmG (continued) How to Set Delay Start and Automatic Stop Quick Reminder 1. Press the BAKE pad. 2. Press the INCREASE or DECREASE pad to select oven temperature. 3. Press the COOK TIME pad. 4. Press the INCREASE or DECREASE pad to set the length of cooking time. 5. Press the STOP TIME pad. 6. Press the INCREASE or DECREASE pad until desired stop time appears in display. Delay Start and Automatic Stop is setting the oven control to turn the oven on and bake until a specific time.
BAmG For best baking results, follow these suggestions: Oven Shelves Arrange the oven shelf or shelves in the desired locations while the oven is cool. The correct shelf position depends on the kind of food and the Y w browning desired. As a general rule, place most foods in the middle of the oven, on either the second or third shelf from the bottom. See the chart for suggested shelf positions.
BA~G (continued) Baking Guides When using prepared baking mixes, follow package recipe or instructions for the best baking results. Cookies When baking cookies, flat cookie sheets (without sides) produce better-looking cookies. Cookies baked in a jelly roll pan (short sides all around) may have darker edges and pale or light browning may occur. Do not use a cookie sheet so large that it touches the walls or the door of the oven.
ROASTmG Roasting is cooking by dry heat. Tender meat or poultry can be roasted uncovered in your oven. Roasting temperatures, which should be low and steady, keep spattering to a minimum. 1. Place the shelf in A or B position. No preheating is necessary. 2. Check the weight of the meat. Place it, fat side up, (or for poultry breast-side-up) on a trivet in a shallow pan. The melting fat will baste the meat. Select a pan as close to the size of the meat as possible.
ROAST~G WITH T~ PROBE See the Roasting Guide. Correct Placement of the Temperature Probe For many foods, especially roasts and poultry, internal food temperature is the best test for doneness. The temperature probe takes the guesswork out of roasting by cooking foods to the exact doneness you want. When the internal temperature of the food reaches the temperature you set, the oven automatically shuts off.
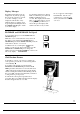
How to Set the Oven When Using the Temperature Probe The display will flash “PROBE” and beep if the probe is inserted into the outlet, but the oven is not programmed for the probe. 1. Insert probe into the meat. 2. Plug the probe into ,:,<~g:-.. . IN the outlet on the (+ &Lfi,:~’’”oven wall. M&e sure it’s pushed all ~ the way in. Close E“-= the oven door. K~ 3. Press the PROBE pad. ❑ 7.
ROAST~G WITH THE PROBE (continued) Questions and Answers Q. Is it necessary to check for doneness with a meat thermometer? A. Checking the finished internal temperature at the completion of cooking time is recommended if you did not use the probe while cooking. Temperatures are shown in the Roasting Guide. For roasts over 8 lbs., check with thermometer at half-hour intervals after half the cooking time has passed. Q. Why is my roast crumbling when I try to carve it? A.
BROmmG Broiling is cooking food by intense radiant heat from the upper broil unit in the oven. Most fish and tender cuts of meat can be broiled. Follow these steps to keep spattering and smoking to a minimum. 1. If meat has fat or gristle near edge, cut vertical slashes through both about 2 inches apart. If desired, fat may be trimmed, leaving layer about 1/8 inch thick. 2. Place meat on broiler grid in broiler pan.
BRO~ING (continued) Use of Aluminum Foil You can use aluminum foil to line your broiler pan and broiler grid. However, you must mold the foil tightly to the grid and cut slits in it just like the grid. Without the slits, the foil will prevent fat and meat juices from draining to the broiler pan. The juices could become hot enough to catch on fire. If you do not cut the slits, you are frying, not broiling. Questions and Answers Q. When broiling, is it necessary to always use a grid in the pan? A. Yes.
BRO~~G GU~E 1. Always use the broiler pan and grid that comes with your oven. It is designed to minimize smoking and spattering by trapping juices in the shielded lower part of the pan. 2. The oven door should be open to the broil stop position. 3. For steaks and chops, slash fat evenly around the outside edges of the meat. To slash, cut crosswise through the outer fat surface just to the edge of the meat. Use tongs to turn meat over to prevent piercing the meat and losing juices. 4.
OPEMT~G T~ SELF-CLEANmG OWN (Normal Cleaning Time: 3 hours) Before a Clean Cycle Quick Reminder: 1. Prepare the oven for cleaning. 2. Close the oven door. 3. Press the CLEAN pad. 4. Press the INCREASE or DECREASE pad to set clean time. 1. Remove the broiler pan, broiler grid, all cookware and any aluminum foil from the oven— they cannot withstand the high cleaning temperatures. (Oven shelves may be left in oven. NOTE: Shelves will discolor after the self-clean cycle.) 2.
How to Set Oven for Cleaning Quick Reminder: 1. Prepare the oven for cleaning. 2. Close the oven door completely. 3. Press the CLEAN pad. 4. Press the INCREASE or DECREASE pad until desired Clean Time appears. If the oven is too hot and you start to set a clean cycle, the word “OFF” will appear in the display. Allow additional time for cooling before you try to set the cycle. 1. Follow directions to prepare the oven for cleaning. 12. Press the CLEAN pad.
OPEMT~G T~ SELF-CLEANmG OWN (continued) After Self-Cleaning You may notice some white ash in the oven. Just wipe it up with a damp cloth after the oven cools. If white spots remain, remove them with a soap-filled steel wool pad. Be sure to rinse thoroughly with a vinegar and water mixture. These deposits are usually a sdt residue that cannot be removed by the clean cycle. If the oven is not clean after one clean cycle, repeat the cycle.
Questions and Answers Q. If my oven clock is not set to the correct time of day, can I still self-clean my oven? A. If the clock is not set to the correct time of day you will not be able to set a delay clean to end at a specific time. Q. Can I use commercial oven cleaners on any part of my self-cleaning oven? A. No cleaners or coatings should be used around any part of this oven.
CAm Am CLEAN~G Proper care and cleaning are important so your oven will give you efficient and satisfactory service. Follow these directions carefully in caring for your oven to assure safe and proper maintenance. Broiler Pan and Grid After broiling, remove the broiler pan from the oven. Remove the grid from the pan. Carefully pour out the grease in the pan into a proper container. Wash, scour if necessary with a soap-filled or plastic scouring pad, in hot, soapy water.
Oven Door The oven door is removable but it is heavy. You may need help removing and replacing the door. To remove the door, open it a few inches to the special stop position that will hold the door open. Grasp firmly on each side and lift the door straight up and off the hinges. NOTE: Be careful not to place hands between the hinge and the oven door frame as the hinge could snap back and pinch fingers. To replace the door, make sure the hinges are in the special stop position.
CAm Am CLEAN~G (continued) Probe The temperature probe may be cleaned with soap and water or a soap-filled scouring pad. Cool the temperature probe before cleaning. Scour stubborn spots with a soap-filled scouring pad, rinse and dry. Do not immerse the temperature probe in water. Do not store the temperature probe in the oven. CLEAN~G GU~E NOTE: Let oven parts cool before touching or handling. PART Bake Unit and Broil Unit MATERIALS TO USE GENERAL DIRECTIONS Do not clean the bake unit or broil unit.
QUESTIONS? USE THIS PROBLEM SOLVER PROBLEM OVEN WILL NOT WORK OVEN LIGHT DOES NOT WORK OVEN DOES NOT COOK PROPERLY OVEN WILL NOT SELF-CLEAN OVEN DOOR WILL NOT OPEN OVEN NOT CLEAN AFTER CLEAN CYCLE “door” APPEARS ON DISPLAY “F-” AND A NUMBER FLASH ON DISPLAY “OFF” APPEARS ON DISPLAY I POSSIBLE CAUSE The circuit breaker in your house has been tripped, or a fuse has been blown. ● Oven controls not properly set. ● Light bulb is loose or defective. Tighten or replace. ● Button operating oven light is broken.
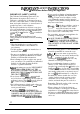
With the purchase ofyour new Mono~am appliance, receive the assurance that ifyou ever need information or assistance from GE, we’ll be there. All you have to do is call—toll-free! lmHome Repak Service 80~GECARES(80~4322737) AGE consumer service professional will provide expert repair service, scheduled at a time that’s convenient for you. Many GE Consumer Service companyoperated locations offer you service today or tomorrow, or at your convenience (7:00 a.m. to 7:00 p.m. weekdays, 9:00 a.m. to 2:00 p.m.
1 YOUR MONOGRAM ELECTRIC OVEN I WARRANTY Save proof of original purchase date such as your sales slip or cancelled check to establish warranty period. WHAT IS COVERED FULL ONE-YEAR WARRANTY For one year from date of original purchase, we will provide, free of charge, parts and service labor in your home to repair or replace any pati of the oven that fails because of a manufacturing defect.
Puh. No. 4Y-8:405 Part N,,. 164 D2588P1 MNUIOO Rev. 1 5-Y2 General E/ectr;c Company Lou;sv;//e, KY@225 cc.