Use andCare & Installation Guide Gas Downdraft Cooktop Safety Instructions................... 3 –5 Before You Call For Service ......................... 26 More questions?…call Operating Instructions, Tips Controls............................................................ 8 Cooktop Comparison.................................... 7 Cookware ........................................................ 9 Electric Ignition............................................... 8 Features ..............................
HELP US HELP YOU… Read this guide carefully. It is intended to help you operate and maintain your new cooktop properly. Keep it handy for answers to your questions. If you don’t understand something or need more help, call: GE Answer Center® 800.626.2000 24 hours a day, 7 days a week Write down the model and serial numbers. You’ll find the model and serial numbers on a label located on the underside of the cooktop.
IMPORTANT SAFETY INSTRUCTIONS Read all instructions before using this appliance. When You Get Your Cooktop When you get your cooktop, have the installer show you the location of the gas cut-off valve and how to shut it off if necessary. • Have your cooktop installed and properly grounded by a qualified installer, in accordance with the Installation Instructions. Any adjustment and service should be performed only by qualified gas range installers or service technicians.
IMPORTANT SAFETY INSTRUCTIONS (continued) Using Your Cooktop • Do not leave children alone or unattended where a cooktop is hot or in operation. They could be seriously burned. • CAUTION: Items of interest to children should not be stored in cabinets above a cooktop— children climbing on the cooktop to reach items could be seriously injured. • When raising or lowering the vent, keep fingers away from all vent parts; assure that cookware, pans and handles will not be struck and tipped when raising the vent.
• If the cooktop is located near a window, do not use long curtains which could blow over the burners and create a fire hazard. • If you smell gas, turn off the gas to the cooktop and call a qualified service technician. Never use an open flame to locate a leak. • Do not cover or block the area around the cooktop knobs. This area must be kept clear for proper ventilation and burner performance.
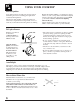
FEATURES OF YOUR COOKTOP 1 2 4 4 3 5 9 8 7 Feature Index 6 6 8 5 Explained on page 1 Vent 10 2 Vent Filters 11 3 Cast-Iron Burner Grates 12 4 Spillproof Burners 12 5 High Power Spillproof Burners 8 6 Fan Speed Control 10 7 Vent Control 10 8 Surface Unit Controls 8 9 Glass Cooktop Surface 11
HOW DOES THIS COOKTOP COMPARE TO YOUR OLD ONE? The best types of cookware to use, plus heat-up and cool-down times, depend upon the type of burner or surface unit you have. The following chart will help you to understand the differences between gas burner cooktops and any other type of cooktop you may have used in the past. Type of Cooktop Description How It Works Gas Burners Regular or sealed gas burners use either LP gas or natural gas. Flames heat the pans directly.
USING YOUR COOKTOP Electric Ignition Your surface burners are lighted by electric ignition, eliminating the need for standing pilot lights with constantly burning flames. The igniters make clicking sounds and spark even when only a single burner is being turned on. Do not touch any of the burners when the igniters are clicking. In case of a power outage, you can light the surface burners on your cooktop with a match. Hold a lighted match to the burner, then turn the knob to the HIGH position.
Cookware Aluminum: Medium-weight cookware is recommended because it heats quickly and evenly. Most foods brown evenly in an aluminum skillet. Use saucepans with tight-fitting lids for cooking with minimum amounts of water. Cast Iron: If heated slowly, most skillets will give satisfactory results. Enamelware: Under some conditions, the enamel of some cookware may melt. Follow cookware manufacturer’s recommendations for cooking methods.
COOKTOP VENT SYSTEM The built-in vent system helps remove cooking vapors, odors and smoke from foods prepared on the cooktop. Continuous use of the vent system helps keep the kitchen comfortable and less humid, reducing cooking odors and soiling moisture that normally creates a frequent need for cleaning. Raising or Lowering the Vent To raise the vent, turn the VENT knob to the RAISE/LOWER position. The vent will rise to the fully extended position. There is no intermediate position.
CARE AND CLEANING Before cleaning any part of your cooktop, be sure all burners are off and DISCONNECT ELECTRICAL POWER TO THE COOKTOP at the fuse box or circuit breaker panel, or pull the cooktop power plug, located beneath the cooktop and inside the cabinets. Glass Cooktop To keep the cooktop looking its best, wipe up any spills as they occur. This will keep them from burning on and becoming more difficult to remove.
CARE AND CLEANING (continued) Burner Assembly The burner assemblies should be wiped clean often. Turn all controls OFF before removing burner parts. The electrode of the spark igniter is exposed when the top of the burner is removed. Be careful not to push in any surface unit controls while the top of a burner is removed. A slight electrical shock might result which could cause you to knock over hot cookware. CAUTION: DO NOT OPERATE THE BURNER WITHOUT ALL BURNER PARTS IN PLACE.
INSTALLATION INSTRUCTIONS BEFORE YOU BEGIN PARTS LIST Read these instructions completely and carefully. Save these instructions for local inspector’s use. IMPORTANT–OBSERVE ALL GOVERNING CODES AND ORDINANCES. NOTE TO INSTALLER: Be sure to leave these instructions with the consumer.
INSTALLATION INSTRUCTIONS (continued) IMPORTANT SAFETY INSTRUCTIONS The cooktop has been design certified by the American Gas Association. As with any appliance using gas and generating heat, there are certain safety precautions you should follow. You’ll find these precautions in this Use and Care Guide; read it carefully. • Be sure your cooktop is installed properly by a qualified installer or service technician.
CUT THE OPENING PREPARING THE COUNTERTOP 2″ Back of countertop 5/16″ 36″ 2″ 221⁄4″ 2″ 83⁄4″ 33 ⁄16″ 15 21″ 15″ 19″ 21″ 349⁄16″ Front of countertop Countertop cut-out dimensions Cut out the opening as shown in the diagram. Measure carefully when cutting the countertop. Making sure the sides of the opening are parallel and the front and rear cuts are exactly perpendicular to the sides.
INSTALLATION INSTRUCTIONS (continued) PLAN THE DUCTWORK DUCTWORK ARRANGEMENT 2″ 21⁄4″ 15″ 31⁄4″ 31⁄4″ Right discharge Transition (supplied with blower/motor) 71⁄2″ Left discharge (as shipped) 10″ 31⁄4″ Adjustable 5″ to 8″ 131⁄4″ Prepare ductwork to vent to outdoors: • Use the shortest and straightest duct run possible. • Duct run should not exceed equivalent length of 150 feet. Refer to “Duct Fittings” chart to calculate equivalent length for various duct configurations.
To accurately locate the ductwork holes in the cabinet floor: • Place the downdraft vent against the back of the cutout. • Place the transition duct supplied on top of the blower/motor assembly. • Position the transition duct and assembly below the discharge outlet. • Position a transition duct (not supplied) to the end of the blower in the direction of desired discharge. • Mark the location and remove the assembly. • Cut the holes and install ductwork connection.
INSTALLATION INSTRUCTIONS (continued) DUCT FITTINGS Use the chart at the right to compute maximum permissible lengths for duct runs to outdoors. NOTE: Do not exceed maximum permissible equivalent lengths! Flexible ducting: If flexible metal ducting is used, all the equivalent feet values in the table should be doubled. The flexible metal duct should be straight and smooth and extended as much as possible. Do NOT use flexible plastic ducting.
POWER SUPPLY LOCATIONS Electrical Supply: Gas Supply: These cooktops are designed to operate on natural gas at 4″ of water column pressure or on LP gas at 10″ of water column pressure. • These cooktops are shipped from the factory set for natural gas. If you decide to use this cooktop with LP gas, conversion adjustments must be made by a service technician or other qualified person.
INSTALLATION INSTRUCTIONS (continued) STEP 1 STEP 3 Install Downdraft Vent Install the Motor/Blower Assembly Place the downdraft vent into the countertop cutout, against the back side. • Secure the transition duct to the top of the assembly with 2 screws on each side. • Position the assembly with duct below the vent discharge. • Adjust the height by sliding the brackets up or down until the assembly is tight against the vent discharge. • Tighten all nuts and bolts on the brackets.
STEP 5 STEP 6 Install the Pressure Regulator Install the Cooktop Regulator NOTE: If the cooktop is installed into a 36″ base cabinet, the pressure regulator MUST BE installed to the bottom of the cooktop before the cooktop is placed into the cabinet. • Remove packaging from the cooktop. Solid piping or flexible connector Shut-off valve Pipe stub • Install the supplied pressure regulator and nipple in the gas line as close to the cooktop inlet as possible.
INSTALLATION INSTRUCTIONS (continued) STEP 6 STEP 7 Install the Cooktop (continued) Electrical Connections 1/16″ 3/8″ • Cut a 3/16″ gasket strip in half. Peel off the backing and apply to the underside of the glass cooktop edge, on each side at least 3/8″ from the back and as close to the edge as possible without protruding. • Apply the other gasket strip to the underside of the glass at the front of the cooktop. • Remove remaining adhesive backing.
STEP 9 STEP 10 Assemble Burners, Check Ignition Install Filters, Check Operation of Downdraft Assemble burner as shown. To raise the vent, turn the VENT knob to RAISE/LOWER. • Hold the knob until the vent begins to raise. The vent will automatically stop when it is fully extended. Top grate Burner cap • Tip filter into the opening and pull straight down so that the filter rests on slides. Check for proper ignition: • Push in one control knob and turn 90° to HIGH position.
CONVERTING TO LP GAS or Converting Back to Natural Gas from LP WARNING: If you are using LP (bottled) gas, all adjustments described in the following steps must be made before attempting burner adjustments or use of the cooktop. This cooktop leaves the factory set for use with natural gas. If you convert to LP gas, keep these instructions and orifices in case you want to convert back to natural gas. The conversion should be done by a qualified technician or installer.
CONVERTING TO LP GAS or Converting Back to Natural Gas from LP 4 CONVERT THE PRESSURE REGULATOR WARNING: Do not remove the pressure regulator from the cooktop. 1. Locate the pressure regulator under the rear of the cooktop. 2. Use an adjustable wrench to remove the nut from the pressure regulator. 6 CHECK QUALITY OF FLAMES The combustion quality of burner flames needs to be determined visually.
QUESTIONS? BEFORE YOU CALL FOR SERVICE… PROBLEM BURNERS DO NOT LIGHT POSSIBLE CAUSE • Make sure electrical plug is plugged into a live power outlet. • Slot in burner base may be clogged. Remove the obstruction. • Burner parts not replaced correctly. • Hole in burner cap behind igniter may be clogged.
We’ll Be There With the purchase of your new GE appliance, receive the assurance that if you ever need information or assistance from GE, we’ll be there. All you have to do is call—toll-free! Before You Call for Service GE Answer Center® 800.626.2000 Whatever your question about any GE major appliance, GE Answer Center® information service is available to help. Your call—and your question— will be answered promptly and courteously. And you can call any time.
YOUR GE COOKTOP WARRANTY Staple sales slip or cancelled check here. Proof of original purchase date is needed to obtain service under warranty. WHAT IS COVERED FULL ONE-YEAR WARRANTY For one year from date of original purchase, we will provide, free of charge, parts and service labor in your home to repair or replace any part of the cooktop that fails because of a manufacturing defect.