Owner’s Manual Built-In 36″ Single Door Refrigerators and 36″ Single Door Freezers
Consumer Information Refrigerator/Freezer Introduction Your new Monogram refrigerator/freezer makes an eloquent statement of style, convenience and kitchen planning flexibility. Whether you chose it for its purity of design, practical storage arrangements or assiduous attention to detail—or for all of these reasons—you’ll find that your Monogram refrigerator/freezer’s superior blend of form and function will delight you for years to come.
Write down the model & serial numbers You’ll see them on a label inside the refrigerator/freezer under the storage drawers. These numbers are also on the Consumer Product Ownership Registration Card included with this manual. Before sending in this card, please write these numbers here: Model Number Serial Number Use these numbers in any correspondence or service calls concerning your refrigerator/freezer.
IMPORTANT SAFETY INSTRUCTIONS READ AND SAVE THESE INSTRUCTIONS WARNING–When using this appliance, always exercise basic safety precautions, including the following: • Use this appliance only for its intended purpose as described in this Owner’s Manual. • This refrigerator/freezer must be properly installed in accordance with the Installation Instructions before it is used. • Do not allow children to climb, stand or hang on the shelves in the refrigerator/freezer.
LIRE ET CONSERVER CES INSTRUCTIONS AVERTISSEMENT : Lorsque vous utilisez le réfrigérateur/congélateur, observez toujours certaines précautions de base, notamment : • N’utilisez l’appareil que pour son usage prévu, comme décrit dans le présent manuel de l’utilisateur. • Installez le réfrigérateur/congélateur conformément aux directives d’installation avant de l’utiliser. • Ne laissez pas les enfants grimper, s’asseoir, se tenir debout ni se pendre aux clayettes du réfrigérateur/congélateur.
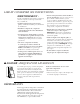
IMPORTANT SAFETY INSTRUCTIONS HOW TO CONNECT ELECTRICITY Do not, under any circumstances, cut or remove the third (ground) prong from the power cord. For personal safety, this appliance must be properly grounded. This provides the best performance and also prevents overloading house wiring circuits which could cause a fire hazard from overheated wires.
RACCORDEMENT ÉLECTRIQUE Ne coupez ni retirez en aucun cas la troisième broche (mise à la terre) de la fiche du cordon d’alimentation. Pour votre sécurité, cet appareil doit être correctement mis à la terre. Le cordon d’alimentation de cet appareil est muni d’une fiche à 3 broches (mise à la terre) qui se branche dans une prise mural ordinaire à 3 alvéoles (mise à la terre) pour réduire au minimum les risques du chocs électriques.
Operating Instructions Refrigerator/Freezer Set the temperature control WHEN YOU FIRST TURN THE REFRIGERATOR/FREEZER ON, SET THE CONTROL AT 5. 9 is the coldest setting, 1 is the warmest. For colder or warmer temperatures, adjust the control one number at a time. IMPORTANT: When first setting the control, or adjusting it, allow 24 hours for the refrigerator/freezer to get cold.
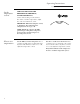
Automatic Icemaker (freezer models) Refrigerator/Freezer Automatic icemaker A newly-installed freezer may take 12–24 hours to begin making ice. (freezer models) The icemaker will produce seven cubes per cycle—approximately 100–130 cubes in a 24-hour period, depending on the freezer temperature, room temperature, number of door openings and other use conditions. If your freezer is operated before the water connection is made to the icemaker, set the power switch to O (off).
Storage Drawers Refrigerator/Freezer Refrigerator— Storage drawers The upper drawers have individual, adjustable humidity controls that let you control the amount of cold air entering the drawers. Slide the control all the way to the High setting and the drawer provides higher humidity levels recommended for most leafy vegetables. Slide the control all the way to the Low setting and the drawer provides lower humidity levels recommended for most fruits.
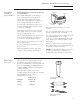
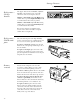
Shelves Refrigerator/Freezer Adjustable shelves Tempered glass shelves in the refrigerator and wire shelves in the freezer enable you to make efficient shelf arrangements to fit your family’s food storage needs. To remove shelves: Tilt shelf up at front, then lift it up and out of tracks on rear wall of refrigerator/freezer. To replace shelves: Select desired shelf height. With shelf front raised slightly, engage top lugs in tracks at rear of cabinet.
Shelves Refrigerator/Freezer Door shelves Some door shelves are adjustable and can be moved up and down to meet your storage needs. The deeper door shelves must be placed at the bottom of the door. To remove: Lift the shelf up and slide it towards you.
Care and Cleaning Refrigerator/Freezer Cleaning outside Door handles and trim—Clean with a cloth dampened with soapy water. Dry with a soft cloth. Keep the outside clean. Wipe with a clean cloth lightly dampened with mild liquid dish detergent. Dry with a clean, soft cloth. Do not wipe the refrigerator with a soiled dish cloth or wet towel. These may leave a residue that can damage the finish.
Care and Cleaning Refrigerator/Freezer Preparing for vacation Upper light bulb replacement For long vacations or absences, remove food and unplug the refrigerator/freezer. Move the control to OFF, and clean the interior with a baking soda solution of one tablespoon (15 ml) of baking soda to one quart (1 liter) of water. Leave the doors open. Turning the control to OFF does not remove power to the light circuit. There are light bulbs at the top of the refrigerator/freezer.
Preparation Refrigerator/Freezer Refrigerator/ freezer location Do not install the refrigerator/freezer where temperatures will be below 60°F (16°C) because it will not run often enough to maintain proper temperatures, and the refrigerator will develop high internal humidity. For proper installation, the refrigerator/ freezer must be placed on a level surface of hard material the same height as the rest of the flooring.
The Problem Solver Refrigerator/Freezer Questions? Use this problem solver! PROBLEM POSSIBLE CAUSE REFRIGERATOR/ FREEZER DOES NOT OPERATE • May be in defrost cycle when motor does not operate for about 30 minutes. • Temperature control in the OFF position. • If interior light is not on, refrigerator/freezer may not be plugged in at wall outlet. • The fuse is blown/circuit breaker is tripped. Replace fuse or reset the breaker.
Questions? Use this problem solver! PROBLEM POSSIBLE CAUSE FROST OR ICE CRYSTALS ON FROZEN FOOD (Frost within package is normal.) • Door left open or package holding door open. SLOW ICE CUBE FREEZING • Door may have been left open. ICE CUBES HAVE ODOR/TASTE • Old cubes need to be discarded. • Too frequent or too long door openings. • Turn temperature control to a colder setting. • Ice storage bin needs to be emptied and washed.
Notes Refrigerator/Freezer 18
Consumer Services Refrigerator/Freezer With the purchase of your new Monogram appliance, receive the assurance that if you ever need information or assistance from GE, we’ll be there. All you have to do is call—toll- free! GE Answer Center® In the USA: 800.626.2000 Whatever your question about any Monogram major appliance, GE Answer Center® information service is available to help. Your call—and your question—will be answered promptly and courteously. And you can call any time.
Warranty Refrigerator/Freezer YOUR MONOGRAM REFRIGERATOR WARRANTY Staple sales slip or cancelled check here. Proof of original purchase date is needed to obtain service under warranty. WHAT IS COVERED From the Date of the Original Purchase LIMITED TWO-YEAR WARRANTY For two years from date of original purchase, we will provide, free of charge, parts and service labor in your home to repair or replace any part of the refrigerator that fails because of a manufacturing defect.