
DL 455a362e561c07b96069ab446b42


49-80152-7
11
Installation Instructions
67(3$,167$//+22'2172:$//
• Secure the wood support to 2 or more vertical studs, using at
least 2 of the 4 supplied long screws.
IMPORTANT: Screws must penetrate at least 1-1/2" into vertical
studs. Countersink screws into support.
• Adjust depth of original mounting screws in the wood support
until they protrude 1/4" forward. This 1/4" gap will provide
clearance to hang the hood.
IMPORTANT: Framing must be capable of
VXSSRUWLQJXSWROEV
Test Duct Cover Fit
• Place duct cover(s) over the top of the hood to check for gaps.
Adjust the hood up or down if necessary.
Install Bottom Mounting Screws
• Drill 1/8" pilot holes into the two lower mounting holes. Enlarge
the holes if they did not enter studs to 3/8". Insert anchors
for wall fasteners into bottom holes. Remove anchor screws
DQGDGGÀDWZDVKHUVSURYLGHG'ULYHVFUHZVLQWRDQFKRUVDQG
tighten.
• Install 4 additional screws through the back of the hood and
into the wood support.
Duct
Transition
Top of
Hood
SKIP THIS STEP IF INSTALLING BENEATH A SOFFIT OR CABINET,
*27267(3%
• Locate at least 2 vertical studs at the wood support.
• Center the supplied wood support, left to right and below the
20" marked line.
• Place the duct transition piece over the hood exhaust and secure
with 4 screws provided.
• Use duct tape to seal the connection. Check to be sure the
damper moves freely.
Hang Hood On Wood Support
• Lift the hood and hold close to the installation location. Route
house wiring through the knockout and into the junction box.
• Place the hood over the wood support. Be sure the mounting
screws engage the keyhole slots in the back of the hood. Tighten
the screws.
WARNING: Continue to provide additional support
while the hood is mounted with only these 2 screws. These screws
will not support the weight of the hood. The hood could fall
resulting in damage or personal injury.
AVERTISSEMENT– Continuez à fournir un soutien
additionnel pendant le montage de la hotte avec ces deux vis seulement.
Ces deux vis ne soutiendront pas le poids de la hotte. La hotte peut tomber,
occasionnant des blessures corporelles ou des dommages matériels.
• Check to be sure the hood is level and centered.
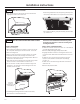
Install Transition Onto Top of Hood
Note: The mounting
screws must remain in
their original shipping
location. These screws
are positioned to
engage the keyhole
slots in the back of
the hood.
1/4"
Gap
Original Mounting
Screws as Shipped
IMPORTANT: Remove
shipping tape from
damper and check that
damper moves freely.
Centerline of
Installation
Space
Bottom
Mounting
Holes
30"
to
36"
Centerline of
Installation
Space
20"
Bottom
of
Hood
Wood
Support