Installation Instructions If you have questions, call 800.626.2000 or visit our website at: www.monogram.
Safety Information BEFORE YOU BEGIN: WARNINGS: Read these instructions completely and carefully. • Use this appliance only for its intended purpose. • Immediately repair or replace electrical service cords that become frayed or damaged. • Unplug the unit before cleaning or making repairs. • Repairs should be made by a qualified service technician. IMPORTANT – Save these instructions for local inspector’s use. IMPORTANT – Observe all governing codes and ordinances.
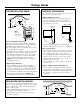
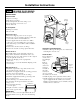
Design Guide THE INSTALLATION SPACE PRODUCT CLEARANCES The wine chiller, wine reserve and beverage center is factory set for a 110° door swing. Locate Outlet 10-1/2" 34-1/2"-35" When installed in a corner: • Allow 4″ min. clearance on the hinge side for the 90° door swing and to allow racks to slide out. • Allow 10″ minimum clearance on the hinge side for a full 110° door swing. 24" 9" Max. 1-1/2" 23-3/4" Min.
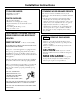
Installation Instructions TOOLS REQUIRED STAINING WOOD DRAWER FRONTS • #2 Phillips screwdriver • Adjustable wrench The drawer fronts are unfinished cherry wood. During use, oil from hands may accumulate and stain the wood. • The drawer fronts may be stained and sealed to match adjacent cabinetry. The tinted glass will make the stained wood appear darker. A true color match can be seen only when the door is opened. • Apply the stain and sealer according to the manufacturer’s instructions.
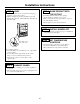
Installation Instructions STEP 2 REVERSE DOOR SWING SKIP THIS STEP IF DOOR SWING SUITS THE INSTALLATION Install 3 Hinge Screws Parts Included: • Top left case hinge • Bottom left case hinge • Left and right side decorative hinge cover • Decorative hinge screw hole cover • Torx® driver bit Remove Top Hinge Hinge Pin and Bracket Tools Required: • Phillips screwdriver • Electric drill Door Stop and Cam Riser Remove the door: • Flatten the shipping carton to use as a pad.
Installation Instructions STEP 3 LEVEL STEP 5 SLIDE PRODUCT INTO THE CUTOUT • Use an adjustable wrench to turn the leveling legs and raise or lower the product. • Adjust carefully; the product should be level and plumb with cabinetry, and should align with adjacent toekick height. • Carefully, slide the unit into the opening. Be careful not to entangle power cord. • Make certain that the door protrudes 1″ beyond the surrounding cabinets. • Check again to be sure the unit is level.
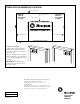
TEMPLATE FOR NAMEPLATE LOCATION Cut on Dotted Line Upper Left Corner of Glass if Hinge is on Left Top of Glass Door Top of Badge Door Frame Side Door Frame Side DOOR NAMEPLATE LOCATION To position nameplate: • Cut template along dotted line. • Hold or tape template behind glass door so that it is visible from the front side. • Remove backing from nameplate. • Place nameplate onto front side of door, matching illustration on the template.