Monogram. Use & Care Guide and Installation Instructions for ZDIB50 ZDIW50 Automatic Icemaker TM Monogram. Monogram. TM General Electric Company Louisville, KY 40225 Automatic Icemaker Pub. No. 49-6857 Part No.
Introduction Your new Monogram icemaker makes an eloquent statement of style, convenience and kitchen planning flexibility. Whether you chose it for its purity of design, practical features or assiduous attention to detail—or for all of these reasons—you’ll find that your Monogram icemaker’s superior blend of form and function will delight you for years to come. The Monogram icemaker was designed to provide the flexibility to blend in with your kitchen cabinetry.
HELP US HELP YOU… Read this guide carefully. Write down the model and serial numbers. It is intended to help you operate and maintain your new icemaker properly. Keep it handy for answers to your questions. If you don’t understand something or need more help, call: GE Answer Center® 800.626.2000 24 hours a day, 7 days a week You’ll see them on a plate on the left side of the ice bin. These numbers are also on the Consumer Product Ownership Registration Card that came with your icemaker.
IMPORTANT SAFETY INSTRUCTIONS Read All Instructions Before Using This Appliance. WARNING—To reduce the risk of fire, electrical shock, or injury when using your icemaker, follow basic precautions including the following: • Never allow children to operate, play with, or crawl inside the icemaker. • Never clean icemaker parts with flammable fluids. The fumes can create a fire hazard or explosion.
OPERATING YOUR ICEMAKER How the Icemaker Works 1. Water is constantly circulated over a freezing plate. As the water freezes into ice, the minerals in the water are rejected. This produces a sheet of ice with a low mineral content. NOTE: The icemaker is designed to make clear ice from the majority of water sources on a daily basis. If your results are unsatisfactory, water may need to be filtered or treated. See Filtering and Treating Water in the Care and Cleaning section. 2.
OPERATING YOUR ICEMAKER (continued) Setting the Controls 1. Select ice thickness. The icemaker has been preset to produce ice approximately 1/2″ (13 mm) thick, while operating in a room temperature of 70°F. (21°C.). Operation in different room temperatures may require readjusting the control toward either the “THICK” or “THIN” setting. Best operation will be obtained with ice 1/2″ (13 mm) to 5/8″ (16 mm) thick. If operating in a warm room (above 90°F. [32°C.
CARE AND CLEANING Periodically inspect and clean the icemaker to keep it operating at peak efficiency and to prevent premature failure of system components. Both the icemaking system and the air-cooled condenser need to be cleaned regularly. The minerals rejected from the circulating water during the freezing cycle will eventually form a hard scaly deposit in the water system which prevents a rapid release of the ice from the freezing plate.
CARE AND CLEANING (continued) Cleaning the Icemaker System WARNING: Most ice machine cleaners are citric or phosphoric acid which can cause irritation even after dilution. In case of contact with eyes, flush eyes thoroughly with fresh water and contact a physician immediately. In case of contact with skin, rinse well with water. If swallowed, give large amounts of water and contact a physician immediately. Do not induce vomiting. KEEP OUT OF REACH OF CHILDREN. 1. Turn the Cycle Control Knob to “OFF.
Cleaning the Inside Parts of the Icemaker WARNING: • Do not operate the icemaker with the lower access panel or control panel removed. Electrical shock or personal injury could result. • Do not wash plastic parts in dishwasher. They cannot withstand temperatures above 145°F. (63°C.). 1. Turn the Cycle Control Knob to “OFF” and disconnect the electrical power supply to the machine. Open the storage bin door and remove any ice that is in the bin.
CARE AND CLEANING (continued) Filtering and Treating Water In most areas it will be beneficial to filter or treat the water being supplied to the icemaker. It can improve the reliability of the icemaker, reduce water system maintenance and produce the best quality of ice. The installation of a polyphosphate feeder will generally reduce scale build-up and the icemaker will require less frequent cleaning. Municipal water systems are generally treated with chlorine to maintain a safe drinkable water supply.
PREPARATION Unpacking the Icemaker 1. Lay the carton on rear face and break open the bottom flap. 2. Set the carton upright with all four flaps outward. 3. Lift carton up and off icemaker. 4. Remove all tape and packaging material from the outside and inside of the cabinet. 5. Remove the front grille; take Remove out the screws securing the Interior Packing grille at the bottom and lift it free of the cabinet. 6. Turn the fan by hand to make certain it moves freely.
PREPARATION (continued) Changing the Bin Door Panel You can easily change the color of the front panel on the storage bin door. Two colors are available: black and white. To change the panel: 1. Open the storage bin door. Remove the two screws on the top of the door which hold the handle. 2. Loosen the screws in both of the side trim pieces. 3. Remove the handle and the handle insert. 4. Carefully slide the panel out. You will find the reverse side is black.
Changing the Lower Access Panel WARNING: Do not operate the icemaker with the lower access panel or control panel removed. Electrical shock or personal injury could result. 1. Remove the screw from the top of the lower access panel and the two screws in the bottom grille area. Pull forward at the bottom, then down to remove the panel. Lower Access Panel Screw Grill Area Screws 2. Remove the two screws from the top panel trim and remove the top trim. 3. Carefully slide the panel out. 4.
CUSTOM DOOR AND ACCESS PANELS Custom Door and Access Panels—1/4″ Thick Cut panels to the same size as the production metal panel. Door Bin Lower Panel 111/4″ 1115/16″ Wood Panel Dimensions 1/4″ 17″ Custom Door and Access Panels—3/4″ Thick These door and access panels—both raised and flat design—should be constructed in the same manner as typical cabinet doors or drawers. Storage bin door panel: • Cut the panel 17″ wide x 111/4″ high.
Vacation and Moving WARNING: Make sure the icemaker is disconnected from the main power supply before removing the lower access panel. Failure to do so could result in electric shock or personal injury. To shut down the icemaker: 1. Disconnect the electrical power supply to the icemaker and turn the Cycle Control Knob to “OFF.” 2. Remove all ice from the storage bin. 3. Shut off the water supply. 4.
FREE STANDING INSTALLATION For the Installer When this icemaker is installed free standing (not under a counter) we strongly recommend that the bottom rear corners of the icemaker be fastened to the floor to prevent accidental tipping. INSTALLATION REQUIREMENTS IMPORTANT…Please Read Carefully For the Electrician—Electrical Requirements A 115 Volt, 60 Hz, AC only, 15 Amp fused electrical supply is required (time delay fuse or circuit breaker is recommended).
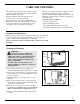
INSTALLATION INSTRUCTIONS 3/4″ Water inlet solenoid valve 1/4″ O.D. water line compression fitting at water valve Back view Right end view 237/8″ 71/2″ 177/8″ 33/4″ Bend field supplied water line to Figure 1 connect to water valve fitting 4″ long 5/8″ I.D. rubber drain tube—run to open drain 3413/32″ 9″ 21/2″ 3/4″ 34 /2″ 9″ Max. 1 41/2″ to center line 11/4″ Min.
INSTALLATION INSTRUCTIONS (continued) DRAIN PUMP CHECK OPERATION • When the drain connection is below the level of the icemaker, a drain pump may be used to lift the water to an available drain. Use only an approved drain pump kit ZDK50 from your dealer. • Complete installation instructions are included with the drain pump kit. • Start the icemaker by turning the service switch to “ON” and opening the line water valve. • NOTE: Left is “OFF”—Middle is “ON”—Right is “CLEAN.
QUESTIONS? USE THIS PROBLEM SOLVER PROBLEM POSSIBLE CAUSE ICEMAKER DOES NOT RUN • Cycle Control Knob must be in the “ON” position. • Check to see that the power cord is plugged in. • Have you checked your home’s main fuses or circuit breaker box? • Room temperature must be above 55°F. (13°C.). Otherwise, the bin thermostat may sense the cold room temperature and shut off even though the bin is not full of ice. Also, the icemaker may not restart once it does shut off.
We’ll Be There With the purchase of your new GE appliance, receive the assurance that if you ever need information or assistance from GE, we’ll be there. All you have to do is call—toll-free! GE Answer Center® 800.626.2000 Whatever your question about any GE major appliance, GE Answer Center® information service is available to help. Your call—and your question— will be answered promptly and courteously. And you can call any time. GE Answer Center® service is open 24 hours a day, 7 days a week.
YOUR GE ICEMAKER WARRANTY WHAT IS COVERED WHAT IS NOT COVERED • Service trips to your home to teach you how to use the product. Read your Use and Care material. If you then have any questions about operating the product please contact your dealer or our Consumer Affairs office at the address below, or call, toll free: GE Answer Center® 800.626.2000 consumer information service Staple sales slip or cancelled check here. Proof of original purchase date is needed to obtain service under warranty.
NOTES 22
Monogram. Manual del usuario e instrucciones para la instalación para ZDIB50 ZDIW50 Máquina para hacer hielo TM Monogram. Monogram. TM General Electric Company Louisville, KY 40225 Máquina para hacer hielo Pub. No. 49-6857 Part No.
Introducción Su nueva máquina para hacer hielo Monogram es una afirmación elocuente de estilo, comodidad y flexibilidad en la planeación de su cocina. Ya sea que la elija por la pureza de su diseño, por las características físicas o por la constante atención al detalle—o por todas estas razones—encontrará que la conbinación de forma y función de su maquina para hacer hielo Monogram es superior y dará una gran satisfacción durante los años venideros.
AYUDENOS A AYUDARLE… Lea cuidadosamente este folleto. Anote el modelo y los números de serie. Es nuestra intención ayudarle a operar y mantener adecuadamente su nuevo máquina para hacer hielo. Mantenga este folleto a la mano para responder a sus preguntas. Si no entendiera algo o necesitara asesoría, llame a: GE Answer Center® 800.626.2000 24 horas del día, 7 días a la semana Los verá en la placa del lado izquierdo del depósito de almacenamiento.
INSTRUCCIONES DE SEGURIDAD Lea todas las instrucciones antes de usar este electrodoméstico. ADVERTENCIA—Para reducir el riesgo de incendio, choque eléctrico o lesiones cuando esté usando su máquina para hacer hielo, siga precauciones básicas incluyendo las siguientes: • Nunca permita que los niños operen, jueguen con la máquina o se metan al interior de la máquina. • Nunca limpie las partes de la máquina para hacer hielo con líquidos inflamables. Los vapores pueden crear riesgos de incendio o explosión.
OPERACION DE SU MAQUINA PARA HACER HIELO Cómo funciona la máquina para hacer hielo 1. El agua circula constantemente sobre una placa de congelación. A medida que el agua se enfría para llegar a congelarse, los minerales que contiene el agua son expulsados. Esto produce una capa delgada de hielo con bajo contenido de minerales. NOTA: La máquina para hacer hielo está diseñada para fabricar hielo transparente con la mayoría de las fuentes de suministro de agua todos los días.
OPERACION DE SU MAQUINA PARA HACER HIELO (pase) Ajustando los controles 1. Elija el espesor de hielo que desee. La máquina para hacer hielo ha sido ajustada en la fábrica para producir hielo de aproximadamente 1/2″ (13 mm) de espesor, siempre que esté operando a una temperatura ambiente de 70 °F. (21 °C.). La operación a una temperatura ambiente distinta puede requerir un reajuste del control ya sea hacia la posición “THICK” (grueso) o “THIN” (delgado).
CUIDADO Y LIMPIEZA Inspeccione y limpie periódicamente la máquina para hacer hielo de modo que siga funcionando a su máxima eficiencia y para prevenir una falla prematura de los componentes del sistema. Tanto el sistema de fabricación de hielo como el condensador enfriado por aire necesitan ser limpiados de manera regular.
CUIDADO Y LIMPIEZA (pase) Limpieza del sistema de la máquina para hacer hielo ADVERTENCIA: La mayoría de los limpiadores para máquinas se hacen a base de ácido cítrico o fosfórico y pueden causar irritación incluso después de ser diluidos. En el caso de contacto con los ojos, enjuague los ojos meticulosamente con agua y llame a un médico de inmediato. En caso de contacto con la piel, enjuague bien con agua. Si se ingiere, déle a la persona grandes cantidades de agua y llame a un médico de inmediato.
Limpieza de los componentes interiores ADVERTENCIA: • No opere la máquina para hacer hielo si quitó el panel inferior de acceso o el tablero de control. Puede sufrir un choque eléctrico o lesiones en su persona. • No lave las partes plásticas en la máquina lavavajillas. Las partes no resisten temperaturas superiores a 145 °F. (63 °C.). 1. Haga girar la perilla de Control de ciclo hasta la posición de “OFF” (apagado) y desconecte el suministro de corriente eléctrica que alimenta la máquina.
CUIDADO Y LIMPIEZA (pase) Filtrado y tratamiento del agua En la mayoría de las áreas sería beneficioso filtrar o tratar el agua que alimenta la máquina para hacer hielo. Esto puede mejorar la confiabilidad de la máquina, reducir el mantenimiento del sistema de agua y producir la mejor calidad de hielo. La instalación de un alimentador de polifosfato por lo general reducirá la formación de acumulaciones de sales y la máquina para hacer hielo requerirá de limpiezas menos frecuentes.
PREPARACION Cómo desempacar la máquina para hacer hielo 4. Quite toda la cinta adhesiva y los materiales de empaque del exterior y del interior del gabinete. 5. Quite la rejilla delantera, retire Quite los los tornillos que aseguran la materiales de empaque rejilla con el fondo y levántela del interior sacándola del gabinete. 6. Haga girar el ventilador con la mano para cerciorarse de que se mueve con libertad. 1. Coloque la caja sobre la parte inferior y abra las tapas del fondo. 2.
PREPARACION (pase) Cómo cambiar el panel de la puerta del depósito Usted puede cambiar con facilidad el color del panel delantero de la puerta del depósito de almacenamiento. Hay dos colores disponibles: negro y blanco. Para cambiar el panel: 1. Abra la puerta del depósito de almacenamiento. Quite los dos tornillos que se encuentran en la parte superior de la puerta y que sostienen la manija. 2. Afloje los tornillos en ambos lados de las guarniciones. 3. Quite la manija y la inserción de la manija. 4.
Cómo cambiar el panel inferior de acceso ADVERTENCIA: No opere la máquina para hacer hielo si ha quitado el panel inferior de acceso o el panel de control. Puede sufrir un choque eléctrico o lesiones personales. 1. Quite el tornillo de la parte superior del panel inferior de acceso y los dos tornillos que están en la parte de abajo del área de la rejilla cortadora. Tire hacia el frente en la parte de abajo, entonces tire hacia abajo para quitar el panel. 2.
PUERTA Y PANELES DE ACCESO A LA MEDIDA Puerta y paneles de acceso a la medida de 1/4″ de espesor Corte los paneles del mismo tamaño que el panel de metal. Depósito de Panel la puerta inferior 111/4″ 1115/16″ Dimensiones del panel de madera 1/4″ 17″ Puerta y paneles de acceso a la medida de 3/4″ de espersor La puerta y los paneles de acceso—ambos con diseños en relieve y plano—se deberán armar de la misma manera que el gabinete, las puertas o los cajones típicos.
Vacaciones y mudanzas ADVERTENCIA: Asegúrese de que la máquina para hacer hielo esté desconectada del suministro principal de corriente eléctrica antes de quitar el panel inferior de acceso. Si no lo hace así, corre el riesgo de recibir un choque eléctrico o lesiones a su persona. Para apagar la máquina para hacer hielo: 1. Desconecte el suministro eléctrico que va a la máquina para hacer hielo y haga girar la perilla de Control de ciclo hasta la posición de “OFF” (apagado). 2.
INSTALACION INDEPENDIENTE Para el instalador Cuando se instala esta máquina para hacer hielo de manera independiente (no debajo de un mostrador) recomendamos fuertemente que las esquinas posteriores del fondo de la máquina para hacer hielo se sujeten al suelo para evitar que se vuelque por casualidad. INSTRUCCIONES PARA LA INSTALACION IMPORTANTE…Leer detenidamente Para el electricista—Requerimientos eléctricos Se requiere un suministro eléctrico de 115 voltios, 60 Hz y 15 amperes.
INSTRUCCIONES PARA LA INSTALACION Vista posterior Vista del lado derecho 237/8″ 3/4″ Línea de compresión de 1/4″ de diámetro exterior que se conecta a la válvula de agua Válvula de solenoide de admisión de agua 7/″ 1 2 177/8″ Tubo de desagüe de 4″ de largo y 5/8″ de diámetro interior—corre hacia el drenaje abierto 3413/32″ 33/4″ Doble la línea de suministro 2 /2″ de agua para conectarla a la conexión de la válvula de agua 41/2″ hasta la línea del centro 2 9″ 1 Figura 1 341/2″ 9″ Máx.
INSTRUCCIONES PARA LA INSTALACION (continuación) NIVELACION BOMBA DE DESAGÜE • Después de colocar la máquina para hacer hielo en posición, revise para cerciorarse que esté nivelada de lado a lado y del frente hacia atrás. • Una nivelación precisa es esencial para una operación adecuada. • La máquina para hacer hielo debe estar acuñada para que quede sólida lo mismo que nivelada. Las cuñas deben ser de un material duro y permanente como el masonite (madera aglomerada).
¿ALGUNA PREGUNTA? CONSULTE ESTAS SOLUCIONES PROBLEMA CAUSA POSIBLE LA MAQUINA PARA HACER HIELO NO FUNCIONA • La perilla de control de ciclo debe estar en la posición de “ON” (encendido). • Revise que el cable de corriente esté conectado. • ¿Revisó la caja de fusibles o el interruptor de circuito? • La temperatura ambiente debe ser mayor que 55 °F. (13 °C.). De otro modo, el termostato del depósito puede percibir una temperatura fría en la habitación y cerrarse aunque el depósito no esté lleno de hielo.
Estaremos Con Usted Con la compra de su nuevo aparato GE recibirá la seguridad de que si alguna vez necesita información o asesoría de GE, estaremos a su disposición. Todo lo que tiene que hacer es llamar—¡sin costo! En GE Answer Center se habla español. GE Answer Center® 800.626.2000 Cualquiera que sea su pregunta sobre alguno de los grandes aparatos de GE, el servicio de información de GE Answer Center será dispuesto a ayudar. Usted llama y su pregunta será contestada inmediatamente y con cortesía.
GARANTIA DE SU MAQUINA PARA HACER HIELO GE LO QUE ESTA CUBIERTO LO QUE NO ESTA CUBIERTO • Viajes de servicio a su hogar para mostrar cómo se usa el producto. Lea el material de Uso y cuidado. Si aún tuviera alguna pregunta sobre cómo operar el producto, favor de contactar a nuestro representante o a nuestra oficina de Asuntos del consumidor (Consumer Affairs Office) en la dirección que aparece abajo o llamé sin cargo a: GE Answer Center® 800.626.
NOTAS 22