OWNER’S MANUAL 27" Single Built-In Electric Wall Oven 27" Double Built-In Electric Wall Oven Para consultar una version en español de este manual de instrucciones, visite nuestro sitio de internet Monogram.com. Monogram.
Contents Wall Oven Contents Consumer Information . . . . . . . . . . . . . . . . 3 Safety Information . . . . . . . . . . . . . . . . . . . . 4 Using The Oven Single Wall Oven Controls . . . . . . . . . . . . . . 7 Double Wall Oven Controls . . . . . . . . . . . . . . 8 Special Features . . . . . . . . . . . . . . . . . . . . . . 9 12-hour Auto Shut-Off and Sabbath (SAbbAtH) . . . . . . . . . . . . . . . . . 10 Oven Racks . . . . . . . . . . . . . . . . . . . . . . . . . 11 Aluminum Foil and Oven Liners .
Consumer Information Wall Oven Before using your wall oven Read this manual carefully. It is intended to help you operate and maintain your new wall oven properly. Keep it handy for answers to your questions. If you don’t understand something or need more help, there is a list of toll-free consumer service numbers included in the back section of this manual. OR Visit our website at: Monogram.
IMPORTANT SAFETY INFORMATION READ ALL INSTRUCTIONS BEFORE USING THE APPLIANCE WARNING Read all safety instructions before using the product. Failure to follow these instructions may result in fire, electrical shock, serious injury or death. WARNING GENERAL SAFETY INSTRUCTIONS Ŷ 8 VH WKLV DSSOLDQFH RQO\ IRU LWV LQWHQGHG SXUSRVH DV described in this Owner’s Manual. Ŷ ' R QRW DWWHPSW WR UHSDLU RU UHSODFH DQ\ SDUW RI \RXU oven unless it is specifically recommended in this manual.
IMPORTANT SAFETY INFORMATION READ ALL INSTRUCTIONS BEFORE USING THE APPLIANCE WARNING IN THE EVENT OF A FIRE, TAKE THE FOLLOWING STEPS TO PREVENT INJURY AND FIRE SPREADING Ŷ ' R QRW XVH ZDWHU RQ JUHDVH ILUHV 1HYHU SLFN XS D flaming pan. Ŷ , I WKHUH LV D ILUH LQ WKH RYHQ GXULQJ VHOI FOHDQ WXUQ WKH oven off and wait for the fire to go out. Do not force the door open.
IMPORTANT SAFETY INFORMATION READ ALL INSTRUCTIONS BEFORE USING THE APPLIANCE STATE OF CALIFORNIA PROPOSITION 65 WARNINGS WARNING This product contains one or more chemicals known to the State of California to cause cancer, and birth defects or other reproductive harm.
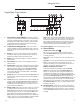
Using the Oven Wall Oven Single Wall Oven Controls 1 2 1. Convection Cooking Modes: Convection cooking modes use increased air circulation to improve performance. The type of benefit depends on the mode. Your oven has the following convection cooking modes: Convection Bake (1 Rack/Multi) and Convection Roast. See the Cooking Modes section for more information. 2. Traditional Cooking Modes: Your oven has the following traditional cooking modes: Bake, Broil Hi, Broil Lo, Proof and Warm.
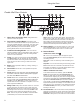
Using the Oven Wall Oven Double Wall Oven Controls 1. 2 1 5 3 4 9 6 Upper Oven and Lower Oven: Designates which oven the controls will operate. 2. 3. 4. Convection Cooking Modes: Convection cook modes use increased air circulation to improve performance. The type of benefit depends on the mode. Your upper oven has the following convection cooking modes: Convection Bake (1 Rack/Multi), and Convection Roast. See the Cooking Modes section for more information.
Using the Oven Wall Oven Special Features There are several different special features on your wall oven. To change the settings of these special features, press the Bake and Broil Hi/Lo pads at the same time and hold for three seconds. "SF" will appear in the display. Select the feature you want to change. When the change has been made, press the Start pad to save the change and return to the time of day. Press the Cancel/Off pad to exit Special Features without saving setting changes.
Using the Oven Wall Oven 12-hour Auto Shut-Off and Sabbath (SAbbAtH) 12-hour auto shut-off turns off the oven after 12 hours of continuous operations. Options for this feature are “12 Shdn”, “no Shdn” and “SAbbAtH”. Press the Bake and Broil Hi/Lo pads at the same time and hold for three seconds until "SF" appears in the display. Press the Delay Time pad to view the current setting and then to change the setting.
Using the Oven Wall Oven Oven Racks Your oven has six rack positions. Recommended rack positions for various types of foods are provided in the Cooking Guide. Adjusting rack position is one way to impact cooking results. For example, if you would prefer darker tops on cakes, muffins, or cookies, try moving food one rack position higher. If you find foods are too brown on top try moving them down next time.
Using the Oven Wall Oven Oven Racks (Cont.) Extension Racks (Cont.) To Replace An Extension Rack: 1. Place the rear portion of the rack onto the rack supports (guides) as shown in the picture. 2. Hold the upper front rail and lower handles and push the rack all the way in until the install feature locks into the front rack support.
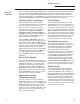
Using the Oven Wall Oven Cooking Modes Your new oven has a variety of cooking modes to help you get the best results. These modes are described below. Refer to the Cooking Guide section for recommendations for specific foods. Remember, your new oven may perform differently than the oven it is replacing. Baking and Roasting Modes Convection Roast Select a mode for baking and roasting based on the type and quantity of food you are preparing.
Using the Oven Wall Oven Cooking Modes (Cont.) Cookware 14 Broil Hi Proof The Broil Hi mode uses intense heat from the upper element to sear foods. Use Broil Hi for thinner cuts of meat and/ or foods you prefer less done on the interior. To use this mode press the Broil Hi/Lo pad once and then press Start. It is not necessary to preheat when using this mode. Proof mode is designed for rising (fermenting and proofing) bread doughs. Press the Proof pad and then press Start.
Using the Oven Wall Oven Cooking Guide RECOMMENDED MODE(S) RECOMMENDED RACK POSITION(S) ADDITIONAL SUGGESTIONS Bake 3 Use shiny cookware. Convection Bake Multi Rack Bake 3 and 5 Extension rack position 3. Ensure adequate airflow (see illustration below). Chiffon cakes (angel food) Bake 1 Use shiny cookware. Cookies, biscuits, scones on a Single Rack Bake 3 Use shiny cookware. Cookies, biscuits, scones on Multiple Racks Convection Bake Multi 3 and 5 1, 3 and 5 Extension rack position 3.
Care and Cleaning Wall Oven Oven Be sure electrical power is off and all surfaces are cool before cleaning any part of the oven Control Panel It’s a good idea to wipe the control panel after each use. Clean with mild soap and water or vinegar and water, rinse with clean water and polish dry with a soft cloth. Do not use abrasive cleansers, strong liquid cleansers, plastic scouring pads or oven cleaners on the control panel—they will damage the finish.
Care and Cleaning Wall Oven Oven (Cont.) Oven Interior The interior of your new oven can be cleaned manually or by using the Steam Clean or Self Clean modes. Spillage of marinades, fruit juices, tomato sauces and basting liquids containing acids may cause discoloration and should be wiped up immediately. Let hot surfaces cool, then clean and rinse.
Care and Cleaning Wall Oven Oven Racks The racks that were provided with your oven (dark enameled racks, not shiny) may remain in the oven during the self-cleaning cycle without being damaged. To manually clean racks, use warm, soapy water. Make sure not to wash the rack slides on an extension rack. If racks become more difficult to remove from the oven, put some vegetable oil on a soft cloth or paper towel and rub onto the oven rack supports. Do not wipe the oil on an extension rack slide.
Care and Cleaning Wall Oven Oven Doors Lift-Off Oven Door The door is very heavy. Be careful when removing and lifting the door. Do not lift the door by the handle. Slot To remove the door: 1. Fully open the door. 2. Pull the hinge locks down toward the door frame, to the unlocked position. A tool, such as a small flat-blade screwdriver, may be required. Hinge lock 3. Firmly grasp both sides of the door at the top. Pull hinge locks down to unlock 4. Close door to the door removal position.
Care and Cleaning Wall Oven Oven Light Oven Light Replacement WARNING SHOCK OR BURN HAZARD: Before replacing oven light bulb, disconnect the electrical power to the oven at the main fuse or circuit breaker panel. Failure to do so may result in electric shock or burn. CAUTION BURN HAZARD: The glass cover and bulb should be removed when cool. Touching hot glass with bare hands or a damp cloth can cause burns. 1. Disconnect power at the main fuse or circuit breaker panel. 2. Remove oven racks. 3.
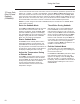
Troubleshooting Tips Wall Oven Before you call for service Save time and money! Review the charts on the following pages first and you may not need to call for service. Problem Possible Cause What To Do My new oven doesn't cook like my old one. Is something wrong with the temperature settings? Your new oven has a different cooking system from your old oven and therefore may cook differently than your old oven. Food does not bake properly Oven controls improperly set.
Troubleshooting Tips Wall Oven Before you call for service Problem Possible Cause What To Do Why is my range making a "clicking" noise when using my oven? Your range has been designed to maintain a tighter control over your oven's temperature. You may hear your oven's heating elements "click" on and off more frequently than in older ovens to achieve better results during baking, broiling, convection, and self-clean cycles. A fuse in your home may be blown or the circuit breaker tripped.
Troubleshooting Tips Wall Oven Before you call for service Problem Possible Cause What To Do Display goes blank A fuse in your home may be blown or the circuit breaker tripped. The clock is turned off. Oven is in Sabbath Mode. Replace the fuse or reset the circuit breaker. Power outage, clock flashes Power outage or surge “Burning” or “oily” odor emitting from the vent Strong odor This is normal in a new oven and will disappear in time. Fan noise This is normal.
Notes Wall Oven Notes 24 49-80821
Notes Wall Oven Notes 49-80821 25
Warranty Wall Oven YOUR MONOGRAM WALL OVEN WARRANTY Staple your receipt here. Proof of the original purchase date is needed to obtain service under the warranty. WHAT IS COVERED LIMITED TWO-YEAR WARRANTY From the Date of the Original Purchase $OO ZDUUDQW\ VHUYLFH LV SURYLGHG E\ RXU )DFWRU\ 6HUYLFH &HQWHUV RU DQ DXWKRUL]HG &XVWRPHU &DUH® technician. To schedule service online, visit us at Monogram.com or call Monogram Preferred Service (800.444.1845).
Accessories Wall Oven Accessories Looking For Something More? Monogram offers a variety of accessories to improve your cooking and maintenance experiences! Refer to the Consumer Support page for phone numbers and website information.
Consumer Support Wall Oven With the purchase of your new Monogram appliance, receive the assurance that if you ever need information or assistance from Monogram, we will be there. All you have to do is call! Register Your Appliance Register your new appliance on-line at your convenience! Timely product registration will allow for enhanced communication and prompt service under the terms of your warranty, should the need arise.
MANUAL DEL PROPIETARIO Horno de Pared Eléctrico Simple Incorporado de 27” Horno de Pared Eléctrico Doble Incorporado de 27” Monogram.
Contenidos Horno de Pared Contenidos Información al Consumidor . . . . . . . . . . . . . . . . 3 Información de Seguridad . . . . . . . . . . . . . . . . . 4 Uso del Horno Controles del Horno Simple de Pared . . . . . . . . . 7 Controles del Horno Doble de Pared . . . . . . . . . . 8 Funciones especiales . . . . . . . . . . . . . . . . . . . . . . 9 Apagado automático de 12 horas y Modo Sabático (SAbbAtH) . . . . . . . . . . . . . . . . 10 Estantes del Horno . . . . . . . . . . . . . . . . . . . . . . .
Información al Consumidor Horno de Pared Antes de Usar su horno de pared Lea este manual cuidadosamente. La finalidad del mismo es ayudarle a realizar un uso y mantenimiento correctos de su nuevo horno de pared. Si usted no entiende algo o necesita más ayuda, en la sección trasera de este manual figura un listado de números gratuitos de servicio al consumidor. Téngalo a mano para encontrar respuestas a sus preguntas.
INFORMACIÓN IMPORTANTE DE SEGURIDAD LEA TODAS LAS INSTRUCCIONES ANTES DE USAR ADVERTENCIA Lea todas las instrucciones antes de usar el producto. Si no se siguen estas instrucciones se podrán producir incendios, descargas eléctricas, lesiones graves o la muerte. ADVERTENCIA INSTRUCCIONES GENERALES DE SEGURIDAD Ŷ 8 VH HVWH HOHFWURGRPpVWLFR VyOR SDUD VX SURSyVLWR RULJLQDO como se describe en el Manual del Propietario.
INFORMACIÓN IMPORTANTE DE SEGURIDAD LEA TODAS LAS INSTRUCCIONES ANTES DE USAR ADVERTENCIA EN CASO DE INCENDIO, SIGA LOS SIGUIENTES PASOS PARA EVITAR LESIONES O LA PROPAGACIÓN DEL FUEGO Ŷ 1 R XVH DJXD VREUH HO IXHJR GH OD JUDVD 1XQFD WRPH XQD olla que se esté incendiando. Ŷ 6 L KD\ XQ LQFHQGLR HQ HO KRUQR GXUDQWH HO KRUQHDGR DKRJXH el fuego cerrando la puerta del horno y apagando el mismo o usando un químico seco multipropósito o un extintor de incendio con espuma.
INFORMACIÓN IMPORTANTE DE SEGURIDAD LEA TODAS LAS INSTRUCCIONES ANTES DE USAR ADVERTENCIA DE LA PROPOSICIÓN 65 DEL ESTADO DE CALIFORNIA ADVERTENCIA Este producto contiene uno o más químicos que el Estado de California entiende que producen FiQFHU \ GHIHFWRV HQ HO QDFLPLHQWR X RWURV GDxRV UHSURGXFWLYRV /RV KRUQRV FRQ OLPSLH]D DXWRPiWLFD SXHGHQ RFDVLRQDU H[SRVLFLRQHV GH EDMR QLYHO D DOJXQDV GH ODV VXVWDQFLDV GH OD 3URSRVLFLyQ 65, incluyendo monóxido de carbono, durante el ciclo de limpieza.
Controles del Horno Horno de Pared Controles del Horno Simple de Pared 1 2 1. Convection Cooking Modes (Modos de Cocción por Convección): Los modos de cocción por convección utilizan una FLUFXODFLyQ GH DLUH LQFUHPHQWDGD SDUD PHMRUDU HO UHQGLPLHQWR (O WLSR GH beneficio depende del modo. Su horno cuenta con los siguientes modos de cocción por convección: Convection Bake (Hornear por Convección) (1 o Múltiples Estantes) y Convection Roast (Asar por Convección).
Controles del Horno Horno de Pared Controles del Horno Doble de Pared 2 1 5 3 4 9 6 1. Upper Oven and Lower Oven (Horno Superior y Horno Inferior): Designa qué horno operarán los controles. 2. Convection Cooking Modes (Modos de Cocción por Convección): Los modos de cocción por convección utilizan 3. 5.
Uso del Horno Horno de Pared Funciones especiales Existen varias funciones especiales en su horno de pared. Para modificar las configuraciones de estas funciones especiales, mantenga presionadas las teclas Bake (Hornear) y Broil Hi/Lo (Asar Alto/Bajo) al mismo tiempo durante tres segundos "SF" aparecerá en la pantalla. Seleccione la función que desee modificar. Una vez realizado el cambio, presione la tecla Start (Iniciar) para guardar dicho cambio y regrese a la hora del día.
Uso del Horno Horno de Pared Apagado automático de 12 horas y Modo Sabático (SAbbAtH) El apagado automático de 12 horas apaga el horno luego de 12 horas de operaciones continuas. Las opciones de esta función son “12 Shdn” (Apagar luego de 12 horas), “no Shdn” (No apagar luego de 12 horas) y “SAbbAtH” (Sabático). Mantenga presionadas las teclas Bake (Hornear) y Broil Hi/Lo (Asar Alto/ Bajo) al mismo tiempo durante tres segundos "SF" aparecerá en la pantalla.
Uso del Horno Horno de Pared Estantes del Horno El horno cuenta con seis posiciones de estantes. En la Guía de Cocción, se brindan recomendaciones de posiciones de los estantes SDUD GLIHUHQWHV WLSRV GH FRPLGDV 6H DMXVWD XQ estante en una dirección para afectar los resultados GH FRFFLyQ 3RU HMHPSOR VL VH SUHILHUHQ SDUWHV superiores más oscuras en tartas, panecillos o galletas, pruebe moviendo la comida a un estante que se encuentre una posición más arriba.
Uso del Horno Horno de Pared Estantes del Horno (Cont.) Estantes Extensibles (Cont.) Para Reemplazar un Estante Extensible: 1. Coloque la posición trasera del estante sobre los soportes del estante (guías), como se muestra en la imagen. 6RVWHQJD HO ULHO IURQWDO VXSHULRU \ ODV PDQLMDV LQIHULRUHV \ HPSXMH HO HVWDQWH KDVWD TXH OD función de instalación se bloquee en el soporte del estante frontal.
Uso del Horno Horno de Pared Modos de Cocción 6X QXHYR KRUQR SRVHH XQD YDULHGDG GH PRGRV GH FRFFLyQ SDUD TXH SXHGD REWHQHU ORV PHMRUHV UHVXOWDGRV Estos modos se describen a continuación. Para acceder a recomendaciones para comidas específicas, consulte la sección de la Guía de Cocción. Recuerde que es posible que su nuevo horno funcione de manera diferente que aquel que está reemplazando.
Uso del Horno Horno de Pared Modos de Cocción (Cont.) Utensilios Asar Alto Leudar El modo Broil Hi (Asar Alto) usa calor intenso del elemento superior para soasar las comidas. Use la función Broil Hi (Asado Alto) para cortes más delgados de carne y/o comidas que prefiera que quedan menos cocinadas en su interior. Para usar este modo, presione la tecla Broil Hi/ Lo (Asar Alto/Bajo) una vez y luego presione Start (Iniciar). No es necesario realizar el precalentamiento al usar este modo.
Uso del Horno Horno de Pared Guía de Cocción MODO(S) RECOMENDADO(S) POSICIÓN(ES) DE ESTANTES RECOMENDADA SUGERENCIAS ADICIONALES Hornear 3 Use utensilios brillantes. Horneado por Convección Múltiples Estantes Hornear 3y5 3RVLFLyQ GHO HVWDQWH H[WHQVLEOH $VHJ~UHVH GH TXH KD\D XQ IOXMR GH DLUH DGHFXDGR (Vea la ilustración). Tortas de grasa (pastel de ángel) Hornear 1 Use utensilios brillantes. Galletas, galletitas, bizcochitos en un Solo Estante Hornear 3 Use utensilios brillantes.
Cuidado y Limpieza Horno de Pared Horno Asegúrese de que la corriente eléctrica esté apagada y que todas las superficies estén frías antes de limpiar cualquier parte del horno. Panel de Control Una buena idea es limpiar el panel de control luego GH FDGD XVR /LPSLH FRQ XQ MDEyQ VXDYH \ DJXD R YLQDJUH \ DJXD HQMXDJXH FRQ DJXD OLPSLD \ SXOD en seco con una tela suave.
Cuidado y Limpieza Horno de Pared Horno (Cont.) Interior del Horno El interior de su nuevo horno puede ser limpiado de forma manual o utilizando los modos Steam Clean (Limpieza con Vapor) o Self Clean (Limpieza Automática). (O GHUUDPH GH DGRER MXJRV GH IUXWD VDOVDV GH tomate y líquidos para humedecer que contengan ácidos pueden ocasionar descoloración y se deberán limpiar de inmediato.
Cuidado y Limpieza Horno de Pared Estantes del Horno Los estantes que fueron provistos con el horno (estantes oscuros esmaltados, no brillantes) pueden permanecer en el horno durante el ciclo de limpieza DXWRPiWLFD \D TXH HVWH FLFOR QR ORV GDxDUi Para limpiar los estantes de forma manual, use DJXD FDOLHQWH \ MDEyQ $VHJ~UHVH GH QR ODYDU HO espacio de deslizamiento de un estante extensible.
Cuidado y Limpieza Horno de Pared Puertas de Horno Puerta del Horno Desmontable La puerta es muy pesada. Tenga cuidado al retirar y levantar la puerta. 1R OHYDQWH OD SXHUWD XVDQGR OD PDQLMD Para retirar la puerta: Ranura 1. Abra la puerta totalmente. (PSXMH ORV EORTXHRV GH OD ELVDJUD KDFLD DEDMR HQ GLUHFFLyQ D OD HVWUXFWXUD GH OD SXHUWD hasta la posición desbloqueada. Es posible que necesite una herramienta tal como un GHVWRUQLOODGRU SHTXHxR GH SXQWD SODQD 3.
Cuidado y Limpieza Horno de Pared Luz del Horno Reemplazo de la Lámpara del Horno ADVERTENCIA PELIGRO DE DESCARGA O QUEMADURAS: Antes de reemplazar la lámpara de luz del horno, desconecte la conexión eléctrica del horno del fusible principal o del panel del disyuntor. Si esto no se cumple, se podrá producir una descarga eléctrica o un incendio. PRECAUCIÓN RIESGO DE INCENDIO: La tapa de vidrio y la lámpara de luz se deberán retirar cuando estén frías.
&RQVHMRV SDUD OD 6ROXFLyQ GH 3UREOHPDV Horno de Pared Antes de solicitar el servicio técnico ¡Ahorre tiempo y dinero! Primero revise los cuadros que aparecen en las siguientes páginas y es posible que no necesite solicitar reparaciones. Problema Causa Posible Qué Hacer Mi horno nuevo no cocina como el anterior.
&RQVHMRV SDUD OD 6ROXFLyQ GH 3UREOHPDV Horno de Pared Antes de solicitar el servicio técnico Problema Causa Posible Qué Hacer ¿Por qué la estufa hace un sonido de “clic” cuando uso el horno? 6X HVWXID IXH GLVHxDGD SDUD PDQWHQHU XQ FRQWURO PiV DMXVWDGR VREUH OD WHPSHUDWXUD del horno.
&RQVHMRV SDUD OD 6ROXFLyQ GH 3UREOHPDV Horno de Pared Antes de solicitar el servicio técnico Problema Causa Posible Qué Hacer La pantalla queda en blanco Es posible que un fusible de su hogar se haya quemado o que el disyuntor se haya desconectado. Reemplace el fusible o reinicie el disyuntor. (O UHORM HVWi DSDJDGR Consulte la sección Funciones Especiales. El horno se encuentra en Sabbath Mode (Modo Sabático).. Verifique que el horno no esté en Sabbath Mode (Modo Sabático).
Notas Horno de Pared Notas 24 49-80821
Notas Horno de Pared Notas 49-80821 25
Garantía Horno de Pared GARANTÍA DE SU HORNO DE PARED DE MONOGRAM Abroche su recibo aquí. Para acceder al servicio técnico de acuerdo con la garantía deberá contar con la prueba de la fecha original de compra. ELEMENTOS CUBIERTOS GARANTÍA LIMITADA DE DOS AÑOS Desde la Fecha de la Compra Original Todo el servicio de garantía es provisto por nuestros Centros de Servicio de Fabricación, o un técnico autorizado de Customer Care®.
Accesorios Horno de Pared Accesorios ¿Busca Algo Más? ¡Monogram ofrece una variedad de accesorios para mejorar sus experiencias de cocción y mantenimiento! Para acceder a números telefónicos e información GH VLWLRV :HE FRQVXOWH OD SiJLQD GH 6RSRUWH SDUD el Consumidor.
Soporte para el Consumidor Horno de Pared Con la adquisición de su nuevo electrodoméstico Monogram, esté seguro de que si alguna vez necesita información o asistencia de Monogram, allí estaremos.