GE Monogram® Installation Instructions 30" Convection Built-In Ovens Models ZET857SYSS ZET857DYSB ZET857BYBB ZET857WYWW ZET837SYSS ZET837DYSB ZET837BYBB ZET837WYWW
Before you begin—Read these instructions completely and carefully. IMPORTANT: Save these instructions for local inspector’s use. IMPORTANT: OBSERVE ALL GOVERNING CODES AND ORDINANCES. NOTE TO INSTALLER: Be sure to leave these instructions with the Consumer. NOTE TO CONSUMER: Keep these instructions with your Use and Care Book for future reference. CAUTION WARNING This appliance must be properly grounded. See “Electrical Supply”, page 9.
Design Information 30" Built-I n Convection Ovens Models available ZET857SYSS Stainless steel double convection oven ZET857DYSB Stainless steel on black double convection oven ZET857BYBB Black double convection oven ZET857WYWW White double convection oven ZET837SYSS Stainless steel single convection oven ZET837DYSB Stainless steel on black single convection oven ZET837BYBB Black single convection oven ZET837WYWW White single convection oven With both single and double built-in styles, contemporar y Monog
Design Information 30" Built-I n Convection Ovens Cabinet style options Front Framed Partial Overlay Door Front Framed Full Overlay Door Monogram ovens are installed directly into a wall or wall oven cabinetry, 30" minimum width. The front surface of the ovens will be nearly flush with surrounding cabinetr y. To obtain optimal appearance, cabinet cutouts must be exact. The examples shown here illustrate typical styles of 30" cabinets and oven fit.
Cabinetry 30" Built-I n Convection Ovens Tools and materials required • • • • 2" x 4" lumber for runners Saw Level Phillips screwdriver, wood screws and adhesive or other hardware for installing runners or shelf to support oven. Ovens are designed for installation in a cabinet 30" min. wide. • Cut 2" x 4" runners of appropriate length or solid shelf to support oven. • Attach runners or solid shelf in opening as shown. • Runners must be level, rigidly mounted and capable of supporting 300 pounds.
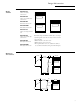
Cabinetry 30" Built-I n Convection Ovens Framed cabinet single oven Front Framed Partial Overlay Door Front Framed Full Overlay Door 30" Allow 3/4" Overlap on Sides. Allow 1" Min. for Top Overlap and Clearance. Allow 1/4" at Bottom for Clearance. 2"x 4" or Equivalent Runners or Solid Shelf 29-1/4" 28" Min. 28-3/8" Max. 23" Max. 17-3/4" 23-1/2" Min. Inside Depth 23-1/4" 34" Recomended 17-3/4" Use the information in this dimension drawing for typical framed cabinets.
Cabinetry 30" Built-I n Convection Ovens Frameless cabinets 30" Frameless 28" Min. 28-3/8" Max. Finish Trim Strip 1/4" Min. Deep for Clearance. To Obtain Installation Height from Floor it may be Necessary to Install a Lower Filler Panel. See page 9. Use the information in this dimension drawing for typical frameless cabinets. The front face of the oven will be flush with cabinetry doors or drawers. Whenever possible, order 30" frameless cabinet with the cutout sized to fit the oven.
Installation 30" Built-I n Convection Ovens Provide oven supports The ovens may be supported by either a solid bottom or 2 x 4 runners. • The support must be level and rigidly mounted, flush with the bottom edge of the cutout. • The entire weight of the oven is supported by 2 x 4 runners or the solid floor and must be capable of supporting 300 lbs. for double ovens and 200 lbs. for single ovens. 2"x 4" or Equivalent Runners 24" 25" 30" Install oven supports 3/4" Min.
Installation 30" Built-I n Convection Ovens Electrical supply • Junction box • Electrical cable—3-conductor or 4-conductor wire—as required by local codes • U.L. listed conduit connector • Wire cutters and wire stripper Note: Do not use an extension cord with these appliances. Do not shorten the flexible power cable. These Monogram built-in ovens require a separate, properly grounded 3-wire 120/208 or 120/240 volt, 60 Hz power supply, protected by a time delay fuse or circuit breaker.
Installation 30" Built-I n Convection Ovens 208V Electrical supply CAUTION WARNING These ovens are pre-wired for connection to 240 volt, 60 Hz., supply. If connecting to a 208 volt supply, modifications must be made. If connecting to a 208 volt, 60 Hz., supply, a jumper must be used across two terminals. • For double ovens, there are two jumpers, one for the upper oven, one for the lower oven. • For single ovens there is one jumper.
Installation 30" Built-In Convection Ovens Step 3 Remove Oven Door(s) Locked Hinge Latch Hinge Latch Normal Position Caution: Do not lift the oven or oven door with handle. Step 4 Route cable through cutout Caution: Oven(s) are very heavy. 2 people are required to lift oven(s) into the opening. Ovens have side handles. Grasp side handle with one hand and into oven opening with other hand. Lift the oven to the cabinet opening, very carefully.
Installation 30" Built-I n Convection Ovens Step 6 Replace the oven door Step 7 Connect electrical • Grasp door firmly on both sides. • Slide the hinge slots in the bottom of the door over the hinges. • Push the door all the way in against oven. • Open the door fully and push hinge latches down, as illustrated, on both sides to secure. • Close the door and open slowly to be sure it moves smoothly.
Installation 30" Built-I n Convection Ovens Determine need for filler panels If the cabinets being used have an opening that is taller than the maximum dimensions indicated for the ovens, filler panels can be made to fill the gaps. Stock filler strips are usually available or for larger gaps order an extra drawer front. Drawer fronts are recommended because they will match the cabinetr y and have finished edges. Any cut edges will be seen and should be finished.
Cabinetry Modification Suggestions 30" Built-I n Convection Ovens Cut rail for filler panel Cut the rail out of finished material: • The width should match cabinet opening width. • The height of the top rail should be enough to securely attach the rail to the appearance panel, plus 1/4" oven trim overlap. • The height of the bottom rail should be enough to securely attach the rail to the appearance panel, plus 7/8" oven trim overlap.
Cabinetry Modification Suggestions 30" Built-I n Convection Ovens Cut and secure cleats to filler panel For the top filler panel: • Cut 2 cleats out of 3/4" thick material, approximately 1-1/4" wide. • Cut the cleats to a length leaving approximately 1/2" at the bottom of the appearance panel to attach the rail. • Position the outside edge and top of the cleat against the corner pencil marks. • Secure the cleat to the appearance panel with screws.
NOTE: While performing installations described in this book, safety glasses or goggles should be worn. To obtain specific information concerning any Monogram product or service, call GE Answer Center® consumer information service at 800.626.2000—any time, day or night. For Monogram local ser vice in your area, call 1-800-444-1845. ® Monogram. General Electric Company Louisville, KY 40225 NOTE: Product improvement is a continuing endeavor at General Electric.