GE Monogram® Installation Instructions Stainless Steel 36" Built-In Refrigerators and Freezers Models ZIRS36N LH - All Refrigerator ZIRS36N RH - All Refrigerator ZIFS36N LH - All Freezer ZIFS36N RH - All Freezer www.monogram.
Before you begin - Read these instructions completely and carefully. IMPORTANT - Save these instructions for local inspector’s use. IMPORTANT - OBSERVE ALL GOVERNING CODES AND ORDINANCES. Note to Installer - Be sure to leave these instructions with the Consumer. Note to Consumer - Keep these instructions with your Use and Care Book for future reference. WARNING This appliance must be properly grounded. See “Grounding the Refrigerator,” page 7. appareil doit être correctement mis à la terre.
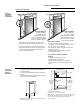
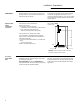
Design Information 36" Stainless Steel Refrigerators, Freezers Advance Planning Flush or Semi-Flush Enclosure Installations 0" 3/4" True Flush Installation In a flush installation, the refrigerator door will align evenly with the front face of adjacent cabinet doors. The refrigerator blends into the surrounding cabinetry. Monogram built-in refrigerators and freezers can be installed flush with typical 24-3/4" deep cabinetry.
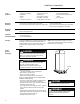
Design Information 36" Stainless Steel Refrigerators, Freezers *Finished Width Side By Side Installation Of Freezer And Refrigerator 2 1/2" 84" 7" 7" 5" 5" 24-3/4" 36" For a complete food storage center, install a Monogram Freezer and Refrigerator side by side. For even more capacity, install two refrigerators and on or two freezers. • Order ZFC1 Trim Kit to cover the side trim and/or gap between the two products.
Design Information 36" Stainless Steel Refrigerators, Freezers Installation At End-of-Run 1/2" Thick Side Panels Finished Dim. 36" Roughed-In Dim. 37" Refrigerator Cabinet Refrigerator door Refrigerator or Freezer Cabinet Note: 1/2" thick side panels shown. Side panels can be any thickness. Add side panel thickness to outside trim width, (36” or 72" for two models) to calculate the rough-in dimension. The leading (front) edge must be finished to match surrounding cabinetry.
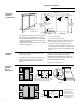
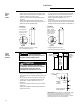
Installation Preparation 36" Stainless Steel Refrigerators, Freezers Clearances When installed into a corner: Allow 15" clearance on the hinge side for a 130° opening and full extension of bottom pans and pan removal. Two products installed side-by-side, both with hinges on left sides (or right sides) will require a 2" min. clearance between the products. The 2" min. separation will prevent one door handle striking the handle on the opposite product.
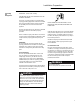
Installation Preparation 36" Stainless Steel Refrigerators, Freezers Grounding the Refrigerator IMPORTANT - (Please read carefully) FOR PERSONAL SAFETY, THIS APPLIANCE MUST BE PROPERLY GROUNDED. The power cord of this appliance is equipped with a 3-prong (grounding) plug which mates with a standard three-prong (grounding) wall receptacle to minimize the possibility of electric shock hazard from this appliance.
Installation Preparation 36" Stainless Steel Refrigerators, Freezers • • • • • Appliance hand truck Tubing cutter 7/16" open-end wrench #2 Phillips screwdriver Stubby Phillips screwdriver Tools Required • Tinsnips to cut banding • Stepladder • Bucket • Level • 1-1/4" open-end wrench Materials Required • 2x4, 35" long, for Anti-Tip support, see page 10 • Stick-on hook and loop fastener strips for 1/4" side panels Hardware Supplied • Copper waterline tubing • Water shut-off valve (optional but recomme
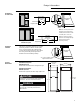
Installation 36" Stainless Steel Refrigerators, Freezers Step 2 Install Freezer Water Line • A cold water supply is required for automatic icemaker operation. The water pressure must be between 20 and 120 p.s.i. • Route 1/4" OD copper tubing between house cold water line and the water connection location. Floor • Copper tubing should be long enough to extend to the front of the freezer. Allow enough to accommodate bend leading into the water valve. Copper Tubing Shut off the main water supply.
Installation 36" Stainless Steel Refrigerators, Freezers Step 3 Install Side Panels • Side panels are required whenever the sides of the product will be exposed and when installed between frameless cabinets. See pages 3 and 4. • Side panels are not required when installed into an enclosure. • Side panel installation will be determined by the design of the side panel you have previously chosen. • Side panels must be installed plumb.
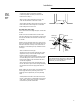
Installation 36" Stainless Steel Refrigerators, Freezers Step 5 Level Refrigerator Step 6 Secure Product to Sides These products have a 4-point leveling system. The front is supported by leveling legs, the rear is supported by wheels. • Adjust rear wheels beneath the product to just barely touch the 2x4 block. • Turn the 7/16" hex nut located above the front wheels. Turn to raise or lower. • For front leveling legs, use a 1-1/4" open-end wrench.
Installation 36" Stainless Steel Refrigerators, Freezers Step 8 Connect Power • Connect the power cord plug to properly grounded receptacle, accessible through the top left side of the hood opening. • Check to make sure power is on by opening the door to see if interior lights are on. Step 9 Mount Top Grille Panel For shipping purposes, the top case trim is secured at 84" installation height.
Installation 36" Stainless Steel Refrigerators, Freezers Step 11 Install Toekick • A standard toekick is supplied. Install with 2 screws provided, adjust to desired height and tighten screws. Important: The vented toekick must remain unobstructed for proper air circulation and operation. Step 12 Temperature Controls • Set temperature control at “5”. Step 13 Start Icemaker • Start the switch to I (on). The green light will come on and the icemaker will begin operation automatically.
ZFC1 Trim Kit Side by Side Installation For the ultimate in convenience, install a refrigerator and freezer side by side. This trim kit includes 6 foam spacer pads to fill the gap between the side case trims. For a finished appearance, a trim strip is provided to conceal the side case trim of the two products. If you are installing into an enclosure, provide a 72" wide opening. If you are installing where the sides will be exposed, allow additional width for any side panels used.
ZUGSS Trim Kit Unified Stainless Steel Custom Grille Panel Tools and materials Required: • #1 and #2 Phillips screwdrivers or sockets • 1/4" angled wrench and 1-1/2" open ended wrench • Drill and appropriate bits • Custom grille panel • Safety glasses • Gloves to protect against D sharp edges E Parts List: A. Soffit Vent Top B. Left Side Case Trim C. Right Side Case Trim D. Center U-Shape Trim E. Grill Base Wrap F. Stainless Steel Unified Panel G.
ZUGSS Trim Kit Unified Stainless Steel Grille Panel Step 2 Install Anti-Tip Brackets WARNING CAUTION ANTI-TIP PRECAUTIONS These products are heavy at the top and must be secured to prevent the possibility of tipping over. Soffit Brackets Block Required Height From Floor to Bottom of Wood Block ATTENTION PRECAUTIONS CONTRE LES BASCULEMENTS Le réfrigérateur est beaucoup plus lourd en haut et il faut le maintenir en place pour éviter la possibilité de son basculement vers l’avant.
ZUGSS Trim Kit Unified Stainless Steel Grille Panel Step 5 Install Center Trim Strip • Open doors fully. • Starting at the top, press trim strip over inside case trims of both products. • Continue pressing trim until you reach the bottom of the case trims. The trim will align with the top and bottom of the case trim. Case Trim U-Shape Trim Step 6 Remove Wire Fence and Switch Cover Remove 3 Screws • Remove 3 screws holding the wire fence on both products. Retain fences and all screws.
ZUGSS Trim Kit Unified Stainless Steel Grille Panel Step 7 Install Grille Base Cover Unified Base Cover Place Trim Over Hinges • Open doors fully. • Install the double width grille base cover by slipping the notched ends over the hinges. Install 3 Screws • Place wire fence over the grill base cover (textured side out). Drive original wire fence screws through the fence, the grille base cover and into the frame. Step 8 Remove Grille Frame • Back out 2 screws on each side of the top case trim.
ZUGSS Trim Kit Unified Stainless Steel Grille Panel Step 9 Install Soffit Vent Top Slip Dust Gasket Into Trim On One End • Separate the top and hinge side trim pieces by removing side screws. Discard top piece, retain screws. • Install one end piece to unified top piece with 2 original screws. • Slip end of rubber dust gasket into end of top unified piece and slide trim towards the center. Engage the second piece of gasket and continue sliding trim until even with opposite ends.
ZUGSS Trim Kit Unified Stainless Steel Grille Panel Step 11 Adjust Door Alignment Bushing Door Hin ge Case Hing e Raise Pin Shoulder Check door alignment. The top of the door should be parallel with the grille panel. If the door appears to be too high or too low on the handle side, adjustments can be made. • Use a 5/16" wrench to turn the hinge. • To raise the door, turn adjustable hinge pin towards the right. • To lower the door, turn hinge pin towards the left.
Notes 21
Notes 22
Notes 23
Note: While performing installations described in this book, safety glasses or goggles should be worn. For Monogram® local service in your area, call 1-800-444-1845. Note: Product improvement is a continuing endeavor at General Electric. Therefore, materials, appearance and specifications are subject to change without notice. Monogram. ® We bring good things to life. Pub. No. 49-60073-2 Part No. 197D3003P001 (N.D.