Installation Instructions If you have questions, call 800-GE-CARES or visit our website at: www.monogram.
Before you begin – Read these instructions completely and carefully. IMPORTANT – Save these instructions for local inspector’s use. IMPORTANT – OBSERVE ALL GOVERNING CODES AND ORDINANCES. Note to Installer – Be sure to leave these instructions with the Consumer. Note to Consumer – Keep these instructions with your Owner’s Manual for future reference. CAUTION WARNING This appliance must be properly grounded. See “Electrical Supply”, page 4. ATTENTION Cet appareil doit être correctement mis à la terre.
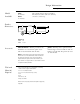
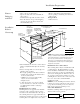
Design Information Warming Drawer Models Available The warming drawers may be installed directly into a wall or wall oven cabinetry, or below a countertop. ZTD910 30” Wide model ZKD910 27” Wide model Product Dimensions 27" 23-1/4" Drawer Open 1" 10-1/2" 9" 26" Including Handle A Dimension A ZTD910 30” ZKD910 26-3/4” Accessories ZXD27B, ZXD30B – This kit provides for the installation of a custom front panel on 27" and 30" black and white wide models. JXPN2 – Warming drawer pan kit.
Design Information Warming Drawer Advance Planning • The drawer may be installed below a countertop, a cooktop, a single or double oven and side by side using 2 drawers. • The warming drawer can be installed below approved cooktops. Allow 2" min. clearance from bottom of cooktop burner box to top of warming drawer cutout. See page 5. • The warming drawer can be installed below approved ovens. Allow a 2" min. clearance between cutouts. Additional clearances may be required. See page 6.
Installation Preparation Warming Drawer Remove Packaging and Parts Installation Below a Countertop • Remove all packing materials and tape. • Locate package containing 4 wood screws and set aside. Parts provided: • 4 Wood Screws • Place carton on a flat surface. • Open one end of the carton and lift off the top piece. • Lift the warmer up and out of the carton. • Place the drawer on top of the shipping carton to protect the drawer front and the finished flooring. Electrical Outlet 16" Max.
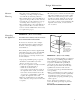
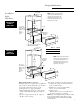
Design Information Warming Drawer 23-1/2" Min. Inside Installation Below Wall Ovens INSTALLATION BELOW A SINGLE OVEN NOTE: Additional clearance between cutouts may be required. Check to be sure that oven supports above the Warming Drawer location does not obstruct the required interior 23-1/2” depth and 9-1/4” height. Oven Cutout 2x2 or 2x4 Anti-Tip Block Against Rear Wall, 9" From Floor to Bottom of Block 2" Min. 9" Allow 5/8" Overlap on All Sides 9-1/4" 23-1/4" 10-1/2" A 1" Min.
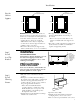
Installation Warming Drawer 2"x 4" or Equivalent Runners Provide Cabinet Support 23-1/2" 2"x 4" or Equivalent Runners 23-1/2" 22" 27" IMPORTANT: When installed below a single or double oven, check to be sure that any oven supports above the cutout do not obstruct the 23-1/2” required depth of the warming drawer cutout. • A 2" min. clearance between oven and warming drawer cutouts are required.
NOTE: While performing installations described in this book, safety glasses or goggles should be worn. For Monogram® local service in your area, call 1.800.444.1845. NOTE: Product improvement is a continuing endeavor at General Electric. Therefore, materials, appearance and specifications are subject to change without notice. Pub. No. 49-8937-2 Dwg. No.