Owner’s Manual Built-In Microwave/ Convection Oven ZMC1095 Series
Introduction Your new Monogram microwave/convection oven makes an eloquent statement of style, convenience and kitchen planning flexibility. Whether you chose it for its purity of design, practical cooking features or assiduous attention to detail—or for all of these reasons—you’ll find that your Monogram microwave/convection oven’s superior blend of form and function will delight you for years to come.
HELP US HELP YOU… Before using your oven, read this manual carefully. It is intended to help you operate and maintain your new microwave oven properly. Keep it handy for answers to your questions. If you don’t understand something or need more help, call: GE Answer Center ® 800.626.2000 24 hours a day, 7 days a week Write down the model and serial numbers. See the Features of Your Oven section for model and serial number location.
IMPORTANT SAFETY INSTRUCTIONS Read all instructions before using this appliance. When using electrical appliances, basic safety precautions should be followed, including the following: WARNING–To reduce the risk of burns, fire, electric shock, injury to persons or exposure to excessive microwave energy, follow basic precautions, including the following: • Read and follow the specific Precautions to Avoid Possible Exposure to Excessive Microwave Energy section on the previous page.
— Do not use the Sensor Features twice in succession on the same food portion. If food is undercooked after the first countdown, use MICRO COOK for additional cooking time. — Do not use the oven for storage purposes. Do not leave paper products, cooking utensils or food in the oven when not in use. — If materials inside the oven ignite, keep oven door closed, turn oven off, and disconnect power cord, or shut off power at the fuse or circuit breaker panel.
IMPORTANT SAFETY INSTRUCTIONS (continued) • Foods with unbroken outer ‘‘skin’’ such as potatoes, sausages, tomatoes, apples, chicken livers and other giblets, and egg yolks (see previous caution) should be pierced to allow steam to escape during cooking. SAFETY FACT—Superheated water. Liquids, such as water, coffee or tea, are able to be overheated beyond the boiling point without appearing to be boiling.
MICROWAVING TIPS • Make sure all cookware used in your microwave oven is suitable for microwaving. Most glass casseroles, cooking dishes, measuring cups, custard cups, pottery or china dinnerware which does not have metallic trim or glaze with a metallic sheen can be used. Some cookware is labeled ‘‘suitable for microwaving.
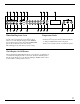
YOUR TOUCH CONTROL PANEL The touch control panel allows you to set the oven controls with the touch of a finger. It’s designed to be easy to use and understand. With your new oven, you have several cooking options. In addition to microwave or convection cooking, you have combination cooking, which uses both methods. Also sensor microwave cooking (Sensor Cook) and sensor microwave defrosting (Sensor Defrost), and sensor combination temperature cooking (Combination Roast).
1 2 3 4 5 12 13 14 15 16 6 7 17 18 8 9 10 19 20 21 11 22 23 24 When You Plug in the Oven Temperature Probe The panel displays “88888” on the upper portion and all of the oven functions on the lower portion. After 15 seconds, all lights disappear and ‘‘RESET’’ appears in the upper portion. Touch the CLEAR/OFF pad, set the clock and oven is ready for use. This will happen any time there is a power outage.
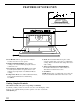
FEATURES OF YOUR OVEN 4 5 Do not use for microwave-only cooking. 6 3 7 2 1 1. Door Handle. Pull to open door. Door must be securely closed for oven to operate. 2. Window with Metal Shield. Screen allows cooking to be viewed while keeping microwaves confined in oven. 3. Receptacle for Temperature Probe. Probe must be securely inserted into receptacle before oven will start any temperature or Combination Roast cooking. 4. Temperature Probe.
WHAT YOUR OVEN CAN DO Cooking with your new oven offers a wide variety of food preparation options. Microwave cooking uses very short, high frequency radio waves. The movement of the microwaves through the food generates heat and cooks most foods faster than regular methods, while retaining their natural texture and moisture. Microwave cooking heats food directly, not the cookware or the interior of the oven.
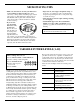
COOKWARE AND ACCESSORIES Cookware Microwave Convection Combination Heat-Resistant Glass, Glass-Ceramic (Pyrex,® Fire King,® Corning Ware,® etc.) YES YES YES Ceramic (Cookware with no metal trim) YES YES YES Metal NO YES NO Non Heat-Resistant Glass NO NO NO Microwave-Safe Plastics YES NO YES* Plastic Films and Wraps YES NO NO Paper Products YES NO NO Straw, Wicker and Wood YES NO NO *Use only microwave cookware that is safe to 400°F.
HOW TO USE THE KITCHEN TIMER The Kitchen Timer Using a Holding Time The Kitchen Timer has 3 timing functions: • It operates as a minute timer. • It can be set to delay cooking. • It can be used as a hold setting after defrosting. The Kitchen Timer operates without microwave energy. The Kitchen Timer can also be used to program a “holding time” between microwave cooking functions. The time can range from 1 second to 99 minutes and 99 seconds.
COOKING BY TIME Micro Cook I Micro Cook allows you to microwave for a preset amount of time. Power Level 10 (High) is recommended for most cooking, but you may change this for more flexibility. See the Cooking Guide. To become better acquainted with time cooking, make a cup of coffee by following the steps below. Step 1: Fill a cup 2/3 full of water, add 1 teaspoon of instant coffee and stir to dissolve. Use a cup that has no metal decoration and is microwavesafe (refer to Microwaving Tips section).
The Express Cook Feature The Express Cook feature is a short-cut method to set time for 1-5 minutes at Power Level 10. To Express Cook your food or beverage: Touch a number pad (from 1 to 5) for 1 to 5 minutes of cooking at Power Level 10. For example, touch the 2 pad for 2 minutes of cooking time. No need to touch START, the oven will start immediately. The oven will signal and turn off automatically when finished.
DEFROSTING BY TIME Time Defrost (Power Level 3) Time Defrost is designed for speedy thawing of frozen food and is one of the great advantages of a microwave oven. Use the Time Defrost setting to quickly thaw foods such as bread, rolls, vegetables, fruits and frozen dinners. The Auto Defrost setting is preferred for meat and poultry because the oven sets the defrosting time and power levels for you.
COOKING BY TEMPERATURE Internal temperature is the best test of doneness for many foods. Use Temp Cook/Hold to cook a variety of foods to the desired finished food temperature. The Micro Cook setting is recommended for batters, doughs, frozen foods and foods which are difficult to cook precisely with the probe.
AUTO DEFROST Auto Defrost With the Auto Defrost feature, the oven automatically sets the defrosting times and power levels for you. Use the Auto Defrost Guide. Enter the food weight in pounds and tenths of a pound (see Conversion Guide below). Then touch START pad. The oven calculates defrosting time and changes power levels during defrosting to give even defrosting results. How to Set Auto Defrost Before you begin, check the Auto Defrost Guide located in this section.
AUTO DEFROST GUIDE RECOMMENDED FOODS MIN.–MAX. WEIGHT FIRST SIGNAL SECOND SIGNAL STAND TIME Chops 0.1 - 6.0 lbs. Turn over. Separate and shield where necessary. 5 minutes Frankfurters, Sausage 0.1 - 6.0 lbs. Separate. Remove defrosted pieces. 2 minutes Ground Meat 0.1 - 6.0 lbs. Turn over. Remove defrosted areas and break apart. 5 minutes Beef Patties 0.1 - 6.0 lbs. Turn over. Separate patties. 5 minutes Roast 0.1 - 6.0 lbs. Turn over and shield. Shield if necessary.
SENSOR POPCORN NOTE: Do NOT use the metal shelf with the Sensor Popcorn program. NOTE: Do not use this feature twice in succession on the same food portion—it may result in severely overcooked or burnt food. The Sensor Popcorn feature is designed to be used only with prepackaged microwave popcorn weighing 3.0 to 3.5 ounces. Step 1: Remove the outer wrapper from the microwave popcorn. Step 2: Open oven door and place package of popcorn in the center of the oven floor as directed by the package instructions.
SENSOR REHEAT Sensor Reheat is designed for reheating single serving sizes of previously prepared foods. With many leftovers, there is no need to look up reheating times in a cookbook or to rely on guesswork. By actually sensing the steam that escapes as food heats, this feature automatically adjusts the oven’s heating time to various types and amounts of precooked food.
SENSOR COOK The Sensor Cook feature makes cooking your favorite foods easy. By actually sensing the steam that escapes as food cooks, this feature automatically adjusts the oven’s cooking time to various types and amounts of food. Because most cooking containers must be covered during Sensor Cook, this feature is best with foods that you want to steam or retain moisture. Foods Recommended Foods Not Recommended A wide variety of foods including meats, fish and vegetables can be cooked using this feature.
SENSOR REHEAT AND SENSOR COOK CONTAINERS AND COVERS Containers and Covers Appropriate containers and coverings help assure good cooking results. • Always use microwave-safe containers and cover them with lids or vented plastic wrap. Wonder if it’s microwave-safe? Put it to the test described in the Microwaving Tips section. • Never use tight-sealing plastic covers—they can prevent steam from escaping and cause food to overcook. • Match the amount of food to the size of the container.
CONVECTION TIME COOKING During convection cooking, a heating element is used to raise the temperature of the air inside the oven. A fan gently circulates this heated air throughout the oven, over and around the food, producing golden brown exteriors and rich, moist interiors. Because the heated air is kept constantly moving, not permitting a layer of cooler air to develop around the food, some foods cook faster than in regular oven cooking.
CONVECTION TEMPERATURE COOKING You can also convection cook with the temperature probe, to assure that foods are cooked precisely to the degree of doneness desired, while the constantly circulating hot air assures even cooking and delicious browning. The temperature probe monitors the internal temperature of the food and turns the oven off automatically when the desired temperature is reached. For best results 1. Place the shelf on the oven floor. 2.
COMBINATION TIME COOKING Combination cooking offers the best features of microwave energy and convection cooking. Microwaves cook food fast and convection circulation of heated air browns foods beautifully. For best results 1. Place the shelf on the oven floor. 2. Allow at least 1″ between the pan and the walls of the oven. 3. When converting your favorite recipe from regular oven cooking to combination cooking, lower the oven temperature 25–35° and check at minimum time.
COMBINATION TEMPERATURE COOKING With this function of your new oven, you can enjoy the benefits of combination cooking with the precision of the temperature probe. The probe makes it simple to cook to the exact degree of doneness desired, by monitoring the internal temperature of the food. This function is exactly like combination time cooking except you set internal food temperature desired instead of cooking time. For best results 1. Place the shelf on the oven floor. 2.
COMBINATION ROAST Combination Roast is a combination function which is similar to combination temperature cooking, using both microwave and convection cooking in conjunction with the temperature probe. However, the Combination Roast feature eliminates most of the steps necessary to program combination temperature cooking. The metal shelf must be in place on the oven floor when using convection or combination cooking. The food is placed in a glass dish on a trivet for cooking during Combination Roast.
Questions and Answers Q. When I cook poultry, the thin, small areas like legs and wings often overcook before the rest of the bird is thoroughly cooked. How can I prevent this? A. Thin, uneven portions of poultry may be shielded with aluminum foil during cooking. Do not allow foil to touch shelf or oven sides, arcing may occur. Q. Usually my temperature probe gives very accurate results, but this time it didn’t. What happened? A.
COOKING REFERENCE GUIDE This is a Quick Reference to guide you in selecting the best method of cooking. Specific recipes can be adapted to any method of cooking.
CARE AND CLEANING An occasional thorough wiping with a solution of baking soda and water keeps the inside fresh. Don’t use sharp-edged utensils on your oven. The inside and outside oven walls can be scratched. The control panel can be damaged. BE CERTAIN POWER IS OFF BEFORE CLEANING ANY PART OF THIS OVEN. How to Clean the Inside Walls and floor. Some spatters can be removed with a paper towel, others may require a damp cloth. Remove greasy spatters with a sudsy cloth, then rinse with a damp cloth.
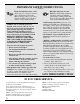
GROUNDING INSTRUCTIONS This appliance must be grounded. In the event of an electrical short circuit, grounding reduces the risk of electric shock by providing an escape wire for the electric current. This appliance is equipped with a power cord having a grounding wire with a grounding plug. The plug must be plugged into an outlet that is properly installed and grounded. (Fig. 1) WARNING —Improper use of the grounding plug can result in a risk of electric shock. PREFERRED METHOD Fig.
QUESTIONS? USE THIS PROBLEM SOLVER PROBLEM POSSIBLE CAUSE OVEN WILL NOT COME ON • A fuse in your home may be blown or the circuit breaker tripped. Replace fuse or reset circuit breaker. • Set the circuit breaker to the off position. Wait 30 seconds. Reset the circuit breaker to the on position. CONTROL PANEL LIGHTED, YET OVEN WILL NOT START • Door not securely closed. • START pad must be touched after entering cooking selection.
With the purchase of your new Monogram appliance, receive the assurance that if you ever need information or assistance from GE, we’ll be there. All you have to do is call—toll- free! GE Answer Center ® 800.626.2000 Whatever your question about any Monogram major appliance, GE Answer Center® information service is available to help. Your call—and your question—will be answered promptly and courteously. And you can call any time. GE Answer Center® service is open 24 hours a day, 7 days a week.
YOUR GE MICROWAVE/ CONVECTION OVEN WARRANTY WHAT IS COVERED Staple sales slip or cancelled check here. Proof of original purchase date is needed to obtain service under warranty. FULL ONE-YEAR WARRANTY For one year from date of original purchase, we will provide, free of charge, parts and service labor in your home to repair or replace any part of the microwave/convection oven that fails because of a manufacturing defect.
164D3370P292 49-40362 06-03 JR Printed in Korea