Monogram. Use and Care Guide for 48” Built-In Refrigerator 1993 Mompam.
Introduction Your new Monogram refrigerator makes an eloquent statement of style, convenience and kitchen planning flexibility. Whether you chose it for its purity of design, practical storage arrangements or assiduous attention to detail—or for all of these reasons—you’ll find that your Monogram refrigerator’s superior blend of form and function will delight you for years to come. The Monogram refrigerator was designed to provide the flexibility to blend in with your kitchen cabinetry.
Read this book carefully. It is intended to help you operate and maintain your new refrigerator properly. Keep it handy for answers to your questions. If you don’t understand something or need more help, write (include your phone number): Consumer Affairs GE Appliances Appliance Park Louisville, KY 40225 Write down the model and serial number. You’ll see them on a label on the right side, near the bottom of the fresh food compartment.
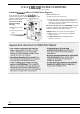
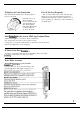
OPEMT~G YOUR REFWGEMTOR Set Temperature Controls Your refrigerator has two controls that let you regulate the temperature in the fresh food and freezer compartments. ::;::ffl:!~ FRESH FOOO — They have settings from 1 through 9, and are located at the top of the fresh food compartment. The freezer control also has an OFF setting. 9 is the coldest setting, 1 is the warmest. 5 IS NORMAL E 91 SCOLDEST FREEZER WHEN YOU FIRST TURN THE REFMGERATOR ON, SET BOTH CONTROLS AT 5.
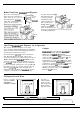
ICE & CH~LED WATER DISPENSER (on some models) Automatic Icemaker and Ice & Chilled Water Dispenser Some models have an automatic icemaker and a dispenser that dispenses chilled water, ice cubes and crashed ice through the freezer compartment door. Here’s how they work. Water flows from the household supply through a (1) dual solenoid valve to the (2) water reservoir and to the (3) automatic icemaker as needed.
Before Using Your Icemaker and Dispenser If you use your refrigerator Ice access before the water connection is door made, raise the ice access door w I and make sure the icemaker Icemaker feeler arm is in the STOP (up) position as shown below. 9 Ice cube mold automatic fills with water after cooling to freezing temperatures. First cubes normally freeze after several hours.
ICE & CH~LED WATER DISPENSER (continued) When Dispensing Ice... When Dispensing Water... Some crushed ice may be dispensed even though you selected CUBED. This happens occasionally when a few cubes accidentally get channeled to the crusher. Sometimes a mound of snow will form on the door in the ice chute. This condition is normal, and usually occurs when you have dispensed crushed ice repeatedly. The snow will eventually evaporate.
To Replace Ice Cube Storage Bin If Ice Is Not Used Frequently . . . Slide the bin back until the tab on the bin locks into the slot in the shelf. If the bin does not go all the way back, remove it and rotate the drive mechanism 1/4 turn. Then push bin back again until the tab on the bin locks into the slot in the shelf. “Old” ice cubes will become cloudy and taste stale. Empty ice storage bin periodically and wash it in lukewarm water.
FOOD STOMGE SUGGESTIONS Suggested storage times for meat and poultry* Eating quality drops after time shown DAYS IN MONTHS IN REFRIGERATOR FREEZER AT 35° to 40”F. AT OOF. Fresh Meats DAYS IN MONTHS IN REFRIGERATOR FREEZER AT 35o to 40°F. AT O°F. Cooked Meats Roasts (Beef & Lamb) ,........3 to 5 Roasts (Pork & Veal) ...........3 to 5 Steaks (Beef) .......................3 to 5 Chops (Lamb) ......................3 to 5 Chops (Pork) .......................
STOMGE DMWERS Fruit and Vegetable Drawers The storage drawers at the bottom of the fresh food compartment are designed to provide high humidity levels required by most vegetables and lower humidity levels required for most fruits. When replacing the drawers, always push them all the way in. Storage time will depend upon the type of food and its condition when placed in the drawers. Excess water that you may find in the bottom of the drawers should be emptied and the drawers wiped dry.
SHELVES How to Rearrange Your Shelves Adjustable Shelves in Both Compartments Tempered glass shelves in the fresh food compartment and steel wire shelves in the freezer compartment are adjustable, enabling you to make efficient shelf arrangements to fit your family’s food storage needs. o 0 o 1 n 0 0 I Inl To remove shelves: Tilt shelf up at front, then lift it up and out of tracks on rear wall of refrigerator. To replace shelves: Select desired shelf height.
CAm Am CLEAN~G Cleaning—Oubide The water and ice dispenser spill shelf should be wiped dry immediately to prevent spotting. Water left on the shelf may leave deposits that you can remove by soaking in undiluted vinegar. You can also use a paste of non-precipitating water softener (such as Calgon brand) and water, or one teaspoon of citric acid powder per pint of hot tap water. Soak until the deposit disappears or becomes loose enough to rinse away. Usually 30 minutes soaking time is adequate.
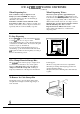
CA~ Am CLEANING (continued) Condenser To clean the condenser fins: First turn off the power at the circuit breaker or fuse box. Wait about 30 minutes for the condenser area to cool. Then remove the decorative panel by lifting up and toward you. Condenser fins Grille 14 _ Condenser fins rille Use a soft bristle brush to loosen dust and lint on the condenser fins. Use a vacuum hose to remove soil. After cleaning: Reconnect power at the fuse box or circuit breaker. Replace the decorative panel.
Light bulb replacement in the fresh food compartment There are upper and lower light bulbs in the fresh food compartments. To replace a bulb: 1. Turn off power at the circuit breaker or fuse box. 2. Remove the light shield from the top fresh food light by pushing the front end up and pulling it toward you to release it from the rear retaining lip. (It may bend slightly.
CAm Am CLEAN~G (continued) Drawer and Cover Removal Drawers at the bottom of the fresh food compartment will stop before coming all the way out of the refrigerator, to help prevent contents from spilling onto floor. These drawers can be removed easily by grasping the sides and lifting up slightly while pulling drawer past “stop” location. 1. Remove food from the shelf above the upper drawer and take out the shelf. 2. Pull the upper drawer forward and lift the front to clear the stops.
~STALLATION ~QUI~MENTS WORTANT...Pleme Read Careftiy. How to connect electricity For personal safety, this appliance must be properly grounded. The power cord of this appliance is equipped with a three-prong (grounding) plug which mates with a standard three-prong (grounding) wall outlet (Fig. 1) to minimize the possibility of electric shock hazard from this appliance. I Fig.
QUESTIONS? USE THIS PROBLEM SOLVER PROBLEM 18 I POSSIBLE CAUSE
PROBLEM [ POSSIBLE CAUSE (continued next page) 19
PROBLEM SOLVER (continued) If you need more help... call, toll free: GE Answer Centerm 800.626.
NOTES 21
With the purchase ofyour new Mono~am appliance, receive the assurance that ifyou ever need information or assis~nce from GE, wdll be there. All you have to do is call—toll-free! In-Home Repair Service 800-GE-CARES (800432-2737) consumer service professional will provide expert repair service, scheduled at a time that’s convenient for you. Many GE Consumer Service company-operated locations offer you service today or tomorrow, or at your AGE convenience (7:00 a.m. to 7:00 p.m. weekdays, 9:00 a.m.
YOUR MONOGRAM REFRIGERATOR WARRANTY Save proof of original purchase date such as your sales slip or cancelled check to establish warranty period.
P“b. No. 49-6719 PdNo.