Mono~am. Use and Care Guide for ZW2000 Series Built-In Microwave @en Mowgam.
Introduction — Your new Monogram microwave oven makes an eloquent statement of style, convenience and kitchen planning flexibility. Whether you chose it for its purity of design, practical cooking features or assiduous attention to detail—or for all of these reasons—you’ll find that your Monogram microwave oven’s superior blend of form and function will delight you for years to come. The Monogram microwave oven was designed to provide the flexibility to blend in with your kitchen cabinetry.
Before using your oven, read this book carefdly. It is intended to help you operate and maintain your new microwave oven properly. Keep it handy for answers to your questions. If you don’t understand something or need more help, write (include your phone number): Consumer Affairs GE Appliances Appliance Park Louisville, KY 40225 If you received a damaged oven... Immediately contact the dealer (or builder) that sold you the oven. Write down the model and serial numbers.
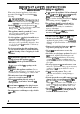
MPORTANT SA~TY INSTRUCTIONS Read M tistmctiom before wing this apphmce. When using electrical appliances, basic safety precautions should bu followed, including the following: A WARNING-Toreducetheriskof ● ● ● ● ● burns, electric shock, fire, injury to persons or expostire to excessive microwave energy: Read and follow the specific Precautions to Avoid Possible Exposure to Excessive Microwave Energy section on the previous page. This appliance must be grounded.
without their lids; especially meat and egg mixtures. e ~~BoiIable” cooking pouches and tightly dosed plastic bags should be slit, pierced or vented as directed by package. If they are not, @astic could burst during or immediately after rooking, possibly resulting in injury. Also, plastic storage containers should be at least partially uncovered becattse they forma ti~ht seal. When cooking with containe~s tightly c;vered wiith #astic wrap, remove covering carefully and &ect steam away from hands and face.
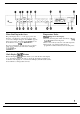
FEATURES OF YOUR OWN Cooking Complete Reminder (For all defrost and cook cycles except Temp Coo~old) To remind you that you have food in the oven, the oven will display “End” ‘and beep once a minute until you either open the oven door or touch the CLEAWOFF pad. = 9 1.0 Cubic Foot Oven Interior 4 / 1. Door Handle. Pull to open door. Door must be securely closed for oven to operate. 2. Window with Metal Shield. Screen allows cooking to be viewed while keeping microwaves confined in oven. 3.
YOUR TOUCH CONTROL PANEL — The Touch Control Panel allows you to set the oven controls with the touch of a finger. It’s designed to be easy to use and understand. 1. TIME COOK. Microwave for a preset amount of time using automatic power level 10 or change power level after setting time. 2. AUTO DEFROST. Touch this pad, then code number and food weight. The oven automatically sets power levels and defrosting time. 3. POWER LEVEL.
When You Plug in the Oven Temperature Probe The panel displays five 8’s on the upper portion and all of the oven functions on the lower portion. After 15 seconds, all lights disappear and “RESET” appears in the upper portion. Touch the CLEAWOFF pad, set the clock and oven is readv. for use. If power is disrupted at any time, the above sequence recurs, and you must reset clock after touching the CLEAWOFF pad.
HOW TO USE THE M~UTE/SECO~ TMER The Minute/Second Timer Using a Holding Time The Minute/Second Timer has three timing functions: It operates as a minute timer. It can be set to delay cooking. It can be used as a hold setting after defrosting. The Minute/Second Timer operates without microwave energy. ● The Minute/Second Timer can also be used to program a “holding time” between microwave cooking functions. The time can range from one second to 99 minutes and 99 seconds.
COO~NG BY TME Time Cook Time Cook allows you to microwave for a selected amount of time. Power level 10 (High) is recommended for most cooking, but you may change this for more flexibility. To become better acquainted with time cooking, make a cup of coffee by following the steps below. Step 1: Fill a cup 2/3 full of water, add 1 teaspoon of instant coffee and stir to dissolve. Use a cup that has no metal decoration and is microwave-safe (refer to Microwaving Tips section). Place cup in oven and close door.
COO~NG BY T~E (continued) The Express Cook Feature The Express Cook feature is a short-cut method to set time for 1-5 minutes. To Express Cook your food or beverage: Step 1: Touch a number pad (from 1 to 5) that corresponds with the amount of your desired cooking time (in minutes). For example, touch the 2 pad for 2 minutes of cooking time. Step 2: Touch the START pad. The oven will automatically signal, flash “End” and shut off at the end of the programmed time.
PoPcom NOTE: Use of the metil she~ with the Popcorn program is NOT recommended. The Popcorn feature is designed to be used only with prepackaged microwave popcorn weighing 3.0 to 3.7 ounces. Step 1: Remove the outer wrapper from the microwave popcorn. Step 2: Open oven door and place package of popcorn in the center of the oven floor as directed by the package instructions. Close oven door. Step 3: Touch POPCORN pad. POPCORN n START Step 4: Touch START.
COOmG BY TE~EWTU~ Internal temperature is the best test of doneness for many foods. Use Temp Coo~old to cook a variety of foods to the desired finished food temperature. The Time Cook setting is recommended for batters, doughs, frozen foods and foods which are difficult to cook precisely with the probe. Temp CootiHold takes the guesswork out of cooking, because the oven automatically switches to “Hold” setting after reaching the preset food temperature from 90°F. to 199°F.
How to Temp Cook a Rolled Beef Rib Roast to Medium Step 1: Insert temperature probe and attach probe securely in oven wall. Close the door. Step 2: Touch TEMP COOW TEMP COOK HoLD pad. HOLD n I I Step 3: Touch 1,5 and O for 150°F. POWER LEVEL Step 5: Touch START. If internal temperature of the roast is less than START 90°F., display will show “COOL”; if temperature is 90°F. or above, n display shows temperature counting up. Step 6: When 150°F. is reached, the oven will sound and-display “HOLd.
AUTO DEFROST — Auto Defrost With the Auto Defrost feature, Use the Auto Defrost Guide. the oven automatically sets the defrosting times and power levels for you. Enter the food weight in pounds and tenths of a pound (see Conversion Guide). Then touch the START pad. The oven calculates defrosting time and changes power levels during defrosting to give even defrosting results. How to Set Auto Defrost Ste~. 1: Remove food from package, place in oven on microwave-safe dish and cl~se do;r.
AUTO DEFROST GU~E 1. Unwrap item being defrosted. 2. Place roasts and whole poultry on trivet in microwave-safe dish. Check food for warm spots halfway through defrosting, and shield these areas with small pieces of foil. RECOMMENDED FOODS Chops MIN.–MAX. WEIGHT I 0.1- 6.Olbs. F r a n k f u r t e r s , Sausage I 0.1- 6.0 lbs. Ground Meat I Beef Patties I 0 . 1 -6.Olbs. 0.1 -6.0 Ibs. INSTRUCTIONS STAND TIME I Separate. turnoverandshield where necessary.
AUTO~TIC ROAST~G Auto Roast uses the temperature probe to cook to the desired serving temperature. Unlike Temp Coo~old, which uses a single power level, Auto Roast uses up to 3 power settings which automatically switch during roasting, thus providing even, tender cooking results without overcooking. Just as in regular roasting, only tender roasts should be Auto Roasted until specified internal temperatures are reached. Less tender roasts should be microwaved by time.
Auto Roast Guide ● Place meats in a cooking bag in microwave-safe dish. (Refer to package ~nstfictions for proper use of cooking bag.) Food Recommended codes are shown below. “ Insert probe as described elsewhere in this section. ● Minimum Final Approx. Time Hold* Code Temp. (minutes per pound) Minutes Doneness Display 1 2 160°F. 170°F. 13-15 15-17 0 5-1o MEd WELL 10 WELL 10-15 WELL Beef (5 lb. max.) Tender Roast Medium Well I Pork (5 lb. max.) Loin Roast 2 I 170°F.
DEFROSTING BY T~E Time Defrost (Power Level 3) Time Defrost is designed for speedy thawing of frozen food and is one of the great advantages of a microwave oven. Use Time Defrost to quic~y thaw foods such as bread, rolls, vegetables, fruits and frozen dinners. The Auto Defrost setting is prefened for meat and poultry because the oven sets the defrosting time and power levels for you. Power level 3 is automatically set when you press TIME DEFROST pad, but you may change this for more flexibility.
AUTO ~HEAT Auto Reheat lets you touch just 2 pads to bring previously prepared foods to serving temperature. Whh many leftovers there is no need to rely on guesswork. By actually sensing the steam that escapes as food heats, this feature automatically adjusts the oven’s heating time to various types and amounts of pre-cooked food. Because all cooking containers must be covered during automatic reheating, this feature is best with foods you want to steam or retain moisture.
AUTO(continued) ~~AT Questions & Answers Q. Mmy food is not completely reheated after using Auto Reheat, what should I do? A. Use Time Cook to reheat for additional time until desired temperature is reached. Q. What if I don’t fully cover the dish in Auto Reheat? A. Oven senses steam too quickly, which shortens the reheating time and leaves food too cool. Cover tightly and reset Auto Reheat. AUTO COOK The Auto Cook feature may be used to eliminate your need to guess how long to set cooking time.
Auto Cook Codes Auto Cook codes 1 through 8 are designed to give you easy automatic results with a number of foods. Code 1, designed for reheating foods quickly, turns the oven off automatically as soon as the sensor detects steam from the foods. When codes 2 through 8 are selected, the oven determines how much additional cooking time is needed after steam has been sensed, automatically switches to ~E COOK and signals.
AUTO~TIC COOmG CONTROL GU~E ● ● ● ● Do not open oven door during Auto cycle. When oven signals and countdown time is displayed, door may be opened for stirring, turning or rotating food. To resume cooking, close door and touch START. Match the amount of food to the size of container. Fill containers at least 1/2 full. Add 1/4 to 1/2 cup water to fresh vegetables. Foods should be covered with lid to dish or vented plastic wrap to prevent spattering to keep oven clean.
Food Casseroles Pre-cooked ingredients in sauce, such as tuna noodle, turkey tetrazzini, and franks and beans Auto Cook Code Container Approx. Time Comments 6 1X- to 3-qt. casserole with lid 20 to 30 min. When oven signals, stir if necessary. 7 1X- to 3-qt. casserole with lid 40 to 55 min. When oven signals, stir if necessary. 5 2-qt. oblong glass baking dish 8 to 24 min. Cover with plastic wrap. Whole chicken (Up to 3 lbs.) 8 2-qt. oblong glass baking dish 30 to 40 min.
AUTOWTIC COO~G CONTAINERS & CO~RS Containers and Covers Appropriate containers and coverings help assure good cooking results. Always use microwave-safe containers and cover them with lids or vented plastic wrap. Wonder if it’s microwave-safe? Put it to the test described in the Microwaving Tips section. Never use tight-sealing plastic covers—they can prevent steam from escaping and cause food to overcook. ● ● ● ● ● Match the amount of food to the size of the container.
GUmE TO USE OF T~ OVEN S~LF ● ● ● ● ● Use the shelf only when cooking food on 2 levels. Food microwaves best when placed directly on the oven floor. W not store or cook with metal shelf on floor of oven. Product damage may result. Use pot holders when handling metal shelf and cookware. They may be hot. h not store microwave browning dish on metal shelf. Use of shelf with the Auto Cook, Auto Reheat or Popcorn program is not recommended.
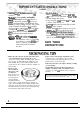
GROUND~G mSTRUCTIONS This appliance must be grounded. In the event of an electrical short circuit, grounding reduces the risk of electric shock by providing an escape wire for the electric current. This appliance is equipped with a power cord having a grounding wire with a grounding plug. The plug must be plugged into an outlet that is properly installed and grounded. (Fig. 1) wARNING–Improper use of the grounding plug can result in a risk of electric shock. PREFERRED METHOD @@ + R Fig.
CLEAN~G GU~E NOTE: Let oven parts cool before touching or handling. PART Stainless Steel Oven Interior –Side Walls Only –Ceiling MATERIALS TO USE Damp Cloth Plastic Scouring Ball ● ● GENERAL DIRECTIONS Clean with mild detergent and water, then rinse well with damp cloth. If desired, a container of water can be boiled in the oven using microwave energy. This will help loosen soil. For hard-to-remove soil, clean gently with scouring ball.
O~N LIGHT ~PLACEMENT Oven Light To replace your oven light, first dismnnect power at main fuse or circuit breaker panel or pull plug. Step 1: Open the oven door. Step 2: Remove the front grille by taking-out the 2 screws that hold it in place. 30 Step 3: Rotate the light bulb housing out and toward YOU tO access the light bulb. Replace the burned-out bulb with a 40-watt incandescent bulb (WB02X4253) available from your GE supplier.
QUESTIONS? USE THIS PROBLEM SOLVER PROBLEM POSSIBLE CAUSE OV~N WmL NOT * A fuse in your home may be blown or the ~ircuit breaker tiipped. Replace fuse or reset circuit breaker. Set the circuit breaker to the off position. Wait 30 seconds. Reset tbe circuit breaker io the on position. * Duar not securely closed. START pad must be touched after entering cooking selection. Another selection entered tieady i~ oven and CLEAWOFF pad nut toucbed to cancal it.
NOTES 32
NOTES
Witi the purchase ofyour new Mono~am appliance, receive the assurance that ifyou ever need information or assistance from GE, we’ll be there. All you have to do is call—toll-free! In-Home Repak Service 80WEXARES(80M32-2737) AGE consumer service professional will provide expert repair service, scheduled at a time that’s convenient for you. Many GE Consumer Service companyoperated locations offer you service today or tomorrow, or at your convenience (7:00 a.m. to 7: OOp.m. weekdays, 9:00 a.m. to 2:00 p.m.
I I YOUR MONOGRAM MICROWAVE OVEN WARRANTY Save proof of original purchase date such as your sales slip or cancelled check to establish warranty period. WHAT IS COVERED FULL ONE-YEAR WARRANTY For one year from date of original purchase, we will provide, free of charge, pans and sewice labor in your home to repair or replace any pad of the mjcrowave oven that fails because of a manufacturing defect.
P“b. No. 494328 Part No.