
User Manual


8
Dishwasher Installation
CONNECT DRAIN LINE
(CONT.)
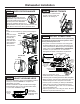
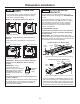
• Connect drain line to air gap, waste tee or disposer
using the previously determined method. Secure
hose with a screw-type clamp.
Method 1 – Air gap with waste tee or disposer
Method 2 – “High drain loop” with waste tee or
disposer
Fasten drain hose to underside of countertop with a
hanger.
IMPORTANT – Either one of the above methods
must be used or dishwasher will not operate
properly.
IMPORTANT – When
connecting drain line to
disposer, check to be sure that
drain plug has been removed.
DISHWASHER WILL NOT
DRAIN IF PLUG IS LEFT IN
PLACE.
Tip: Avoid unnecessary service call charges for a
no drain complaint.
Make sure excess drain hose has been pulled through
the cabinet opening. This will prevent excess hose
in the dishwasher cavity from becoming kinked or
crushed by the dishwasher.
Waste Tee Installation
Disposer Installation
Remove
Drain
Plug
STEP 8
18"
Min.
32"
Min.
Drain Hose Hanger
Waste Tee Installation
18"
Min.
32"
Min.
Drain Hose Hanger
Disposer Installation
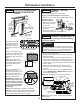
INSTALL MOUNTING
BRACKETS
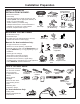
You will need the mounting brackets and 4 of the
Phillips-Head screws set aside in the PREPARATION
section.
You must install the mounting brackets onto the
dishwasher tub frame top OR sides prior to sliding
the dishwasher into place under the countertop.
The mounting brackets have several available
attachment positions to accommodate different
cabinet constructions.
TOP MOUNTING OPTION
Install mounting brackets on top if the underside
of countertop is wood or wood-like material that
accepts screws:
IMPORTANT - After installing brackets and before
closing dishwasher door, adjust the brackets by bending
them up as needed, so that they do not contact the top
of dishwasher door and cause damage.
• If you are installing the dishwasher under a counter
with a short overhang, the countertop brackets may
extend beyond the edge of the counter. If this is the
case, remove the excess length by repeatedly bending
the brackets at the front notch only until they break.
STEP 9
Phillips
Screws
Bend and break at cutout slots in brackets (if/as necessary)
on both sides after installing if counter has a short overhang.
Phillips
Screws
Bracket
Bracket
Top Mounting for 18” Models Only
Phillips
Screws
Phillips
Screws
Bracket
Bracket
Top Mounting for 24” Models Only
Bend and break at cutout slots in brackets (if/as necessary)
on both sides after installing if counter has a short overhang.