
Installation Guide


15
About t he aut omatic ice maker. (cont ) GEAp p l i a nces.com
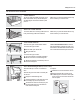
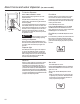
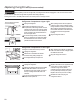
Rem o v i n g I ce Bi n (dispenser models)
CAUTION
Th e i c e b i n i s h ea v y w h en f u l l .
Se t t he p o w e r s w it ch t o t h e OFF position before removing the
bin.
When replacing the bin, be sure to press it firmly into place. If
it does not go all the way back, remove it and rotate the drive
mechanism 1/4 turn. Then push the bin back again.
Ro t a t e
Drive
Mechanism
Dispenser Models only
L i f t t h e b i n , t h e n p u l l i t f o r w a r d
until the bin stops.
L o w e r t h e b i n t o a c c e s s i c e o r
reach the power switch.
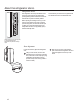
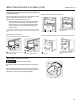
Models with tilt out ice bin
To access i ce a nd r ea ch t h e i cem ak er p ow er sw i t ch:
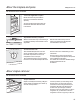
Accessing Ice and Reaching the Power Switch on
Dispenser Models
Ther e ar e t w o t ypes of i ce st or age bins on di sp enser mod el s.
One ha s a sh el f abo ve t he bi n, t he ot h er d oes n ot .
Sp e ci a l n o t e f o r m od e l s w i t h t i l t - ou t i c e b i n :
Th e s e m o d e l s h a v e a t i l t - o u t i c e b i n . Th e b i n c a n b e t i l t e d
out as shown in the illustrations, and it will hold itself up
while you take ice out or turn the icemaker power switch
on and off. Be sure to put the bin back in place before
closing the door.
NOTE: In order to take full advantage of the tilt-out ice bin, only store items
on the shelf below the ice bin that are no taller than the lowest point on the
bin.
To access i ce, p u ll t he b i n f o r w a r d.
To r ea ch t h e po w er sw i t c h, pu l l t h e
shelf straight out. Always be sure to
replace the shelf.
Models with a shelf above the ice bin
Sh e l f
Ice Bin
Sh e l f
Ice Bin
P u l l t h e b i n f o r w a r d u n t i l t h e
bin stops.
L o w e r t h e b i n t o a c c e s s i c e o r
reach the power switch.
On some models, to access ice or reach the power switch: