
Installation Instructions


Water Line Connection
• If using a flexible braided supply hose, label
the hose with the installation date to use as
reference. Flexible braided hoses, elbows and
gaskets should be replaced in 5 years.
• Turn off the water supply.
• Install a hand shut-off valve in an accessible
location, such as under the sink. (Optional, but
strongly recommended and may be required by local
codes.)
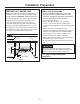
• Water connection is on the left side of the
dishwasher. Install the hot water inlet line, using no
less than 3/8” copper tubing or a flexible braided
hose. Route the line as shown in Figure F and
extend forward at least 19” from rear wall.
• Adjust water heater for 120°F to 140°F temperature.
• Flush water line to clean out debris.
• The hot water supply line pressure must be 20-120
PSI.
Turn page to begin dishwasher
installation.
Installation Preparation
PREPARE HOT WATER LINE
NOTE: GE Appliances recommends copper tubing for
the water line, but if you choose to use flexible hose,
use GE Appliances WX28X326, flexible braided hose.
• The water supply line (3/8” copper tubing or flexible
braided hose) may enter from either side, rear or
floor within the shaded area shown in Figure F.
• The water supply line may pass through the same
hole as the electrical cable and drain hose. Or, cut
an additional 1-1/2" diameter hole to accommodate
the water line. If power cord with plug is used, water
line must not pass through power cord hole.
Figure F
6"
4"
Cabinet Face
Shut-off
Valve
2" From Floor
19" From Wall
2"
From
Cabinet
Hot
1-1/2”
Dia.
Hole
5
Do not remove wood base until you are ready to
install the dishwasher. The dishwasher will tip over
when the door is opened if base is removed.
CAUTION