
Installation Instructions


Installation
30" Induction Cooktop
Instructions
TOOLS YOU WILL NEED
BEFORE YOU BEGIN
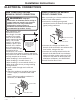
Read these instructions completely and
carefully.
•
IMPORTANT — Save these
instructions for local inspector’s use.
•
IMPORTANT — Observe all
governing codes and ordinances.
•
Note to Installer – Be sure to leave these
instructions with the Consumer.
• Note to Consumer – Keep these instructions
for future reference.
• Product failure due to improper installation is
not covered under the Warranty.
WARNING — This appliance must be
properly grounded.
•
ATTENTION INSTALLER —
ALL COOKTOPS MUST BE HARD WIRED
(DIRECT WIRED) INTO AN APPROVED
JUNCTION BOX.
A “PLUG AND RECEPTACLE” IS NOT
PERMITTED ON THESE PRODUCTS.
• Proper installation is the responsibility
of the installer and product failure due to
improper installation is NOT covered under
warranty.
Saber Saw
Pencil
Safety Glasses
1/8" Drill Bit & Electric or
Hand Drill
Ruler or Straightedge
Phillips Head
Screwdriver
If you have questions, call 800.GE.CARES or visit our website at: GEAppliances.com.
In Canada, call 800.561.3344 or visit our website at: geappliances.ca.
1/4" Nut Driver
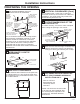
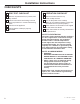
MATERIALS YOU WILL NEED
Large Size
Wire Nuts
Junction Box
(Sized for conduit
per local electrical
codes.)
90º or Straight
Squeeze Connector
for 1” Conduit
PARTS INCLUDED
Baffle
(For all installations
except over an oven)
2 Hex-Head Screws
Foam Tape
WB06K5042
2 Hold Down
Brackets
4 Phillips Screws
WB01X1137
31-10986-2 09-15 GE
1” = 2.5 cm; 1’ = 0.3 m